Bluetooth problems on Ubuntu 9.04

I was having trouble getting my USB Bluetooth dongle working on Ubuntu 9.04. The device itself was really cheap ($10 NZD), but from reading the bugs this isn’t the only device having issues. Below is the lsusb line of my device:

Bus 007 Device 002: ID 0a12:0001 Cambridge Silicon Radio, Ltd Bluetooth Dongle (HCI mode)

The problem was that it was extremely flaky, sometimes it would show up and allow me to scan for devices but usually it wouldn’t. Sometimes “/etc/init.d/bluetooth restart” would bring it to life, but usually not. Another symptom was “Inquiry failed: Connection timed out” when doing a scan (sudo hcitool scan).

In the end the solution was upgrading to the latest version of blueman. There are packages available for Ubuntu 9.04 in the blueman ppa on launchpad: https://edge.launchpad.net/~blueman/+archive/ppa

Add the ppa to your software sources list (instructions on the page), and then do:

sudo aptitude update
sudo aptitude safe-upgrade

After a reboot I was good to go, pairing and file transfers worked perfectly!

Update

This worked on my laptop but not my media PC, despite them both running 9.04 (media PC is mythbuntu however). I also tried updating to the bluez packages from Karmic which didn’t improve the situation. For all the time I’m spedning on this, I think it’s going to be more sensible to buy another bluetooth adaptor.

The perfect LDAP Browser

In my job I do a lot of work with Directory Services such as Novell eDirectory and Microsoft Active Directory, even Apple’s implementation of Open Directory once in a while. All 3 have their own tools to manage them, but generally they are proprietary in nature and differ greatly – no commonality whatsoever. For Novell there’s ConsoleOne and iManager, Microsoft have their Management Console and the rather narrowly defined plugin “Active Directory Users and Computers”. All of these are fairly high level in nature, and are limited in the information they present, particularly in the Windows Server 2003 case although they’ve made significant improvements in Server 2008. Apple – well they tride to hide the fact that you’re using a directory service at all… any organisation seriously deploying a directory service does not do it with Apple.

Whenever I’ve needed to access a directory via the standard LDAP protocol in the past I’ve used a very old Java ldap browser called… ldapbrowser (which is still available at CoolSolutions). It’s been extremely useful for structuring queries and exporting data, but it’s now 7 years old, and quite frankly ugly to use. To export data in a usable format I was exporting an LDIF, then converting it to CSV with a free .net app I found called “LDIF2CSV” and cleaning up the resulting data. It was messy, but ldap queries are so much more flexible, and I could get data out of a directory that you couldn’t using the official administration tools.

Another solution was the free Softerra LDAP Browser. It’s a bit limited though as they want you to pay for the full version (LDAP Administrator). I tried it and it is an excellent tool, but at USD$250 not exactly value for money (not too bad if you’re paying in USD but in NZD it’s a difficult sell). The free version may suffice for some but is Windows only.

Recently however I came across Apache Directory Studio, and I don’t normally gush over software like this but it’s been a revelation. It’s fully open sourc e, based on Eclipse, and designed to manage any LDAP directory.  Ticks just about every box I can think of. Runs on Windows, Mac, Linux. Exports directly to ldif, csv or even xls.
If you need to access an LDAP directory via the LDAP protocol, this is your tool.
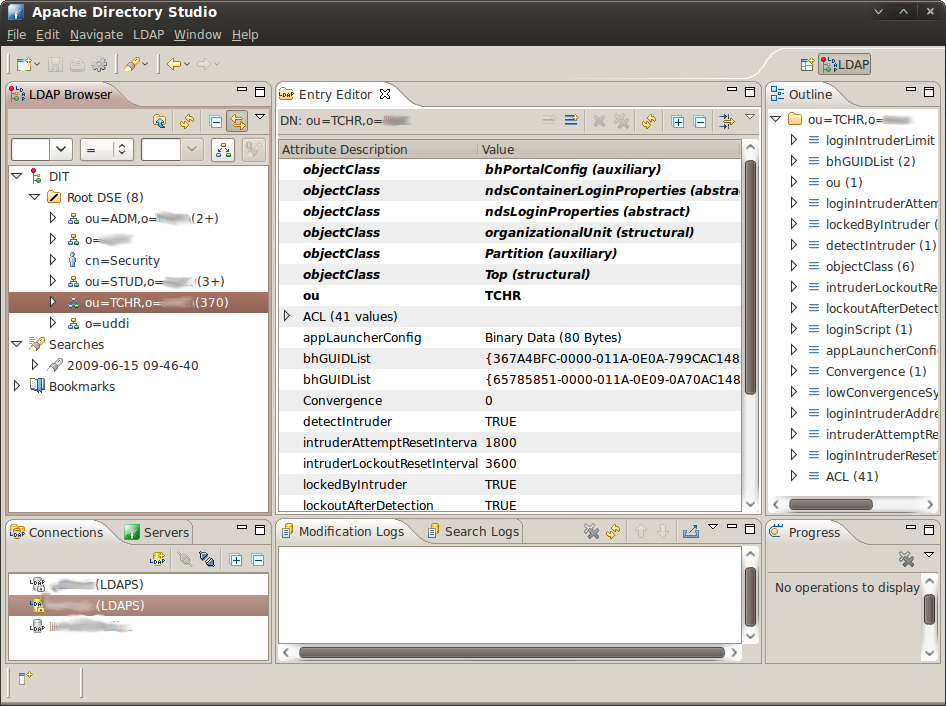
Screenshot-Apache Directory Studio

Website: Apache Directory Studio

I’m curious too see what Apache Directory Server is like, although by the looks of it I’ll be wanting to wait for version 2.0. Maybe if I get a free R&D slot…

Setting up a local apt-cache on Ubuntu

Anyone with more than one Ubuntu machine on their network should do this, basically it sets up an apt proxy server so that once a package has been downloaded once by a computer on your network, the rest can get it locally.

To install it:

sudo apt-get install apt-cacher-ng

Browse to http://localhost:3142 and you should see an error page of sorts telling you to edit apt.conf. Ubuntu however splits the apt.conf file into a directory, so instead we create a new file in that directory:

sudo nano /etc/apt/apt.conf.d/02cache

Paste the following line into the file (highlight to copy, middle click to paste):

Acquire::http { Proxy “http://192.168.1.2:3142”; };

And then press Ctrl+O to save followed by Ctrl+X to exit. Replace 192.168.1.2 with your apt cache’s IP address, or hostname if you have DNS. Using DNS is preferable if it is available, but most home networks won’t have a DNS server.

You then need to add the apt.conf.d file to each machine on your network in order for them to download their packages through your proxy.

See http://localhost:3142/acng-report.html for information and maintenance tasks.

DLNA and my New TV


New TV

Originally uploaded by Al404

I bought a new TV last week – a Sony KDL-32V5500. It’s a mid-range set, but is still fantastic compared to what you could get a year or two ago. Most 32 inch LCD panels seem to be only 720P (or 1366×768), and one thing that attracted me to the Bravia is that it’s 1080P (and the fact that the price was comparable to even generic panels).

One of the first things I noticed was that it has an ethernet port. It’s used for a feature called DLNA, which is a standard for streaming media between devices on a home network. This TV has two modes – a standard media player mode, or “renderer” mode. When acting as a media player, the TV reads files directly from a server device such as a NAS or computer with DLNA-compliant software running on it. When in renderer mode, the server transcodes the media into standard mpeg, before streaming it to the TV.

In terms of the end experience the two modes are similar, as you can pick and choose what to play via the TV’s interface in both modes. The difference is where the decoding is done (TV or Server). The advantage of renderer mode is that you can play any format which the server (generally a computer) can decode, which is far more than they could ever hope to build into a TV set. The disadvantages are that it requires a lot more bandwidth and resources on the server computer, and also much more capable software, as it has to be capable of transcoding the video stream. You also need a reasonably powerful CPU, and since the decoded stream has much less compression than the original, you need a gigabit network to stream even 720P losslessly without stuttering (forget about wifi).

DLNA seems to be a fairly new feature on TV sets, and the software base is not well developed. I tried a couple of basic (non-renderer mode) solutions such as ushare (included in the Ubuntu repositories), and minidlna, which is apparently developed by a Netgear employee for their NAS products. Minidlna seemed to work reliably, but I quickly found that the TV can not play most of my media collection, as few files showed up in the list (those that did show up worked reliably though). I recommend minidlna over ushare, as it’s more current, and ushare is apparently no longer updated.

I then stumbled across PS3MediaServer, which was designed to stream media to the Playstation 3. It’s an open source Java application, and does exactly what I want it to – transcode and stream media to a DLNA device. Unfortunately, the release version can only stream to the PS3 – the betas have support for some other devices but this a very new feature and it’s not without problems. But it’s good enough for now if you can put up with having to restart it now and again. As an added bonus it’s also cross platform, and can be run on Windows, Mac and Linux.

It did take a bit of tweaking to get right though. The most serious problem was that AVI files weren’t showing up, because the config file for the Sony Bravia 5000 series assumes that they can play all .avi files directly without transcoding, which mine certainly can’t. So you have to add .avi files to the “force transcode” list on the transcoding settings tab. I also found that bandwidth limiting seems to have no effect, and using anything other than the default Mpeg2 quality seems to stop media playback from working. It’s the best solution I can find for the moment though, so if you want to give it a try you can download the latest beta here.

For now this is no media PC replacement, but if you’ve already got TiVO/MySky or another set-top box and just want to play the occasional file from your computer it’s worth a look, and much less cumbersome than hooking up your laptop each time.

For anyone else researching DLNA stuff, here are some other useful links:

Olympus E-P1, my next camera?

DPReview have a preview up of the soon-to-be released Olympus E-P1. I was thinking seriously thinking about getting a Panasonic LX3, but this looks like the perfect travel companion:

E-P1 side by side with the LX3

E-P1 side by side with the LX3 (source: dpreview.com)

Perhaps the only barrier could be the price – I’d expect it to be somewhere around the level of current prosumer DSLRs (50D, D90) which is a bit of a step up from the LX3 (close to double, probably more once you add lenses). But image-wise this is more DSLR than compact, whereas the LX3 is much more of a compact. In a portable camera I wouldn’t miss the viewfinder so much, but the poor contrast-detect autofocus would be its major downside compared to the 40D, and the Panasonic G1 which is based on the same system has much better autofocus.

And even with the 17mm “pancake” prime lens it’s still bulkier than the LX3, so there’s definitely room for both models. But with the E-P1 the micro four thirds system just got a whole lot more interesting, and this is tempting as a “do-it-all” camera to replace both my point ‘n shoot and DSLR.

Either way, I can definitely see myself owning a micro 4/3rds camera at some point in the future, but it might be worth waiting for the E-P2, which will hopefully refine the concept (and include Panasonic’s autofocus system).

Update 22-6-09:

It’s available on pre-order in the states at $799 US. Using the Canon 50D as a price index, the cost here at retail for the 14-42mm kit should be about $1450-1500 NZD. Which is about what I paid for my 40D body, so not too bad, in fact slightly cheaper than I was expecting. It’s quite a lot to spend on a downgrade, but for traveling it might just be worth it.

What a concert…


Simon & Garfunkel at Vector Arena

Originally uploaded by Al404

The Simon & Garfunkel concert was just plain awesome.

There were a few opening night jitters including the odd slightly bum note. But one jitter turned out to be the highlight of the night. The PA system blew during Bridge Over Troubled Water, which could have resulted in an awkward silence but instead the audience picked up the slack – you truly had to be there.

The Art of Paul

OK so the heading was a subtle and not so clever Simon & Garfunkel reference which you may have missed, but that doesn’t matter because I’m seeing them live tonight.

Can’t wait!

The New Zealand Government and the Microsoft Deal

Late last month the State Services Commission dropped a bombshell; they would not be renewing their pan-government agreement with Microsoft. This agreement covered the use of Microsoft software in our state departments, and the announcement was widely covered in both the mainstream and technical press:

In typical digg fashion the headline was rather sensationalised:

While Slashdot juiced it up just a little bit:

At first glance this appears to be a victory for competition and open standards in government IT, and certainly it removes one barrier that competing software vendors were facing. However by itself this announcement does not mean that Microsoft solutions are any less favoured than before. Effectively this agreement means that Microsoft is free to negotiate with each state department individually, and you can bet that few departments are in any sort of position to switch wholesale to competing solutions.

So the problem is that many departments (and most businesses in the country) are hopelessly dependent on Microsoft’s products, so when they approach the negotiating table few of them will have much leverage. In this way Microsoft will most likely extract more out of the NZ government than it did under than pan-government deal.

On the positive side this will demonstrate to those state departments the cost of using Microsoft’s products, and opens the door to alternatives. While Microsoft were the only option before, they are now simply the most favoured one. Indeed the harder Microsoft plays them, the more motivated our government departments will be to seek alternatives.

I see this as a victory for both sides – Microsoft can negotiate better rates for its products, and state departments are free to choose the software vendor. In the short term Microsoft wins, but in the long term I think we all will.

Implications for Education

I put these musings into a different section, as it’s a different angle. I work in the education market, and the Ministry of Education is a state service, so this is going to have an impact on our company, although probably not a major one.

The Ministry of Education also negotiates a separate deal for the use of Microsoft software in schools, and it is important to note that this is a separate deal. The pan-government deal is for state services, thus it would cover the Ministry of Education’s internal IT systems but not schools themselves. This comment from the Ministry of Education clarifies the point:

The Microsoft Schools Agreement is totally separate to the pan-government Microsoft licensing agreement that was mentioned in the Computerworld article. The new Microsoft Schools Agreement is still under negotiation, but talks are proceeding well. The current agreement lasts until December 2009. The new agreement would cover the period from January 2010 to December 2012. The products covered by the new agreement are likely to remain largely the same. An announcement regarding the new agreement will be made to schools once negotiations have been concluded.

So an agreement to bulk-license Microsoft software in schools is still likely. However if the talks break down it will be interesting to see what the impact on other vendors is, as Novell also have a bulk license deal with the Ministry. I look forward to the announcement.

Further reading: http://computerworld.co.nz/news.nsf/news/561FB33C30FEB478CC2575C400737916

Grababid.co.nz and Penny Auctions… my take

I recently noticed an ad for www.grababid.co.nz while browsing gmail. It was advertising LCD tvs for $1, no doubt because I had been bidding on such items on trademe, and the keywords would have been fairly prominent in my inbox (don’t you love targeted advertising?). Normally I ignore crap like this, but it looked like a New Zealand auction site so I had to check it out – anything that competes with Trademe is good for the market in my book.

Except perhaps, in this case.

I visited the site and at first glance it looked promising – $1 reserve auctions for high value electronic goods. The problems become apparent quite quickly when you dig deeper.

Grababid is a “Penny Auction” site, and placing bids on is not free. You have to pre-purchase a quantity of “bids” in packages. The site encourages you to buy larger packages of bids in two ways – by giving you more bids for your dollar in larger quantities, and also by giving you 30% extra on your first purchase.

I’d encourage you to read the following wikipedia article (which is not up to the usual wikipedia standard but informative none the less). What it comes down to is that bids are placed which increase the sale price by a fixed amount (say 10c, not sure what it is in grababid’s case). The last bid placed wins the auction, but each bid extends the auction to give other “players” (let’s be straight here, you’re playing a game) the chance to bid. The final sale price is usually well below RRP, but since each bid that is placed has already been paid for, the auctioneer collects fees for each bid in addition to the sale price. So for a $1 start auction with a bid price of $1 and an increment of 10c that finishes at $100, the auctioneer has actually collected over $1000. The “winner” probably got a good deal, but the other bidders/players all have lost out. Note that the price appears to be fixed at $1 for many of grababids auctions, so it’s basically just the last person to bid $1 that wins…

In game theory terms the players are playing a game of brinkmanship, where each bid placed lessens the reward. But in the case of a website there is a third party – the webmaster – and they hold all the cards. The potential for abuse is huge as the webmaster can easily deprive any player of a win simply by placing a shill bid, which would be almost impossible to detect as only the webmaster truly knows who placed each bid. It would also be rather easy to create the impression of a busy site by running a whole lot of bots, and grababid actually does seem rather busy at first glance…

The point is, that unless you like games where the odds are stacked against you (i.e. you’re a gambler), you’d be wise to avoid sites like grababid. I’d sooner do my research and shop around than throw money away trying to “win” a game of brinkmanship. The fact is that if they weren’t making a margin on the goods they’re selling, they wouldn’t be in business. Given that margins are already rather low on electronic goods it makes far more sense to shop elsewhere.

You might also be interested to know that despite the .nz domain name and the skytower graphic in their logo, Grababid.co.nz was registered by someone in Hong Kong with a German registrar:

domain_name: grababid.co.nz
query_status: 200 Active
domain_dateregistered: 2008-07-08T12:38:27+12:00
domain_datebilleduntil: 2009-07-08T12:38:27+12:00
domain_datelastmodified: 2009-05-01T11:14:51+12:00
domain_delegaterequested: yes
%
registrar_name: Key-Systems GmbH
registrar_address1: Prager Ring 4-12
registrar_city: Zweibruecken
registrar_province: RP
registrar_postalcode: 66482
registrar_country: DE (GERMANY)
registrar_phone: +49 6332 791850
registrar_fax: +49 6332 791851
registrar_email: [email protected]
%
registrant_contact_name: Jerry Reddig
registrant_contact_address1: Flat 5, 10/F, Yuen Shing Ind. Bldg.,, Yee Kuk West Street
registrant_contact_city: Hong Kong
registrant_contact_postalcode: 1033
registrant_contact_country: HK (HONG KONG)
registrant_contact_phone: +852 4246860 7
registrant_contact_fax: +852 11111 1
registrant_contact_email: [email protected]

Also note the existence of grababid.com, grababid.co.uk, they’re all the same thing (it doesn’t appear that much localisation was done other than the graphic).

I’ll leave it to you to decide whether or not you want to join this site, but it should be fairly apparent that I won’t be buying my LCD TV from there.

Buying a second-hand Digital SLR Camera

Having recently purchased a camera from TradeMe (New Zealand equivalent of ebay), I now realise that I made several mistakes. The camera was a Canon 5D with a 24-105 F4L lens and was physically flawless. It appeared to have been very well looked after, and the test shots looked fine, so I have to admit I wasn’t as cautious as I should have been. But the day afterwards I noticed what looked like very fine cracks in all my photos. Some quick internet research revealed that what I was seeing was fungal growth on the CMOS sensor! How did I not notice this?

The problem was that I went to have a look at the camera after the sun had gone down, thus all the photos were taken in dim indoor lighting which needs wide a aperture for proper exposure. At wider apertures much of the light hitting the sensor comes in at a wider angle, and as the sensor has a filter in front of it some light can get behind foreign matter on the surface of the filter before hitting the sensor. Narrow apertures show up dirt far more readily as the light is coming in from a narrower range of angles.

Looking at the sensor itself I could see the fungus and some other specks of dust. So I took a test shot of the sky at f/22, +1 EV (although any brightly lit background would do)… and this is what I saw (this is the full frame so you’ll have to view it enlarged to see what I’m talking about):

Filthy!

Filthy!

Needless to say, these marks have a very visible impact on any pictures with an aperture narrower than about f/7, and looking back I can even make out the fungus in the original test shots I took at f/4.

Fungal growth on the sensor could potentially be expensive, as a by-product of fungus is an acidic compound which could eat away at the coating on the filter. Worst case is that it needs a new filter, which should not be expensive in itself but would expensive in terms of labour as it requires dismantling the camera. So I’m hoping a simple clean will put it right!

So, the lesson I learned is to take some test shots in BRIGHT LIGHT, at both narrow and wide apertures. Narrow apertures reveal dirt on the sensor, and wider ones are more likely to show up any lens issues such as fringing or bad focus.

A summary of advice:

  1. Go to view the camera during the day, not at night.
  2. Take your own memory card along so you can examine the shots in more detail when you get home. I did this, but the wide apertures meant that the fungus was barely discernible, and it was on the edge of the image where the picture was out of focus anyway, so I wasn’t looking in the right places.
  3. Take test shots of the sky or another brightly lit background at the narrowest aperture possible (normally f/22) and +1EV (exposure value). If you simply can’t arrange a time during the day, flash shots of a clean white or lightly coloured wall should suffice. Or you could use a long shutter speed, since dirt on the sensor isn’t going to move you don’t have to worry about camera shake or motion blur… just make sure you get the right exposure.
  4. If purchasing a lens with the body, take some shots at the widest aperture possible, as these are far more likely to show up lens flaws such as fringing or bad focus.
  5. Examine the sensor by putting the camera into “sensor cleaning” mode. This flips up the mirror so you can see the sensor. To do this on a 40D you would go to setup menu 2 (yellow icon with two dots) > Sensor Cleaning > Clean Manually. On the 5D just scroll down to it, it’s in the orange setup section close to the bottom.

There are no doubt many other flaws to look out for in cameras which I haven’t touched on here. So be sure to look at other sites with more complete information, but nonetheless I hope this has been useful for someone!

Update 1-6-08

Probably what most people reading this are going to want to know is; did the sensor clean fix the problem? Unfortunately it didn’t, and Canon quoted me $2500+gst in parts alone for repairs (which is a new sensor assembly). Since this is considerably higher than the value of the camera, it’s basically not economic to repair unless you know someone capable of replacing the filter or dismantling the camera and cleaning it properly.