Category Archives: IT

IT related posts, technical stuff

Automatically update DansGuardian Filter Groups List from LDAP

Update 20th March 2011: Heath has made some modifications to the original script and made it more efficient, see the comments below.

Here’s a script I wrote today, which updates the filtergroupslist file of Dansguardian. If you’re using LDAP authentication and want to give different levels of protection to certain groups of users, you need to update the list somehow, as Dansguardian doesn’t support LDAP groups. See this page for more info on filter groups.

The school I wrote this for is a Novell eDirectory site, and it will require a bit of modification to work on other sites. In particular you will need to alter the parameters of the ldapsearch command (filter string, server name, user credentials). Other LDAP servers may not support the ufn attribute, which this is based on. If your directory is well maintained and up to date you would probably be better of using the uid attribute, but this particular school hasn’t populated it for all users yet (only users created with ConsoleOne and iManager populate the uid attribute by default). If you do use uid, be sure to remove the cut command.

ldapsearch outputs data in ldif format, which is difficult to use in scripts. The tool to use to convert this is awk, which unfortunately is a language I haven’t learnt yet. So I found a premade awk script which converts ldif2csv (from here), removed out all the attributes and replaced them with just ufn (you may want to use uid instead).

If you use this script and modify or improve it, I’d appreciate you contributing the modifications back, as they may be useful to others (myself included)!

updateFilter.sh

#!/bin/bash 
#
# Dansguardian filter group update script
# Alex Forbes, Edtech Ltd
# Updated 9th September 2009
#

## Variables
# Dansguardian filtergroupslist file
DESTFILE=/root/filtergroupslist-test
LOGFILE=/var/log/dansfgupdate.log

# LDAP settings
LDAPFILTER="(&(objectClass=Person)(|(groupMembership=cn=ALL-TEACHERS,ou=TCHR,o=HWK)(groupMembership=cn=ALL-ADMIN,ou=ADM,o=HWK)(groupMembership=cn=OESAdmins,o=HWK)))"

# Which filtergroup do you want the users to be a member of
FILTERGROUP=filter2

# Path to the awk script (converts the ldif file to parseable text). I modified one from
# http://www.yolinux.com/TUTORIALS/LinuxTutorialLDAP-ScriptsAndTools.html
AWKSCRIPT=/opt/ldif2csv.awk
TMP=/tmp

# Dansguardian filter group list file
# Temp path, creates folder for the temp files. There are probably better ways of doing it.

# Make temp directories
WIP=$TMP/dgFilterUpdate
mkdir -p $WIP

# Header message
echo "## This file is automatically updated, any changes will be overwritten" > $WIP/4final
echo "## See /opt/edir2dansg.sh" >> $WIP/4final
echo "" >>$WIP/4final

# Perform LDAP search. Outputs ldif file.
ldapsearch -uxvA -H ldaps://fs2.howick.school.nz -b "o=HWK" -S '' -s "sub" -D cn=ldapauth,o=hwk -w password "$LDAPFILTER" ufn > $WIP/1ldif

# Picks out the ufn attribute using a modified awk script I found:
awk -F ': ' -f $AWKSCRIPT  $WIP/2txt

# Picks the first field of the ufn attribute to generate a clean list of users
cut -d, -f1 $WIP/2txt > $WIP/3userlist

# Add the values required to meet the dansguardian filter format
for u in `cat $WIP/3userlist`; do
	echo "$u=$FILTERGROUP" >> $WIP/4final
done

# Finally, copy the file to overwrite the dansguardian list.
# I've done a simple check to make sure the file isn't too small in case of error, but it could be handled better.
SIZE=`stat -c %s $WIP/4final`
if [ $SIZE -gt 2500 ]; then
	cp $WIP/4final $DESTFILE
	echo $(date +"%Y/%m/%d %H:%M"): Updated filter groups list "("size $SIZE bytes")" >> $LOGFILE
else echo $(date +"%Y/%m/%d %H:%M"): Output file is too small, list not updated >> $LOGFILE
fi

# Gentle reload of dansguardian
dansguardian -g

And the modified awk script, ldif2csv.awk:

BEGIN {
        ufn = ""
      }
/^ufn: /              {ufn=$2}
/^dn/ {
        if(ufn != "") printf("%sn",ufn)
        ufn     = ""
      }
# Capture last dn
END {
        if(ufn != "") printf("%sn",ufn)
}

Update 9-9-09: Fixed a few dumb mistakes.

Simple File Backup to Email Script

Here’s a file backup script I installed for a client. The original outline came from a post on the ubuntu forums (I forget where exactly), but it’s simple enough. It creates an archive in /tmp, zips it up, emails it then deletes the archive. If your target is a linux computer then it makes more sense to gzip it by adding a “z” to the tar options (i.e. tar -czf) and removing the zip line.

#!/bin/bash
#
# Simple file backup script, creates archive in /tmp and emails it.
#
# Software required:
#  zip
#  tar
#  mutt

# Variables
[email protected]
SOURCE="/home/user1 /home/user2"
SERVERNAME=server.example.com
MAIL=`which mutt`
ZIP=`which zip`
DATE=`date +%Y_%m_%d`
FILE=myfiles-$DATE.tar
DESTINATION=/tmp/$FILE
ZIPFILE=$DESTINATION.zip

# Actions
tar -cf $DESTINATION $SOURCE 2> /dev/null
$ZIP $ZIPFILE $DESTINATION
$MAIL -a $ZIPFILE -s "Backup for $DATE" -s "$SERVERNAME backup $DATE" $MAILADDR < /dev/null
rm $ZIPFILE $DESTINATION

For mutt to work you need an MTA (mail transport agent) such as postfix. If it’s not installed and you don’t need it for anything else, configure it as a satellite system (the Ubuntu/Debian packages prompt you on install and satellite system is an option). This prevents spammers from using it as a relay, and ensures the mail goes to your real mail server.

Bluetooth problems on Ubuntu 9.04

I was having trouble getting my USB Bluetooth dongle working on Ubuntu 9.04. The device itself was really cheap ($10 NZD), but from reading the bugs this isn’t the only device having issues. Below is the lsusb line of my device:

Bus 007 Device 002: ID 0a12:0001 Cambridge Silicon Radio, Ltd Bluetooth Dongle (HCI mode)

The problem was that it was extremely flaky, sometimes it would show up and allow me to scan for devices but usually it wouldn’t. Sometimes “/etc/init.d/bluetooth restart” would bring it to life, but usually not. Another symptom was “Inquiry failed: Connection timed out” when doing a scan (sudo hcitool scan).

In the end the solution was upgrading to the latest version of blueman. There are packages available for Ubuntu 9.04 in the blueman ppa on launchpad: https://edge.launchpad.net/~blueman/+archive/ppa

Add the ppa to your software sources list (instructions on the page), and then do:

sudo aptitude update
sudo aptitude safe-upgrade

After a reboot I was good to go, pairing and file transfers worked perfectly!

Update

This worked on my laptop but not my media PC, despite them both running 9.04 (media PC is mythbuntu however). I also tried updating to the bluez packages from Karmic which didn’t improve the situation. For all the time I’m spedning on this, I think it’s going to be more sensible to buy another bluetooth adaptor.

The perfect LDAP Browser

In my job I do a lot of work with Directory Services such as Novell eDirectory and Microsoft Active Directory, even Apple’s implementation of Open Directory once in a while. All 3 have their own tools to manage them, but generally they are proprietary in nature and differ greatly – no commonality whatsoever. For Novell there’s ConsoleOne and iManager, Microsoft have their Management Console and the rather narrowly defined plugin “Active Directory Users and Computers”. All of these are fairly high level in nature, and are limited in the information they present, particularly in the Windows Server 2003 case although they’ve made significant improvements in Server 2008. Apple – well they tride to hide the fact that you’re using a directory service at all… any organisation seriously deploying a directory service does not do it with Apple.

Whenever I’ve needed to access a directory via the standard LDAP protocol in the past I’ve used a very old Java ldap browser called… ldapbrowser (which is still available at CoolSolutions). It’s been extremely useful for structuring queries and exporting data, but it’s now 7 years old, and quite frankly ugly to use. To export data in a usable format I was exporting an LDIF, then converting it to CSV with a free .net app I found called “LDIF2CSV” and cleaning up the resulting data. It was messy, but ldap queries are so much more flexible, and I could get data out of a directory that you couldn’t using the official administration tools.

Another solution was the free Softerra LDAP Browser. It’s a bit limited though as they want you to pay for the full version (LDAP Administrator). I tried it and it is an excellent tool, but at USD$250 not exactly value for money (not too bad if you’re paying in USD but in NZD it’s a difficult sell). The free version may suffice for some but is Windows only.

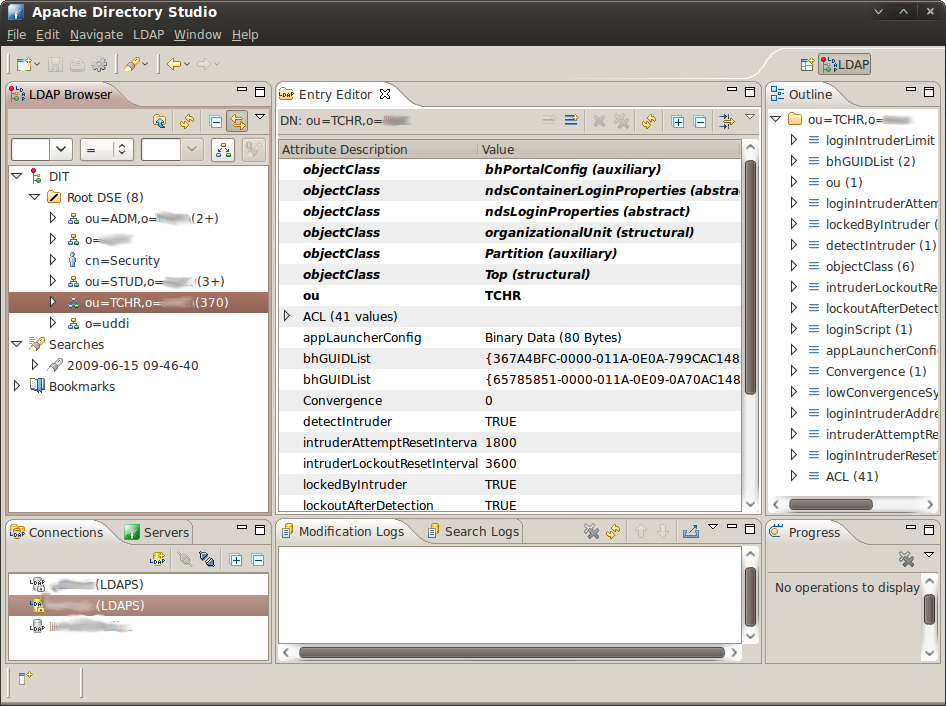
Recently however I came across Apache Directory Studio, and I don’t normally gush over software like this but it’s been a revelation. It’s fully open sourc e, based on Eclipse, and designed to manage any LDAP directory.  Ticks just about every box I can think of. Runs on Windows, Mac, Linux. Exports directly to ldif, csv or even xls.
If you need to access an LDAP directory via the LDAP protocol, this is your tool.

Screenshot-Apache Directory Studio

Website: Apache Directory Studio

I’m curious too see what Apache Directory Server is like, although by the looks of it I’ll be wanting to wait for version 2.0. Maybe if I get a free R&D slot…

Setting up a local apt-cache on Ubuntu

Anyone with more than one Ubuntu machine on their network should do this, basically it sets up an apt proxy server so that once a package has been downloaded once by a computer on your network, the rest can get it locally.

To install it:

sudo apt-get install apt-cacher-ng

Browse to http://localhost:3142 and you should see an error page of sorts telling you to edit apt.conf. Ubuntu however splits the apt.conf file into a directory, so instead we create a new file in that directory:

sudo nano /etc/apt/apt.conf.d/02cache

Paste the following line into the file (highlight to copy, middle click to paste):

Acquire::http { Proxy “http://192.168.1.2:3142”; };

And then press Ctrl+O to save followed by Ctrl+X to exit. Replace 192.168.1.2 with your apt cache’s IP address, or hostname if you have DNS. Using DNS is preferable if it is available, but most home networks won’t have a DNS server.

You then need to add the apt.conf.d file to each machine on your network in order for them to download their packages through your proxy.

See http://localhost:3142/acng-report.html for information and maintenance tasks.

The New Zealand Government and the Microsoft Deal

Late last month the State Services Commission dropped a bombshell; they would not be renewing their pan-government agreement with Microsoft. This agreement covered the use of Microsoft software in our state departments, and the announcement was widely covered in both the mainstream and technical press:

In typical digg fashion the headline was rather sensationalised:

While Slashdot juiced it up just a little bit:

At first glance this appears to be a victory for competition and open standards in government IT, and certainly it removes one barrier that competing software vendors were facing. However by itself this announcement does not mean that Microsoft solutions are any less favoured than before. Effectively this agreement means that Microsoft is free to negotiate with each state department individually, and you can bet that few departments are in any sort of position to switch wholesale to competing solutions.

So the problem is that many departments (and most businesses in the country) are hopelessly dependent on Microsoft’s products, so when they approach the negotiating table few of them will have much leverage. In this way Microsoft will most likely extract more out of the NZ government than it did under than pan-government deal.

On the positive side this will demonstrate to those state departments the cost of using Microsoft’s products, and opens the door to alternatives. While Microsoft were the only option before, they are now simply the most favoured one. Indeed the harder Microsoft plays them, the more motivated our government departments will be to seek alternatives.

I see this as a victory for both sides – Microsoft can negotiate better rates for its products, and state departments are free to choose the software vendor. In the short term Microsoft wins, but in the long term I think we all will.

Implications for Education

I put these musings into a different section, as it’s a different angle. I work in the education market, and the Ministry of Education is a state service, so this is going to have an impact on our company, although probably not a major one.

The Ministry of Education also negotiates a separate deal for the use of Microsoft software in schools, and it is important to note that this is a separate deal. The pan-government deal is for state services, thus it would cover the Ministry of Education’s internal IT systems but not schools themselves. This comment from the Ministry of Education clarifies the point:

The Microsoft Schools Agreement is totally separate to the pan-government Microsoft licensing agreement that was mentioned in the Computerworld article. The new Microsoft Schools Agreement is still under negotiation, but talks are proceeding well. The current agreement lasts until December 2009. The new agreement would cover the period from January 2010 to December 2012. The products covered by the new agreement are likely to remain largely the same. An announcement regarding the new agreement will be made to schools once negotiations have been concluded.

So an agreement to bulk-license Microsoft software in schools is still likely. However if the talks break down it will be interesting to see what the impact on other vendors is, as Novell also have a bulk license deal with the Ministry. I look forward to the announcement.

Further reading: http://computerworld.co.nz/news.nsf/news/561FB33C30FEB478CC2575C400737916

Trying Windows 7, and backing up Vista first

I grabbed a copy of the Windows 7 release candidate off a colleague at work today. Yeah I’m a Linux guy but it’s good to keep tabs on what the dark side is doing, so I thought I’d upgrade Vista SP1 on my laptop to Win 7. My laptop is a dual boot setup with Ubuntu 9.04 as well as Windows, and of course I want to keep a backup of the Vista partition so I can revert to it when the RC expires in March 2010 (I would probably pay to upgrade to Win7 if the cost was sub $50, but this is not likely).

Listing the partitions to begin with:

sudo fdisk -l

My hard disk is partitioned with Windows on a primary partition an Linux on an extended one. Sda1 is my Vista partition, sda5 is Linux root and sda7 is my storage space.

Disk /dev/sda: 500.1 GB, 500107862016 bytes
255 heads, 63 sectors/track, 60801 cylinders
Units = cylinders of 16065 * 512 = 8225280 bytes
Disk identifier: 0x2af0e241

Device Boot      Start         End      Blocks   Id  System
/dev/sda1   *           1        9710    77994551    7  HPFS/NTFS
/dev/sda2            9711       60801   410388457+   5  Extended
/dev/sda5            9711       22764   104856223+  83  Linux
/dev/sda6           60410       60801     3148708+  82  Linux swap / Solaris
/dev/sda7           22765       60409   302383431   83  Linux

I want to make a backup of sda1, which is an 80gb NTFS partition, to a file on sda7. A straight dd copy would result in an 80gb file which is a bit much, so there are a couple of tricks that can be used to get the file size down.

The first is zeroing out the empty space parts of the drive. Deleting files on a hard drive doesn’t blank the space it previously occupied, it simply marks it as unused space so that it can be used for something else. Since dd is a low level copy, it copies everything, including blocks that have deleted data which we don’t want. So to make sure this data is erased we mount the filesystem and create a file full of zeros on it (easiest way to do this is to simply click on it by going to places if you use Gnome, otherwise you can use the mount command if you wish e.g. “mount -t ntfs-3g /dev/sda1 /mnt/windows”):

dd if=/dev/zero of=/media/disk/zeroFile.tmp bs=4M

The bs=4M parameter isn’t essential, but it makes the process significantly faster.

Once dd process stops, the partition should be full and you can delete zeroFile.tmp. You now know that the free space has no data in it.

Taking a straight dd image now would still result in an 80gb file however, as dd will simply copy all the zeroes verbatim. Fortunately blank space will compress down to nothing, so we can pipe the output from dd through gzip. The parameters I’ve used are “c” (which writes output to std out), and “9” for best compression.

In effect we will have 3 programs running:

  • dd bs=4M if=/dev/sda1
  • gzip -c9
  • dd bs=4M of=/media/disk/Vista.img.gz

When you exclude the “if=” or “of=” parameters, dd reads or writes from stdin/stdout, depending on which is omitted. So the first dd is reading the partition and outputting to stdout, and the second one is reading from stdin and writing it to the file. Gzip sits in the middle compressing the stream.

The full command is thus:

dd bs=4M if=/dev/sda1 | gzip -c9 | dd bs=4M of=/media/disk/Vista.img.gz

To restore the partition you would use:

dd if=/media/disk/Vista.img.gz | gzip -dc | dd of=/dev/sda1

(bearing in mind of course that this overwrites sda1 with whatever is in the image file)

I don’t know how Windows 7 handles foreign bootloaders yet, but before installing Windows it would also be wise to backup your mbr, which is the first 512 bytes on your hard drive:

dd if=/dev/sda of=bootSectorBackup.img bs=512 count=1

And to restore it:

dd if=bootSectorBackup.img of=/dev/sda bs=512 count=1

Note that in this case the block size (bs) and count parameters are very important, as they define how much of the disk is overwritten. Also if Windows does overwrite the bootloader, you’ll need a Linux boot CD to restore your MBR.

Right, now I just need to go and install Win 7.

Addendum:

If you want to check the status of the dd copy (see this post), it’s more useful to send the sigusr1 command to the “read” instance of dd (the one with the if= parameter), as that way you can see how much of the disk has been read. If you sent it to the output instance, you’d get the amount of data which has been written to disk, and this is after it has been compressed so unless you know what size the resulting file is going to be it’s not much use!

Printing dd stats / status

I keep Googling this, when really I should have committed it to memory by now. It’s extremely useful when cloning hard drives, which takes a long time with modern disks (a 160gb hard drive takes about an hour over eSATA @ ~50MB/s).

Anyway while there are more efficient methods, dd is simple and it works.

So given the following dd command:

dd if=/dev/sda of=/dev/sdb bs=32M

We can find out the pid (process ID) with the following command:

ps ax | grep dd

Which in my case gives:

12147  tty2    R+     6:17 dd if /dev/sda of /dev/sdb bs 32M

i.e. 12147.

To get dd to output the stats, we send it a SIGUSR1 signal:

kill -SIGUSR1 12147

Resulting in:

3205+0 records in
3204+0 records out
107508400128 bytes (108 GB) copied, 2111.05 s, 50.9 MB/s

I should thank the author of the following link, it’s the result I get whenever I google this:

http://prefetch.net/blog/index.php/2006/06/11/printing-dd-status/

Dell E4300, 3 weeks on

Linux support has turned out to be much, much better than I anticipated, in fact I’ve basically switched to Ubuntu.

The first surprise was when I tried Ubuntu 8.10 – everything worked. Suspend, resume, hibernate, wireless, ethernet, the webcam, hotkeys… there were no issues. I’ve since upgraded to Jaunty and have been using it daily for the past couple of weeks. In that time a few glitches have become apparent, but these are not majors and won’t stop me using it as my main machine:

  • Occasionally doesn’t power off on shutdown (needs ctrl+alt+del)
  • Graphics can occassionally go haywire with an external monitor, mitigated by restarting gdm
  • Hard disk parks too often when running off battery
  • Poor battery life compared to Vista (used to get 5 hours, now 3-4)

The battery life is probably the one that concerns me most, but I suspect the excessive hdd duty cycle and poor intel graphics performance (using too much cpu) are contributing factors. I’m sure the Intel issues will be fixed by 9.10… Hdd issue just needs some tweaking.

My colleague also bought an E4300, and has installed SLED (Suse Linux Enterprise Desktop) on it. It worked well for him, although there were some issues with sound and he had to spend a bit of time getting it working.

All in all I’m impressed, this is the best Linux experience I’ve had on a laptop, and it’s also the newest laptop (age-wise) I’ve ever owned.

Dell E4300 or HP 2710p?

Recently I picked up a “resealed” (very close to new) Dell E4300 at what I think was a pretty good price, well below the $4000 RRP. The downside is that there’s no warranty on it unless I purchase one from Dell at about $460 for 1 year going up to over $900 for 3 years. Since even the 1 year warranty is over a third of the cost of the machine and I can fix/diagnose many problems myself I think I’ll pass. It’s a risk but a calculated one.

Of course I didn’t really need an E4300, I already have a HP 2710p tablet PC which has been serving me very well. So now I have to decide which one to keep. To help me evaluate, I’ve rated them on the categories that are important to me, other people will have different priorities.
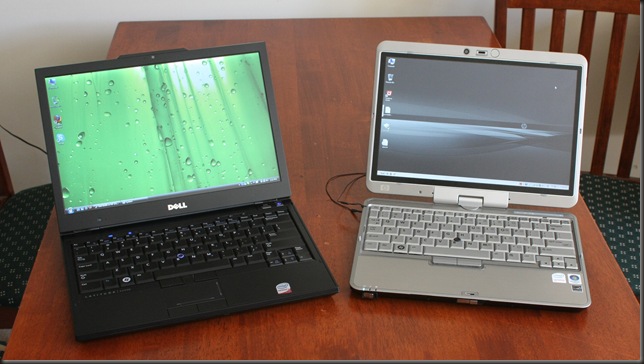
IMG_1674

Performance

The E4300 is configured with a Core 2 Duo SP9300 (2.26ghz, 6mb L2 cache), versus the U7600 (1.2ghz, 2mb L2 cache) in the 2710p. While the 2710p rarely frustrated me with slow performance, it is running Vista and I have disabled indexing and the Aero desktop effects. I probably won’t need to do this on the Dell. The 2.5” 5400rpm hdd in the Dell is also streets ahead of the 2710p’s 4200rpm 1.8” IDE hard drive – a major downside of many 12” ultraportables.

Both have 4gb of ram (DDR2 in the 2710p and DDR3 in the E4300).

Result: No contest, this one goes to the E4300 by a country mile.

Battery Life

You might expect this one to go to the 2710p, but actually the Dell lasts longer. I don’t have the extended battery for the HP, just the internal 6-cell one and I generally get between 4 and 5 hours from it with normal use. Dropping the display brightness and using other tricks such as setting the display to 16-bit I’m sure I could get over 5 hours, but not by much. The Dell lasts 6 hours with its higher wattage CPU, and the battery is also a 6-cell model. It does protrude out the back, although this doesn’t bother me at all. Another factor to consider is that I don’t know how old the HP battery was when I bought it, and I’ve used it for another 6 months, so it may have lasted a bit longer than it does now (although going by the reviews I’ve read I seems to be getting similar battery life).

With the E4300 I feel I could possilby get through a whole day’s work on one charge, as long as I aggressively used the power saving features and put it to sleep when not in use.

Result: E4300, but this probably isn’t fair

Connectivity / Peripherals

Both have webcams and VGA ports (I can forgive the 2710p for this as when it was made displayport wasn’t available and HDMI wasn’t all that common, but why on earth are Dell putting VGA ports on laptops in 2008/9?).

The Dell has an anemic two USB ports, and one of those is a dual purpose USB/ESATA port. The Dell has a built in DVDRW, the HP has one but it’s in its docking station (which is actually designed to be left on the laptop if you so chose, it’s rather slim). If you chose to leave the docking station on you get another 4 usb ports bringing the total to 6 which is pretty incredible for a 12” device (admittedly a rather bulky one). I don’t have the Dell docking station – it has more USB ports and a DVI connector, but it’s not the sort of thing you’d throw in your laptop bag.

The HP has bluetooth, WLAN, WWAN (HSDPA, or 3G), whereas the person that configured this E4300 omitted the bluetooth option! I can forgive him/her for not adding HSDPA but omitting bluetooth is inexcusable. Maybe Dell are to blame for overpricing an option which costs just a few dollars to implement.

While the ESATA feature of the E4300 is nice, this one goes to the 2710p easily for having Bluetooth as standard and more flexibility.

Size / Weight

Without its docking station the 2710p is obviously quite a bit smaller and does weigh less. With it attached however the weight is actually about the same. The 2710p does feel a lot “denser”, and my first impression of the E4300 was that it is rather light – probably because the weight is spread over 13 inches rather than 12.

Size is a matter of personal preference and the weights are similar so the result is a TIE.

Build & quality

The Dell feels more solid, but the HP is handicapped somewhat by being a tablet as it has to have a rotating lid. Both have metal bases, but the HP has a matte finish on the base which doesn’t appear to dissipate heat as well, although that may not actually be the case, just my impression. The HP’s lid is plastic, the Dell’s in a much nicer brushed metal. The Dell wins narrowly in terms of thermals, it gets a bit warm on the lap but not quite as warm as the 2710p.

The screen of the 2710p weighs quite a bit which puts more stress on the hinge, and the latch is fiddly and difficult to release with one hand. The Dell’s screen is lighter, has a really nice hinge and a magnetic latch which is effortless to open.

While this isn’t really fair due to the different nature of these devices, I’m giving the edge to the E4300.

Input

Well the 2710p is a tablet so we’re not really comparing apples to apples here (although that was never my intention, I just want to decide which one to keep). The Dell has a trackpoint and touchpad which makes it more flexible than the 2710p (which only has a trackpoint) in laptop mode. The keyboard of the 2710p feels nicer, and in my opinion is higher quality – I’ve had several people comment on how nice it is. The keyboard on the Dell feels cheap, but in actual use it’s pretty good – I can type very fast on it.

In terms of keyboard layout, having the page up & down keys right by the arrow keys on the Dell is fantastic – the HP’s are virtually impossible to find without looking, but it is more constrained for space. The Dell lacks the right click menu “application” key, which many people probably don’t use but I actually miss. It’s especially handy for spell checks as you just navigate to the word with the keypad and then hit the button instead of switching to the mouse. I like the third mouse button of the Dell though, it’s extremely handy when things don’t quite fit on the screen (rather common at 1280×800).

Result: While the HP is a tablet I can’t really take that into account so the result is TIE.

Screen

The 2710p’s display is really nice. Both are 1280×800 and LED backlit but the Dell seems to have a problem with moiré (I think that’s what it is), where you can sometimes see very fine diagonal lines moving across the screen. It feels like Dell cut a corner here, and if I had paid $4000 for this I would be pissed. Brightness is comparable, the E4300 is obviously larger but that isn’t a consideration here. The Dell also seems washed out by default, I had to reduce the brightness in the Intel control panel applet, but the HP has never needed any sort of adjusting.

Result: 2710p, and very comfortably.

Linux Support

The E4300 has Latitude On, a lightweight Linux distribution which you can boot into to check your Outlook calendar or email without waiting for Windows to load. I haven’t installed a Linux distribution on it, but I assume hardware support won’t be a problem, it’s mostly Intel stuff. Dell generally seems to have pretty good Linux support, as they offer Ubuntu on some models.

The 2710p never had any problems with Linux, even the tablet functions are supported. Like the Dell, it’s mostly Intel hardware, and even the bits that aren’t Intel are supported such as the Sierra wireless 3G card and the Wacom digitiser.

UPDATE: Originally I called this one a tie, but my faith in Dell’s Linux support is somewhat misplaced, there are issues with Linux on the E4300 but to be fair you get this with any new laptop model. Also I gather they are “working on it”, and the problems should be fixed with an updated bios.

Result: 2710p

Conclusion

It’s difficult to decide actually. I have a desktop so a laptop for me is a portable computer, and portability is more important than performance. However with the E4300 I don’t feel as though I’m giving up much portability to gain a lot of power. The tablet functions were handy, but it’s not something I use everyday and I can certainly do without it. So I feel the performance trumps the pen. The HP night-light was very handy, and the E4300 has a backlit keyboard as an option but this one doesn’t have it.

At this stage I think I’ll keep the E4300, I feel it suits me better and allows me to do more things on the road than I could on the HP. The eSATA port and more powerful CPU make running virtual machines a possibility, which is something I wouldn’t bother with on the 2710p.

Both are top-class laptops, and while neither is without flaws the overall quality and design of these laptops is quite outstanding (and you’d hope so too given their recommended retail prices). But I’ll be using the Dell for a few more days before I finally decide!