Category Archives: Linux

HDD failure warning in Ubuntu Karmic (9.10)

I started to write a blog post about my backup solution, but didn’t actually finish it before this happened. I only got it running on Wednesday this week, when today my laptop (running Ubuntu 9.04) refused to boot! I was getting a lot of I/O and “DRDY ERR” error messages. The boot process mounted the drive read only, dropped me to a shell and told me to run fsck manually (not terribly helpful for inexperienced users I might add).

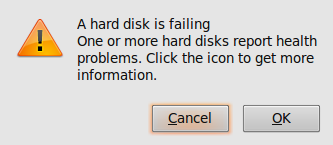
Anyway, instead of doing that I elected to reboot from a flash drive with 9.10 alpha6 on it, and examine the disk from a properly working system. After booting Karmic, I was greeted with the following message:

Screenshot-gdu-notification-daemon

How thoughtful!

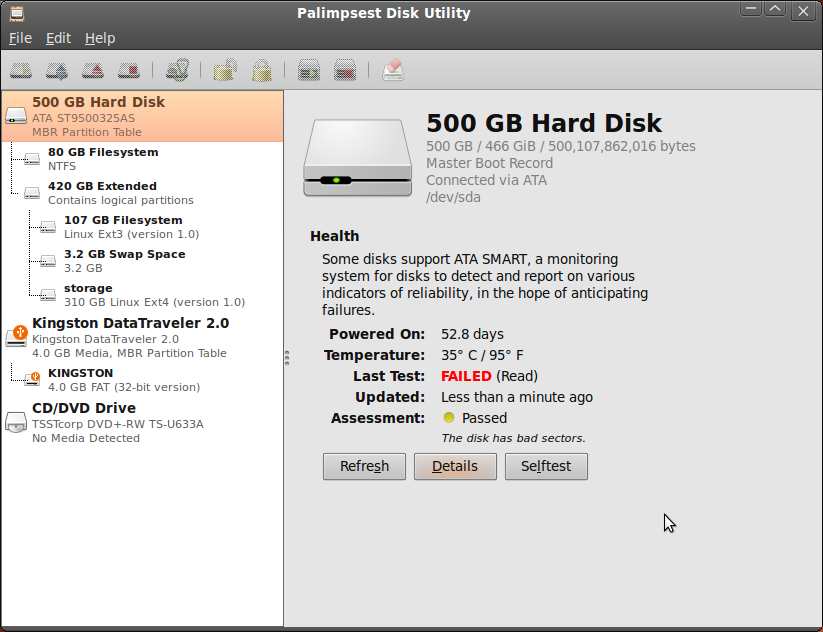
The “icon” it’s referring to is a little disk icon in the top right of the screen with an exclamation mark on it. Clicking on it brings up the new Palimpsest Disk Utility – a nice step forward from 9.04, which only included gparted. There’s not really anything wrong with gparted, but its main focus is on partitioning and it doesn’t have other disk management features such as SMART monitoring. And Palimpsest does present a nice interface:

Palimpsest Disk Utility

Bad sectors are not a good sign, so it would seem that this not-very-old 500gb hard drive is on the way out.

To “repair” the bad sectors (i.e. make sure the filesystem doesn’t use them), I ran “fsck -c /dev/sda5” (sda5 is my root partition, the one that was giving me trouble). This runs the filesystem check in conjunction with the badblocks tools. For now it’s up and running again, but I’ll be replacing the drive and restoring my data before sending it off for RMA!

It looks like I won’t need to go back to a backup, but this certainly shows the value of regular backups and when my laptop failed to boot I was extremely glad I had them!

Ubuntu 9.10 beta is only a week away, and so far “Karmic Koala” is shaping up to be a solid release.

Ubuntu 9.10 Alpha 6 Impressions

So it’s Saturday night and… I’m blogging about Karmic Koala. My social life has really taken off recently.

But on a more serious note I took alpha 6 for a spin on my E4300, and so far I’m impressed. I haven’t actually installed it to the hard drive yet, just booted from a USB key. But everything’s working well so far, and kernel mode setting is just the bees knees. It’s amazing how much of a difference it makes when switching terminals – it’s instantaneous. You will definitely want to be running an Intel or ATI card for this version.

I’ll be upgrading permanently once the beta comes out, so I’ll go into more detail then. I’ll also be refreshing my Mythbuntu media PC (Athlon II 250, Geforce 8200 motherboard), older laptop (HP nx6120), and maybe my old desktop (Intel P35 + ATI 4850), which gives a pretty broad coverage in terms of hardware testing. I’m looking forward to seeing if battery life has improved, as when Vista gets 5 hours and Ubuntu just over 3, you know something’s wrong.

It will also be nice to have an up to date browser again – Firefox 3.5 under Jaunty is not well integrated. Can’t comment on the boot speed as my flash drive is rather slow (and the live distro is not really indicative anyway). I tried to have a go with the new gnome-shell too, but unfortunately couldn’t get it to load. All I did was aptitude install gnome-shell from the live usb distro, so hopefully I’ll be able to get it working after installing the beta.

Decided it’s time to finally wipe Windows too, I never boot to it so it’s just a waste of 80gb. Believe it or not, this will actually be the first time I’ve not had Windows installed on my main computer, so quite a milestone really. It’s been over 3 years since I switched to using Ubuntu as my main OS, and looking back at Ubuntu 3 years ago it has come a long way. Edgy Eft (6.10) was usuable but rough (wireless networking was huge pain), and 7.04 was a big improvement. 7.10 was one of those high points, and was when I first started seriously recommending Ubuntu to others as a replacement for Windows. Then 8.04 with pulseaudio was a bit of a mixed bag but otherwise pretty solid, and 8.10 was a rather unexciting steady improvement. 9.04 was a big step forward with much faster boot times but big problems with the Intel graphics driver. 9.10 looks to resolve most of the Intel graphics regressions but I think we’ll find there will be room for 10.04 to improve again.

That’s one of the things I like about following Ubuntu – we get new toys to play with twice a year.

Automatically update DansGuardian Filter Groups List from LDAP

Update 20th March 2011: Heath has made some modifications to the original script and made it more efficient, see the comments below.

Here’s a script I wrote today, which updates the filtergroupslist file of Dansguardian. If you’re using LDAP authentication and want to give different levels of protection to certain groups of users, you need to update the list somehow, as Dansguardian doesn’t support LDAP groups. See this page for more info on filter groups.

The school I wrote this for is a Novell eDirectory site, and it will require a bit of modification to work on other sites. In particular you will need to alter the parameters of the ldapsearch command (filter string, server name, user credentials). Other LDAP servers may not support the ufn attribute, which this is based on. If your directory is well maintained and up to date you would probably be better of using the uid attribute, but this particular school hasn’t populated it for all users yet (only users created with ConsoleOne and iManager populate the uid attribute by default). If you do use uid, be sure to remove the cut command.

ldapsearch outputs data in ldif format, which is difficult to use in scripts. The tool to use to convert this is awk, which unfortunately is a language I haven’t learnt yet. So I found a premade awk script which converts ldif2csv (from here), removed out all the attributes and replaced them with just ufn (you may want to use uid instead).

If you use this script and modify or improve it, I’d appreciate you contributing the modifications back, as they may be useful to others (myself included)!

updateFilter.sh

#!/bin/bash 
#
# Dansguardian filter group update script
# Alex Forbes, Edtech Ltd
# Updated 9th September 2009
#

## Variables
# Dansguardian filtergroupslist file
DESTFILE=/root/filtergroupslist-test
LOGFILE=/var/log/dansfgupdate.log

# LDAP settings
LDAPFILTER="(&(objectClass=Person)(|(groupMembership=cn=ALL-TEACHERS,ou=TCHR,o=HWK)(groupMembership=cn=ALL-ADMIN,ou=ADM,o=HWK)(groupMembership=cn=OESAdmins,o=HWK)))"

# Which filtergroup do you want the users to be a member of
FILTERGROUP=filter2

# Path to the awk script (converts the ldif file to parseable text). I modified one from
# http://www.yolinux.com/TUTORIALS/LinuxTutorialLDAP-ScriptsAndTools.html
AWKSCRIPT=/opt/ldif2csv.awk
TMP=/tmp

# Dansguardian filter group list file
# Temp path, creates folder for the temp files. There are probably better ways of doing it.

# Make temp directories
WIP=$TMP/dgFilterUpdate
mkdir -p $WIP

# Header message
echo "## This file is automatically updated, any changes will be overwritten" > $WIP/4final
echo "## See /opt/edir2dansg.sh" >> $WIP/4final
echo "" >>$WIP/4final

# Perform LDAP search. Outputs ldif file.
ldapsearch -uxvA -H ldaps://fs2.howick.school.nz -b "o=HWK" -S '' -s "sub" -D cn=ldapauth,o=hwk -w password "$LDAPFILTER" ufn > $WIP/1ldif

# Picks out the ufn attribute using a modified awk script I found:
awk -F ': ' -f $AWKSCRIPT  $WIP/2txt

# Picks the first field of the ufn attribute to generate a clean list of users
cut -d, -f1 $WIP/2txt > $WIP/3userlist

# Add the values required to meet the dansguardian filter format
for u in `cat $WIP/3userlist`; do
	echo "$u=$FILTERGROUP" >> $WIP/4final
done

# Finally, copy the file to overwrite the dansguardian list.
# I've done a simple check to make sure the file isn't too small in case of error, but it could be handled better.
SIZE=`stat -c %s $WIP/4final`
if [ $SIZE -gt 2500 ]; then
	cp $WIP/4final $DESTFILE
	echo $(date +"%Y/%m/%d %H:%M"): Updated filter groups list "("size $SIZE bytes")" >> $LOGFILE
else echo $(date +"%Y/%m/%d %H:%M"): Output file is too small, list not updated >> $LOGFILE
fi

# Gentle reload of dansguardian
dansguardian -g

And the modified awk script, ldif2csv.awk:

BEGIN {
        ufn = ""
      }
/^ufn: /              {ufn=$2}
/^dn/ {
        if(ufn != "") printf("%sn",ufn)
        ufn     = ""
      }
# Capture last dn
END {
        if(ufn != "") printf("%sn",ufn)
}

Update 9-9-09: Fixed a few dumb mistakes.

Simple File Backup to Email Script

Here’s a file backup script I installed for a client. The original outline came from a post on the ubuntu forums (I forget where exactly), but it’s simple enough. It creates an archive in /tmp, zips it up, emails it then deletes the archive. If your target is a linux computer then it makes more sense to gzip it by adding a “z” to the tar options (i.e. tar -czf) and removing the zip line.

#!/bin/bash
#
# Simple file backup script, creates archive in /tmp and emails it.
#
# Software required:
#  zip
#  tar
#  mutt

# Variables
[email protected]
SOURCE="/home/user1 /home/user2"
SERVERNAME=server.example.com
MAIL=`which mutt`
ZIP=`which zip`
DATE=`date +%Y_%m_%d`
FILE=myfiles-$DATE.tar
DESTINATION=/tmp/$FILE
ZIPFILE=$DESTINATION.zip

# Actions
tar -cf $DESTINATION $SOURCE 2> /dev/null
$ZIP $ZIPFILE $DESTINATION
$MAIL -a $ZIPFILE -s "Backup for $DATE" -s "$SERVERNAME backup $DATE" $MAILADDR < /dev/null
rm $ZIPFILE $DESTINATION

For mutt to work you need an MTA (mail transport agent) such as postfix. If it’s not installed and you don’t need it for anything else, configure it as a satellite system (the Ubuntu/Debian packages prompt you on install and satellite system is an option). This prevents spammers from using it as a relay, and ensures the mail goes to your real mail server.

Bluetooth problems on Ubuntu 9.04

I was having trouble getting my USB Bluetooth dongle working on Ubuntu 9.04. The device itself was really cheap ($10 NZD), but from reading the bugs this isn’t the only device having issues. Below is the lsusb line of my device:

Bus 007 Device 002: ID 0a12:0001 Cambridge Silicon Radio, Ltd Bluetooth Dongle (HCI mode)

The problem was that it was extremely flaky, sometimes it would show up and allow me to scan for devices but usually it wouldn’t. Sometimes “/etc/init.d/bluetooth restart” would bring it to life, but usually not. Another symptom was “Inquiry failed: Connection timed out” when doing a scan (sudo hcitool scan).

In the end the solution was upgrading to the latest version of blueman. There are packages available for Ubuntu 9.04 in the blueman ppa on launchpad: https://edge.launchpad.net/~blueman/+archive/ppa

Add the ppa to your software sources list (instructions on the page), and then do:

sudo aptitude update
sudo aptitude safe-upgrade

After a reboot I was good to go, pairing and file transfers worked perfectly!

Update

This worked on my laptop but not my media PC, despite them both running 9.04 (media PC is mythbuntu however). I also tried updating to the bluez packages from Karmic which didn’t improve the situation. For all the time I’m spedning on this, I think it’s going to be more sensible to buy another bluetooth adaptor.

Setting up a local apt-cache on Ubuntu

Anyone with more than one Ubuntu machine on their network should do this, basically it sets up an apt proxy server so that once a package has been downloaded once by a computer on your network, the rest can get it locally.

To install it:

sudo apt-get install apt-cacher-ng

Browse to http://localhost:3142 and you should see an error page of sorts telling you to edit apt.conf. Ubuntu however splits the apt.conf file into a directory, so instead we create a new file in that directory:

sudo nano /etc/apt/apt.conf.d/02cache

Paste the following line into the file (highlight to copy, middle click to paste):

Acquire::http { Proxy “http://192.168.1.2:3142”; };

And then press Ctrl+O to save followed by Ctrl+X to exit. Replace 192.168.1.2 with your apt cache’s IP address, or hostname if you have DNS. Using DNS is preferable if it is available, but most home networks won’t have a DNS server.

You then need to add the apt.conf.d file to each machine on your network in order for them to download their packages through your proxy.

See http://localhost:3142/acng-report.html for information and maintenance tasks.

Trying Windows 7, and backing up Vista first

I grabbed a copy of the Windows 7 release candidate off a colleague at work today. Yeah I’m a Linux guy but it’s good to keep tabs on what the dark side is doing, so I thought I’d upgrade Vista SP1 on my laptop to Win 7. My laptop is a dual boot setup with Ubuntu 9.04 as well as Windows, and of course I want to keep a backup of the Vista partition so I can revert to it when the RC expires in March 2010 (I would probably pay to upgrade to Win7 if the cost was sub $50, but this is not likely).

Listing the partitions to begin with:

sudo fdisk -l

My hard disk is partitioned with Windows on a primary partition an Linux on an extended one. Sda1 is my Vista partition, sda5 is Linux root and sda7 is my storage space.

Disk /dev/sda: 500.1 GB, 500107862016 bytes
255 heads, 63 sectors/track, 60801 cylinders
Units = cylinders of 16065 * 512 = 8225280 bytes
Disk identifier: 0x2af0e241

Device Boot      Start         End      Blocks   Id  System
/dev/sda1   *           1        9710    77994551    7  HPFS/NTFS
/dev/sda2            9711       60801   410388457+   5  Extended
/dev/sda5            9711       22764   104856223+  83  Linux
/dev/sda6           60410       60801     3148708+  82  Linux swap / Solaris
/dev/sda7           22765       60409   302383431   83  Linux

I want to make a backup of sda1, which is an 80gb NTFS partition, to a file on sda7. A straight dd copy would result in an 80gb file which is a bit much, so there are a couple of tricks that can be used to get the file size down.

The first is zeroing out the empty space parts of the drive. Deleting files on a hard drive doesn’t blank the space it previously occupied, it simply marks it as unused space so that it can be used for something else. Since dd is a low level copy, it copies everything, including blocks that have deleted data which we don’t want. So to make sure this data is erased we mount the filesystem and create a file full of zeros on it (easiest way to do this is to simply click on it by going to places if you use Gnome, otherwise you can use the mount command if you wish e.g. “mount -t ntfs-3g /dev/sda1 /mnt/windows”):

dd if=/dev/zero of=/media/disk/zeroFile.tmp bs=4M

The bs=4M parameter isn’t essential, but it makes the process significantly faster.

Once dd process stops, the partition should be full and you can delete zeroFile.tmp. You now know that the free space has no data in it.

Taking a straight dd image now would still result in an 80gb file however, as dd will simply copy all the zeroes verbatim. Fortunately blank space will compress down to nothing, so we can pipe the output from dd through gzip. The parameters I’ve used are “c” (which writes output to std out), and “9” for best compression.

In effect we will have 3 programs running:

  • dd bs=4M if=/dev/sda1
  • gzip -c9
  • dd bs=4M of=/media/disk/Vista.img.gz

When you exclude the “if=” or “of=” parameters, dd reads or writes from stdin/stdout, depending on which is omitted. So the first dd is reading the partition and outputting to stdout, and the second one is reading from stdin and writing it to the file. Gzip sits in the middle compressing the stream.

The full command is thus:

dd bs=4M if=/dev/sda1 | gzip -c9 | dd bs=4M of=/media/disk/Vista.img.gz

To restore the partition you would use:

dd if=/media/disk/Vista.img.gz | gzip -dc | dd of=/dev/sda1

(bearing in mind of course that this overwrites sda1 with whatever is in the image file)

I don’t know how Windows 7 handles foreign bootloaders yet, but before installing Windows it would also be wise to backup your mbr, which is the first 512 bytes on your hard drive:

dd if=/dev/sda of=bootSectorBackup.img bs=512 count=1

And to restore it:

dd if=bootSectorBackup.img of=/dev/sda bs=512 count=1

Note that in this case the block size (bs) and count parameters are very important, as they define how much of the disk is overwritten. Also if Windows does overwrite the bootloader, you’ll need a Linux boot CD to restore your MBR.

Right, now I just need to go and install Win 7.

Addendum:

If you want to check the status of the dd copy (see this post), it’s more useful to send the sigusr1 command to the “read” instance of dd (the one with the if= parameter), as that way you can see how much of the disk has been read. If you sent it to the output instance, you’d get the amount of data which has been written to disk, and this is after it has been compressed so unless you know what size the resulting file is going to be it’s not much use!
Printing dd stats / status

I keep Googling this, when really I should have committed it to memory by now. It’s extremely useful when cloning hard drives, which takes a long time with modern disks (a 160gb hard drive takes about an hour over eSATA @ ~50MB/s).

Anyway while there are more efficient methods, dd is simple and it works.

So given the following dd command:

dd if=/dev/sda of=/dev/sdb bs=32M

We can find out the pid (process ID) with the following command:

ps ax | grep dd

Which in my case gives:

12147  tty2    R+     6:17 dd if /dev/sda of /dev/sdb bs 32M

i.e. 12147.

To get dd to output the stats, we send it a SIGUSR1 signal:

kill -SIGUSR1 12147

Resulting in:

3205+0 records in
3204+0 records out
107508400128 bytes (108 GB) copied, 2111.05 s, 50.9 MB/s

I should thank the author of the following link, it’s the result I get whenever I google this:

http://prefetch.net/blog/index.php/2006/06/11/printing-dd-status/

Dell E4300, 3 weeks on

Linux support has turned out to be much, much better than I anticipated, in fact I’ve basically switched to Ubuntu.

The first surprise was when I tried Ubuntu 8.10 – everything worked. Suspend, resume, hibernate, wireless, ethernet, the webcam, hotkeys… there were no issues. I’ve since upgraded to Jaunty and have been using it daily for the past couple of weeks. In that time a few glitches have become apparent, but these are not majors and won’t stop me using it as my main machine:

  • Occasionally doesn’t power off on shutdown (needs ctrl+alt+del)
  • Graphics can occassionally go haywire with an external monitor, mitigated by restarting gdm
  • Hard disk parks too often when running off battery
  • Poor battery life compared to Vista (used to get 5 hours, now 3-4)

The battery life is probably the one that concerns me most, but I suspect the excessive hdd duty cycle and poor intel graphics performance (using too much cpu) are contributing factors. I’m sure the Intel issues will be fixed by 9.10… Hdd issue just needs some tweaking.

My colleague also bought an E4300, and has installed SLED (Suse Linux Enterprise Desktop) on it. It worked well for him, although there were some issues with sound and he had to spend a bit of time getting it working.

All in all I’m impressed, this is the best Linux experience I’ve had on a laptop, and it’s also the newest laptop (age-wise) I’ve ever owned.

Raw photo processing on Linux

Being a Linux user, one of my concerns with shooting raw was what to do with the files once I’d captured them. On Windows I’d probably just use Canon’s software that was supplied with my 40D – Zoombrowser and Digital Photo Professional.

However the default photo mangement application in Ubuntu, F-Spot, pleasantly surprised me in the way it handles raw files. Not only does it understand and preview them, it can manage raw .cr2 files, developed jpegs and camera jpegs as one image, meaning that you can preserve all versions of a picture without cluttering up your library with multiple versions. For me this is almost an essential feature now, as I frequently have three, sometimes four versions of the same image – raw, camera jpeg, developed jpeg, cropped, etc.

So here’s my brief outline of the components I use for managing photos:

  1. F-Spot, installed by default in Ubuntu and also many other distros such as OpenSUSE
  2. UFRaw standalone
  3. F-Spot DevelopInUFRaw plugin
  4. F-Spot RawPlusJpeg plugin
  5. Canon Digital Photo Professional

UFRaw is an excellent raw processing tool, based on dcraw, and supports many other raw formats (not just Canons). Ubuntu provides a standalone version and a GIMP integrated version, but the one we want is just called ufraw. To install it, open a terminal and type:

sudo aptitude install ufraw

You will need to have the universe repository enabled to install this package, to enable it go to software sources and tick the appropriate box.

The F-Spot plugins are simple to install and can be added from within F-Spot itself – just go to Edit > Manage Extensions, enable them if present and install them first if not:

F-Spot Extension Manager

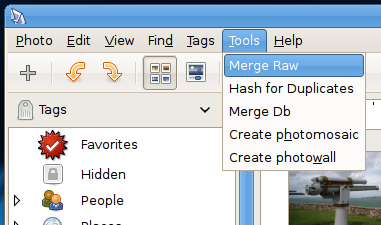
Once you’ve installed everything, the first thing I recommend doing is merging your raw files:

Merging Raw Files

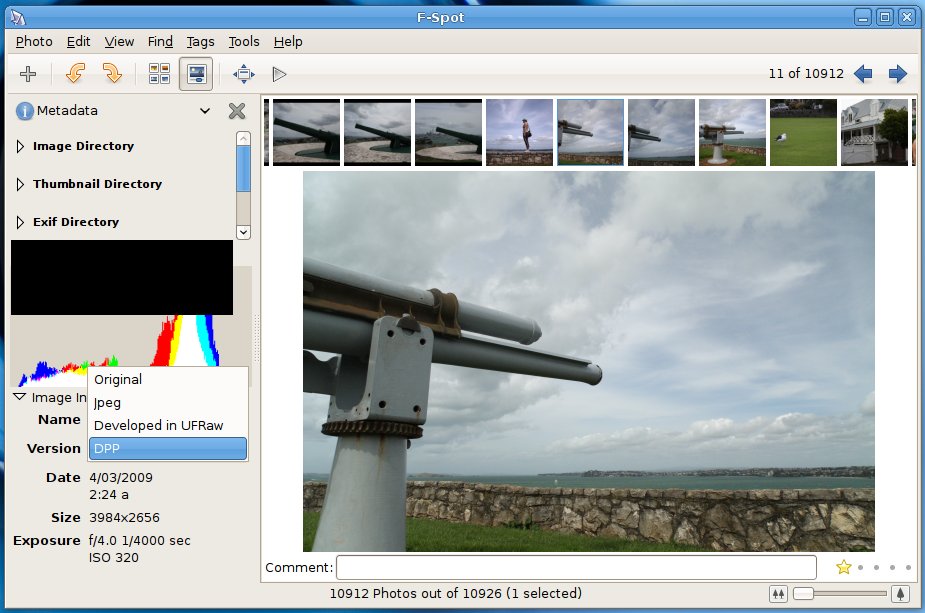
With the UFRaw plugin installed you should also be able to right-click on any image and select “Develop in UFRaw”, but obviously it will only work if the picture you’ve selected actually has a raw file. Any developed files appear as a version rather than a new image like so:

FSpot Versions

The main down side to using UFRaw as opposed to Canon’s Digital Photo Professional, is the lack of lens aberration correction. This may not be a problem for you if you only shoot L glass, but for the rest of us with consumer zooms the lens correction is a nice feature to have. I also find that it’s easier to achieve better results with DPP, it’s not that UFRaw can’t make the adjustments, but DPP does seem to make more intelligent guesses and I find I can achieve a good result faster than with UFRaw.

Fortunately, Digital Photo Professional works fairly well in Wine. To install it on Ubuntu 8.10 simply pop in the CD, and open the setup.exe file with wine (right click, Open with “Wine Windows Program Loader”). I’d suggest deselecting all drivers and anything unnecessary, I installed DPP only).

F-Spot and UFRaw make a pretty powerful photographic toolset, and with DPP running in Wine there’s little need for Windows. If you don’t like F-Spot there’s Google’s Picasa (which is actually a Wine app on Linux…), and DigiKam which is the KDE equivalent.