Trying Windows 7, and backing up Vista first

I grabbed a copy of the Windows 7 release candidate off a colleague at work today. Yeah I’m a Linux guy but it’s good to keep tabs on what the dark side is doing, so I thought I’d upgrade Vista SP1 on my laptop to Win 7. My laptop is a dual boot setup with Ubuntu 9.04 as well as Windows, and of course I want to keep a backup of the Vista partition so I can revert to it when the RC expires in March 2010 (I would probably pay to upgrade to Win7 if the cost was sub $50, but this is not likely).

Listing the partitions to begin with:

sudo fdisk -l

My hard disk is partitioned with Windows on a primary partition an Linux on an extended one. Sda1 is my Vista partition, sda5 is Linux root and sda7 is my storage space.

Disk /dev/sda: 500.1 GB, 500107862016 bytes
255 heads, 63 sectors/track, 60801 cylinders
Units = cylinders of 16065 * 512 = 8225280 bytes
Disk identifier: 0x2af0e241

Device Boot      Start         End      Blocks   Id  System
/dev/sda1   *           1        9710    77994551    7  HPFS/NTFS
/dev/sda2            9711       60801   410388457+   5  Extended
/dev/sda5            9711       22764   104856223+  83  Linux
/dev/sda6           60410       60801     3148708+  82  Linux swap / Solaris
/dev/sda7           22765       60409   302383431   83  Linux

I want to make a backup of sda1, which is an 80gb NTFS partition, to a file on sda7. A straight dd copy would result in an 80gb file which is a bit much, so there are a couple of tricks that can be used to get the file size down.

The first is zeroing out the empty space parts of the drive. Deleting files on a hard drive doesn’t blank the space it previously occupied, it simply marks it as unused space so that it can be used for something else. Since dd is a low level copy, it copies everything, including blocks that have deleted data which we don’t want. So to make sure this data is erased we mount the filesystem and create a file full of zeros on it (easiest way to do this is to simply click on it by going to places if you use Gnome, otherwise you can use the mount command if you wish e.g. “mount -t ntfs-3g /dev/sda1 /mnt/windows”):

dd if=/dev/zero of=/media/disk/zeroFile.tmp bs=4M

The bs=4M parameter isn’t essential, but it makes the process significantly faster.

Once dd process stops, the partition should be full and you can delete zeroFile.tmp. You now know that the free space has no data in it.

Taking a straight dd image now would still result in an 80gb file however, as dd will simply copy all the zeroes verbatim. Fortunately blank space will compress down to nothing, so we can pipe the output from dd through gzip. The parameters I’ve used are “c” (which writes output to std out), and “9” for best compression.

In effect we will have 3 programs running:

  • dd bs=4M if=/dev/sda1
  • gzip -c9
  • dd bs=4M of=/media/disk/Vista.img.gz

When you exclude the “if=” or “of=” parameters, dd reads or writes from stdin/stdout, depending on which is omitted. So the first dd is reading the partition and outputting to stdout, and the second one is reading from stdin and writing it to the file. Gzip sits in the middle compressing the stream.

The full command is thus:

dd bs=4M if=/dev/sda1 | gzip -c9 | dd bs=4M of=/media/disk/Vista.img.gz

To restore the partition you would use:

dd if=/media/disk/Vista.img.gz | gzip -dc | dd of=/dev/sda1

(bearing in mind of course that this overwrites sda1 with whatever is in the image file)

I don’t know how Windows 7 handles foreign bootloaders yet, but before installing Windows it would also be wise to backup your mbr, which is the first 512 bytes on your hard drive:

dd if=/dev/sda of=bootSectorBackup.img bs=512 count=1

And to restore it:

dd if=bootSectorBackup.img of=/dev/sda bs=512 count=1

Note that in this case the block size (bs) and count parameters are very important, as they define how much of the disk is overwritten. Also if Windows does overwrite the bootloader, you’ll need a Linux boot CD to restore your MBR.

Right, now I just need to go and install Win 7.

Addendum:

If you want to check the status of the dd copy (see this post), it’s more useful to send the sigusr1 command to the “read” instance of dd (the one with the if= parameter), as that way you can see how much of the disk has been read. If you sent it to the output instance, you’d get the amount of data which has been written to disk, and this is after it has been compressed so unless you know what size the resulting file is going to be it’s not much use!

Printing dd stats / status

I keep Googling this, when really I should have committed it to memory by now. It’s extremely useful when cloning hard drives, which takes a long time with modern disks (a 160gb hard drive takes about an hour over eSATA @ ~50MB/s).

Anyway while there are more efficient methods, dd is simple and it works.

So given the following dd command:

dd if=/dev/sda of=/dev/sdb bs=32M

We can find out the pid (process ID) with the following command:

ps ax | grep dd

Which in my case gives:

12147  tty2    R+     6:17 dd if /dev/sda of /dev/sdb bs 32M

i.e. 12147.

To get dd to output the stats, we send it a SIGUSR1 signal:

kill -SIGUSR1 12147

Resulting in:

3205+0 records in
3204+0 records out
107508400128 bytes (108 GB) copied, 2111.05 s, 50.9 MB/s

I should thank the author of the following link, it’s the result I get whenever I google this:

http://prefetch.net/blog/index.php/2006/06/11/printing-dd-status/

Dell E4300, 3 weeks on

Linux support has turned out to be much, much better than I anticipated, in fact I’ve basically switched to Ubuntu.

The first surprise was when I tried Ubuntu 8.10 – everything worked. Suspend, resume, hibernate, wireless, ethernet, the webcam, hotkeys… there were no issues. I’ve since upgraded to Jaunty and have been using it daily for the past couple of weeks. In that time a few glitches have become apparent, but these are not majors and won’t stop me using it as my main machine:

  • Occasionally doesn’t power off on shutdown (needs ctrl+alt+del)
  • Graphics can occassionally go haywire with an external monitor, mitigated by restarting gdm
  • Hard disk parks too often when running off battery
  • Poor battery life compared to Vista (used to get 5 hours, now 3-4)

The battery life is probably the one that concerns me most, but I suspect the excessive hdd duty cycle and poor intel graphics performance (using too much cpu) are contributing factors. I’m sure the Intel issues will be fixed by 9.10… Hdd issue just needs some tweaking.

My colleague also bought an E4300, and has installed SLED (Suse Linux Enterprise Desktop) on it. It worked well for him, although there were some issues with sound and he had to spend a bit of time getting it working.

All in all I’m impressed, this is the best Linux experience I’ve had on a laptop, and it’s also the newest laptop (age-wise) I’ve ever owned.

Dell E4300 or HP 2710p?

Recently I picked up a “resealed” (very close to new) Dell E4300 at what I think was a pretty good price, well below the $4000 RRP. The downside is that there’s no warranty on it unless I purchase one from Dell at about $460 for 1 year going up to over $900 for 3 years. Since even the 1 year warranty is over a third of the cost of the machine and I can fix/diagnose many problems myself I think I’ll pass. It’s a risk but a calculated one.

Of course I didn’t really need an E4300, I already have a HP 2710p tablet PC which has been serving me very well. So now I have to decide which one to keep. To help me evaluate, I’ve rated them on the categories that are important to me, other people will have different priorities.
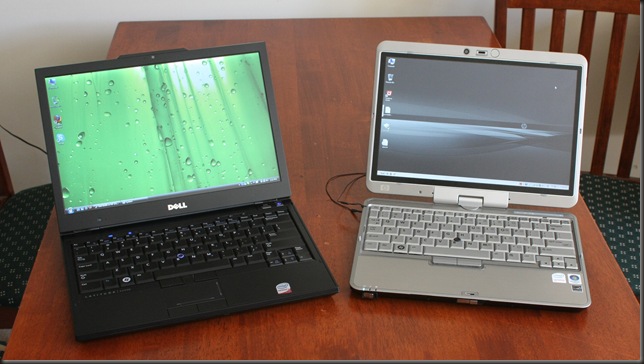
IMG_1674

Performance

The E4300 is configured with a Core 2 Duo SP9300 (2.26ghz, 6mb L2 cache), versus the U7600 (1.2ghz, 2mb L2 cache) in the 2710p. While the 2710p rarely frustrated me with slow performance, it is running Vista and I have disabled indexing and the Aero desktop effects. I probably won’t need to do this on the Dell. The 2.5” 5400rpm hdd in the Dell is also streets ahead of the 2710p’s 4200rpm 1.8” IDE hard drive – a major downside of many 12” ultraportables.

Both have 4gb of ram (DDR2 in the 2710p and DDR3 in the E4300).

Result: No contest, this one goes to the E4300 by a country mile.

Battery Life

You might expect this one to go to the 2710p, but actually the Dell lasts longer. I don’t have the extended battery for the HP, just the internal 6-cell one and I generally get between 4 and 5 hours from it with normal use. Dropping the display brightness and using other tricks such as setting the display to 16-bit I’m sure I could get over 5 hours, but not by much. The Dell lasts 6 hours with its higher wattage CPU, and the battery is also a 6-cell model. It does protrude out the back, although this doesn’t bother me at all. Another factor to consider is that I don’t know how old the HP battery was when I bought it, and I’ve used it for another 6 months, so it may have lasted a bit longer than it does now (although going by the reviews I’ve read I seems to be getting similar battery life).

With the E4300 I feel I could possilby get through a whole day’s work on one charge, as long as I aggressively used the power saving features and put it to sleep when not in use.

Result: E4300, but this probably isn’t fair

Connectivity / Peripherals

Both have webcams and VGA ports (I can forgive the 2710p for this as when it was made displayport wasn’t available and HDMI wasn’t all that common, but why on earth are Dell putting VGA ports on laptops in 2008/9?).

The Dell has an anemic two USB ports, and one of those is a dual purpose USB/ESATA port. The Dell has a built in DVDRW, the HP has one but it’s in its docking station (which is actually designed to be left on the laptop if you so chose, it’s rather slim). If you chose to leave the docking station on you get another 4 usb ports bringing the total to 6 which is pretty incredible for a 12” device (admittedly a rather bulky one). I don’t have the Dell docking station – it has more USB ports and a DVI connector, but it’s not the sort of thing you’d throw in your laptop bag.

The HP has bluetooth, WLAN, WWAN (HSDPA, or 3G), whereas the person that configured this E4300 omitted the bluetooth option! I can forgive him/her for not adding HSDPA but omitting bluetooth is inexcusable. Maybe Dell are to blame for overpricing an option which costs just a few dollars to implement.

While the ESATA feature of the E4300 is nice, this one goes to the 2710p easily for having Bluetooth as standard and more flexibility.

Size / Weight

Without its docking station the 2710p is obviously quite a bit smaller and does weigh less. With it attached however the weight is actually about the same. The 2710p does feel a lot “denser”, and my first impression of the E4300 was that it is rather light – probably because the weight is spread over 13 inches rather than 12.

Size is a matter of personal preference and the weights are similar so the result is a TIE.

Build & quality

The Dell feels more solid, but the HP is handicapped somewhat by being a tablet as it has to have a rotating lid. Both have metal bases, but the HP has a matte finish on the base which doesn’t appear to dissipate heat as well, although that may not actually be the case, just my impression. The HP’s lid is plastic, the Dell’s in a much nicer brushed metal. The Dell wins narrowly in terms of thermals, it gets a bit warm on the lap but not quite as warm as the 2710p.

The screen of the 2710p weighs quite a bit which puts more stress on the hinge, and the latch is fiddly and difficult to release with one hand. The Dell’s screen is lighter, has a really nice hinge and a magnetic latch which is effortless to open.

While this isn’t really fair due to the different nature of these devices, I’m giving the edge to the E4300.

Input

Well the 2710p is a tablet so we’re not really comparing apples to apples here (although that was never my intention, I just want to decide which one to keep). The Dell has a trackpoint and touchpad which makes it more flexible than the 2710p (which only has a trackpoint) in laptop mode. The keyboard of the 2710p feels nicer, and in my opinion is higher quality – I’ve had several people comment on how nice it is. The keyboard on the Dell feels cheap, but in actual use it’s pretty good – I can type very fast on it.

In terms of keyboard layout, having the page up & down keys right by the arrow keys on the Dell is fantastic – the HP’s are virtually impossible to find without looking, but it is more constrained for space. The Dell lacks the right click menu “application” key, which many people probably don’t use but I actually miss. It’s especially handy for spell checks as you just navigate to the word with the keypad and then hit the button instead of switching to the mouse. I like the third mouse button of the Dell though, it’s extremely handy when things don’t quite fit on the screen (rather common at 1280×800).

Result: While the HP is a tablet I can’t really take that into account so the result is TIE.

Screen

The 2710p’s display is really nice. Both are 1280×800 and LED backlit but the Dell seems to have a problem with moiré (I think that’s what it is), where you can sometimes see very fine diagonal lines moving across the screen. It feels like Dell cut a corner here, and if I had paid $4000 for this I would be pissed. Brightness is comparable, the E4300 is obviously larger but that isn’t a consideration here. The Dell also seems washed out by default, I had to reduce the brightness in the Intel control panel applet, but the HP has never needed any sort of adjusting.

Result: 2710p, and very comfortably.

Linux Support

The E4300 has Latitude On, a lightweight Linux distribution which you can boot into to check your Outlook calendar or email without waiting for Windows to load. I haven’t installed a Linux distribution on it, but I assume hardware support won’t be a problem, it’s mostly Intel stuff. Dell generally seems to have pretty good Linux support, as they offer Ubuntu on some models.

The 2710p never had any problems with Linux, even the tablet functions are supported. Like the Dell, it’s mostly Intel hardware, and even the bits that aren’t Intel are supported such as the Sierra wireless 3G card and the Wacom digitiser.

UPDATE: Originally I called this one a tie, but my faith in Dell’s Linux support is somewhat misplaced, there are issues with Linux on the E4300 but to be fair you get this with any new laptop model. Also I gather they are “working on it”, and the problems should be fixed with an updated bios.

Result: 2710p

Conclusion

It’s difficult to decide actually. I have a desktop so a laptop for me is a portable computer, and portability is more important than performance. However with the E4300 I don’t feel as though I’m giving up much portability to gain a lot of power. The tablet functions were handy, but it’s not something I use everyday and I can certainly do without it. So I feel the performance trumps the pen. The HP night-light was very handy, and the E4300 has a backlit keyboard as an option but this one doesn’t have it.

At this stage I think I’ll keep the E4300, I feel it suits me better and allows me to do more things on the road than I could on the HP. The eSATA port and more powerful CPU make running virtual machines a possibility, which is something I wouldn’t bother with on the 2710p.

Both are top-class laptops, and while neither is without flaws the overall quality and design of these laptops is quite outstanding (and you’d hope so too given their recommended retail prices). But I’ll be using the Dell for a few more days before I finally decide!

The Impact of Digital Media

This is perhaps a more reflective post than I ever intended to make on this blog, but digital photography is an interest of mine, and it’s interesting to note how it’s changing society.

  • Exhibit A – Barack Obama’s campaign photographer’s raw unedited photos of the Obama family on election night
  • Exhibit B – The New Zealand National Party’s Flickr photostream

The Obama election night pictures are particularly fascinating as they’re behind-the-scenes images that you just wouldn’t have seen several years ago. But what’s significant is that those two links contain (as far as I can tell) raw, virtually unedited photos from official photographers of political parties. The kind that photographers might have provided to journalists back in the day, open to the public. I think it reflects a shift in society that we’re seeing more than just posed photographs officially sanctioned by a publicist.

I remember I got my first digital camera at Christmas 2002. It was a Fuji Finepix A303, and cost approximately $900 NZD. At that stage digicams were pretty rare, and I was the first amongst my friends to have one, although the earliest picture in my photo library actually dates back to January 2001 when my cousin was showing me his Fuji  6900 Zoom (that thing was impressive back then). But over the following year the entry price of a decent digital camera dropped dramatically and finally film point ‘n shoots became obsolete. So 2003-2004 was really the point where digital point ‘n shoots began to replace entry level film cameras and is thus what I consider to be the start of the digital revolution (just early enough to take some embarrassing university photos!), and when Digital SLRs caught up to the resolution of film in 2004-2005, film became obsolete (some argue it was earlier/later, I reckon it was when the ID Mark II was released in June 2004).

2001_0124_015738AA.JPG

This is one of the earliest digital images in my library. It was taken on January 24th 2001 by my cousin in Wairoa, New Zealand.

When you consider the explosion of content that digital media has facilitated, you can’t escape the fact that our lives are documented far more thoroughly (an order of magnitudes more) than any other generation in history. Historians looking back to our time 100 years from now might struggle to find content from the 80s and 90s, but get to the 2000s and they’ll have an abundance, probably more than they can sift through. The problem then becomes not one of scarcity, but of finding the diamonds in the rough.

Metadata (information about information) will assist with this. First of all, virtually all cameras embed the date, time, and lots of photographic information in every picture they take. Future cameras will embed GPS coordinates if the users chooses, some actually already do this (my cell phone does, but if you want a DSLR to do it you need an expensive addon, and I haven’t seen any point ‘n shoots with an embedded GPS yet).  Sites like Flickr  gauge the quality of a photograph via the concept of “interestingness“, and also allow users to tag the files which further helps describe the content. A photo that didn’t get any views in 2009 probably won’t be of much interest to historians in 2109, but is Flickr going to be around in 2109? I find it hard to believe that this data would be lost forever, although when you consider the fact that it could well be based in just one room in a single building in the US… that great repository of our generation’s content looks rather fragile. One would hope they have a distributed network of some kind, or at least an off-site mirror, but I digress…

Another interesting use of digital media is the 3d reconstruction of scenes and landmarks using digital photos. When you allow your mind to wander through the possibilities this opens up, it’s not hard to imagine a system in the future that allows you to “travel back in time” and walk around a scene that existed today. What’s more, this system would be fed by the vast amount of user photos posted online, and its accuracy would only be limited by the number of photos of a particular scene and the number of angles they were taken from. I can see this becoming a pastime of hobbyist photographers everywhere – taking detailed photographs of an area previously “unexplored” (or explored in poor detail) thus opening it up to the virtual public.

The digital revolution was only the beginning, what will be more interesting is what we do with all this new information over the coming years, and I’ve no doubt we’ll see many fascinating developments within our life time.

By the way that Fuji A303 (my first digital camera), finally died late last year. I passed it on to my brother in 2005 and it was roughly 6 years old when it died, which is a pretty good run considering the hard life it had… It survived many university parties, and even had coke (with something else) spilled on it at one point which made the selection wheel sticky. My current point ‘n shoot is an F50fd. :-)

Raw photo processing on Linux

Being a Linux user, one of my concerns with shooting raw was what to do with the files once I’d captured them. On Windows I’d probably just use Canon’s software that was supplied with my 40D – Zoombrowser and Digital Photo Professional.

However the default photo mangement application in Ubuntu, F-Spot, pleasantly surprised me in the way it handles raw files. Not only does it understand and preview them, it can manage raw .cr2 files, developed jpegs and camera jpegs as one image, meaning that you can preserve all versions of a picture without cluttering up your library with multiple versions. For me this is almost an essential feature now, as I frequently have three, sometimes four versions of the same image – raw, camera jpeg, developed jpeg, cropped, etc.

So here’s my brief outline of the components I use for managing photos:

  1. F-Spot, installed by default in Ubuntu and also many other distros such as OpenSUSE
  2. UFRaw standalone
  3. F-Spot DevelopInUFRaw plugin
  4. F-Spot RawPlusJpeg plugin
  5. Canon Digital Photo Professional

UFRaw is an excellent raw processing tool, based on dcraw, and supports many other raw formats (not just Canons). Ubuntu provides a standalone version and a GIMP integrated version, but the one we want is just called ufraw. To install it, open a terminal and type:

sudo aptitude install ufraw

You will need to have the universe repository enabled to install this package, to enable it go to software sources and tick the appropriate box.

The F-Spot plugins are simple to install and can be added from within F-Spot itself – just go to Edit > Manage Extensions, enable them if present and install them first if not:

F-Spot Extension Manager

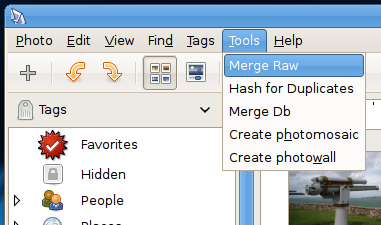
Once you’ve installed everything, the first thing I recommend doing is merging your raw files:

Merging Raw Files

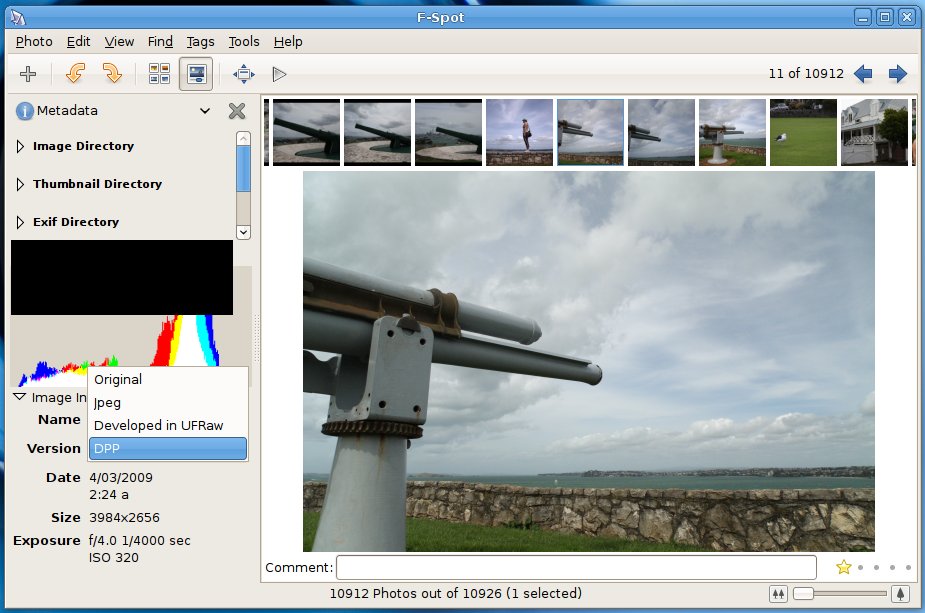
With the UFRaw plugin installed you should also be able to right-click on any image and select “Develop in UFRaw”, but obviously it will only work if the picture you’ve selected actually has a raw file. Any developed files appear as a version rather than a new image like so:

FSpot Versions

The main down side to using UFRaw as opposed to Canon’s Digital Photo Professional, is the lack of lens aberration correction. This may not be a problem for you if you only shoot L glass, but for the rest of us with consumer zooms the lens correction is a nice feature to have. I also find that it’s easier to achieve better results with DPP, it’s not that UFRaw can’t make the adjustments, but DPP does seem to make more intelligent guesses and I find I can achieve a good result faster than with UFRaw.

Fortunately, Digital Photo Professional works fairly well in Wine. To install it on Ubuntu 8.10 simply pop in the CD, and open the setup.exe file with wine (right click, Open with “Wine Windows Program Loader”). I’d suggest deselecting all drivers and anything unnecessary, I installed DPP only).

F-Spot and UFRaw make a pretty powerful photographic toolset, and with DPP running in Wine there’s little need for Windows. If you don’t like F-Spot there’s Google’s Picasa (which is actually a Wine app on Linux…), and DigiKam which is the KDE equivalent.

North Head Sunset


Last night I decided to head over to North Head in Devonport (see map below), with the intention of photographing the sunset. I got a few sunset pics, but they weren’t spectacular and I think the shots of the city came out better.

Pity I forgot to take a tripod!

Full set is here.

[googlemaps http://maps.google.co.nz/maps?f=q&source=s_q&hl=en&geocode=&q=north+head&sll=-36.87354,174.703377&sspn=0.024993,0.05579&ie=UTF8&ll=-36.818561,174.814196&spn=0.025008,0.05579&t=h&z=14&iwloc=addr&output=embed&s=AARTsJqtKfu71y0HHy0osknI1Du7CC1mNA&w=425&h=350]

My new toy


img_6909-1.jpg

Originally uploaded by Al404

I’ve been getting into my photography recently – I’ve had an SLR camera (a Canon 350D)  for a long time but haven’t really used it as much as I could have. What better way to reinvigorate my love for photography than buy new gear?

I started quite modestly, replacing the kit lens of my 350D with a Canon 17-85mm which really makes it a whole new camera as it’s a much nicer lens. Next I bought the cheapest possible prime lens, the 50mm F1.8 II. So far so good.

But then I bought a 40D. Followed by a 70-200mm F4L lens. And before you can blink I’ve spent over $3k NZD…

Ah well, it was nice having money while it lasted. You can see the results of my purchase on Flickr, although you’ll need to be a friend to see them all.

Edubuntu for Vanuatu

Over the past few days I’ve been setting up a few old computers to send to a school in Vanuatu. They’re fairly modest machines but still perfectly usable (albeit not with Vista); P4 1.6ghz, 256mb ram, 40gb hdd. They even have nvidia vanta graphics cards (which sadly can’t do OpenGL – it would have been nice to load Stellarium on the machines). They also have brand new 17 inch LCD monitors, as the bulky CRT monitors that they had originally can’t be taken over as luggage on the plane.

The computers are going accross with students as part of a cultural exchange trip, which allows the students to experience life in Vanuatu. The school they are visiting has virtually no IT expertise – when our english teacher sets them up he will be the closest thing they have to a systems administrator!

This makes is more important for things to just work, but there are also other challenges. We could just roll back the machines to the Microsoft operating system they are licensed for (Windows 2000), install a few Open Source applications such as Open Office & Firefox, and send them on their way. However a computer setup in this way doesn’t even begin to realise the potential of computers as tools for teaching and learning.

In the end it was a pretty easy decision to install Edubuntu on them. Edubuntu comes with all the usual productivity tools (the base Ubuntu system), plus a whole lot of “edutainment” packages (games), and also some specific tools to aid the teaching of specific subjects. You don’t get an equivalent setup on Windows 2000 without a lot more effort or a lot of money. Windows 2000 is now 8 years old, and well past its use-by date anyway.

The timing actually turns out to be quite bad however, as Edubuntu 7.10 is now 6 months old, and the LTS version 8.04 is about to be released. But I would rather send over a fully patched Gutsy system than a beta Hardy system, so that is what they’re getting.

The school also asked if we had an old library cataloguing system that they could use, as their one has “crashed”. Unfortunately I only heard about this yesterday, otherwise I could have set up koha on another machine. Koha is an open source intergrated library system that was originally developed by a New Zealand company. There may yet be time to do this, but I have never even looked at it before so it would be a bit of a rush job.