Tag Archives: backup

Samba config for Apple Time Machine

I’ve been using samba’s vfs_fruit module to enable backing up my mac laptop to my ubuntu-based NAS. I’ve found the configuration fiddly, and it occasionally breaks with macOS upgrades.

Anyway, I thought I would document my settings in case it helps anyone else out there. The file system backing my Time Machine share is ZFS, and I am using Samba 4.15 and MacOS Sonoma 14.4.1.

Global config

In /etc/samba/smb.conf under the [global] section, I have the following (not complete config, just the relevant settings):

protocol=SMB3
vfs objects = acl_xattr fruit streams_xattr aio_pthread
fruit:aapl = yes
fruit:model = MacSamba
fruit:posix_rename = yes
fruit:metadata = stream
fruit:nfs_aces = no
recycle:keeptree = no
oplocks = yes
locking = yes

Some comments:

  • I believe SMB3 is required – Time Machine struggles with older protocols.
  • The order of vfs objects is important – aio_pthread must go last.
  • Without aio_pthread, my backups fail while scanning. I suspect Time Machine is heavily threaded and does a lot of requests in parallel – apparently too much for a single samba thread.
  • fruit:posix_rename = yes appears to be the default and can probably be omitted
  • fruit:metadata = stream was a copy-paste and not thought through by me – I’m unsure of the implications of this

These work for me as a general set of settings for mac clients – I don’t use Windows or Linux clients often, so I don’t know how well it works for them. It’s possible some of these options are not required, as they’ve accumulated over time.

Share Config

The share itself is configured like so:

[TimeMachine NAS]
path=/pool1/backup/timemachine
comment=Time Machine
valid users = alex
writable = yes
durable handles = yes
kernel oplocks = no
kernel share modes = no
posix locking = no
ea support = yes
browseable = yes
read only = no
inherit acls = yes
fruit:time machine = yes

According to the docs, “fruit:time machine = yes” sets durable handles, kernel oplocks, kernel share modes and posix locking – you can probably omit these.

/pool1/backup/timemachine is a ZFS volume with a quota, which was set with “zfs set quota=3TB pool1/backup“. The available space is reported correctly to the client (Finder), so I’d expect it to work fine for restricting disk usage, and for time machine to manage its snapshots.

See also

Backups – au revoir Urbackup, bon jour syncthing!

A while ago I wrote a post about my backup solution and replacing Crashplan – a once great product I was a happy user of. It served pretty much all my backup needs in one product, but alas it was too good to last.

Eventually I settled on Duplicati on my home server backing up to Backblaze, and Urbackup to back up my various devices to the NAS. But since then a few things have changed:

  • The upgrade to Ubuntu 18.04 broke the Urbackup installation on my server. I never really got around to fixing it, so my device backups have been manual. Fortunately the server hosts the important stuff, and I don’t keep much on my devices that aren’t saved elsewhere, but it’s still not ideal.
  • If a broken server wasn’t enough, Urbackup discontinued support for MacOS earlier this year, which made the product useless to me.
  • Perhaps somewhat mitigating this for Mac clients, the Samba project released version 4.8.0, which includes support for MacOS time machine (see “Time Machine Support with vfs_fruit”).
  • Dropbox have started being dicks.

… Dropbox?

Er, yeah. Despite writing “I think that you should never use Dropbox for anything remotely private or sensitive”, words that I stand by today, I have not only been using Dropbox… but for private and sensitive things.

Continue reading

Life after Crashplan

Crashplan’s email to home customers

If you’re reading this and don’t know me personally, you’re probably aware that Crashplan decided to “sunset” their Crashplan Home offering on August 22nd last year. No new subscriptions are being taken, and it will cease to exist from August 2018. Unfortunately, my subscription expired in December.

I was hugely satisfied with Crashplan, and thought it was by far the best online cloud backup solution in the market for the average home user.

  • It offered free peer-to-peer backups which meant I could backup my devices to my own server, or even trade encrypted backups with friends.
  • The client to backup to your own devices was free, and the cost for online cloud backups was a very-reasonable $150 USD for 12-months of unlimited backup storage.
  • By virtue of being written in Java, the client was available for Windows, Mac and Linux (I have all 3).
  • It supported headless operation, albeit with a bit of jiggery-pokery, i.e. editing the client config file to point to another agent via an SSH tunnel. This meant I could run it on my home NAS device, which naturally stores my important data (Photos mainly).
  • No limits on the number of devices that were backed up, or charges per-device.

Naturally, I was disappointed when they announced they were discontinuing it. “No worries!” I thought, there must be something else out there. As it turns out, Crashplan Home was almost too good to be true. Continue reading

Archival Storage Part 1: The Problems

All of us have data which has value beyond our own lives. My parents’ generation have little record of their childhoods, other than the occasional photo album, but what little records there are, are cherished. My own childhood was well preserved, thanks to the efforts of my mother. Each of my brothers and I has a stack of photo albums, with dates and milestones meticulously documented.

Today, we are generating a massive amount of data. While the majority of it will not be of interest to future generations, I believe preserving a small, selective record of it, akin to the photo albums my mother created, would be immensely valuable to my relatives and descendants – think of your great grandparents jewellery, a photo album of your childhood that your parents created, immigration papers of your predecessors.

Modern technology allows us to document our lives in vivid detail, however the problem is that the data is transient by nature. For example, this blog is run on a Linode server – if I die, the bill doesn’t get paid and Linode deletes it. If Linode goes away, I have to be there to move it to a new server. If Flickr goes away, my online photos are lost. If Facebook goes away, all that history is lost. Laptops and computers are replaced regularly, and the backups created by previous computers may not be readable by future ones, unless we carry over all the data each time.

In part one of this series (this article) I document the problems of common backup solutions for archival storage, with reference to my own set-up. In part two, I’ll detail my “internet research” into optical BD-R media and how it solves these problems, and in part 3 I’ll deal with checksums and managing data for archival (links will be added when done).

Part 1 is fairly technical, so if you just want safe long-term storage, install and configure Crashplan, and skip to part 2.

Continue reading

Configuring the backup system

This article is part of a series about setting up a home server. See this article for further details.

Surprisingly, this is one of the easiest bits. If you don’t mind sticking with the options presented by the GUI, Back In Time makes backups so simple it’s almost criminal not to use it. The use of the GUI itself is fairly straightforward so I’m not going to go step by step and instead go for the important bits.

Just make sure you use the root shortcut (Back In Time – root) to prevent any permissions problems.

I’ve used NTFS for the backup volume because it supports hard links and is readable by Windows machines if something goes wrong. A native Linux file system would be preferable for many, but whatever you do don’t use FAT32 (FAT32 doesn’t support hard links, so every snapshot would consume 100% of its size whether the file was changed since the last backup or not).

Creating the Job

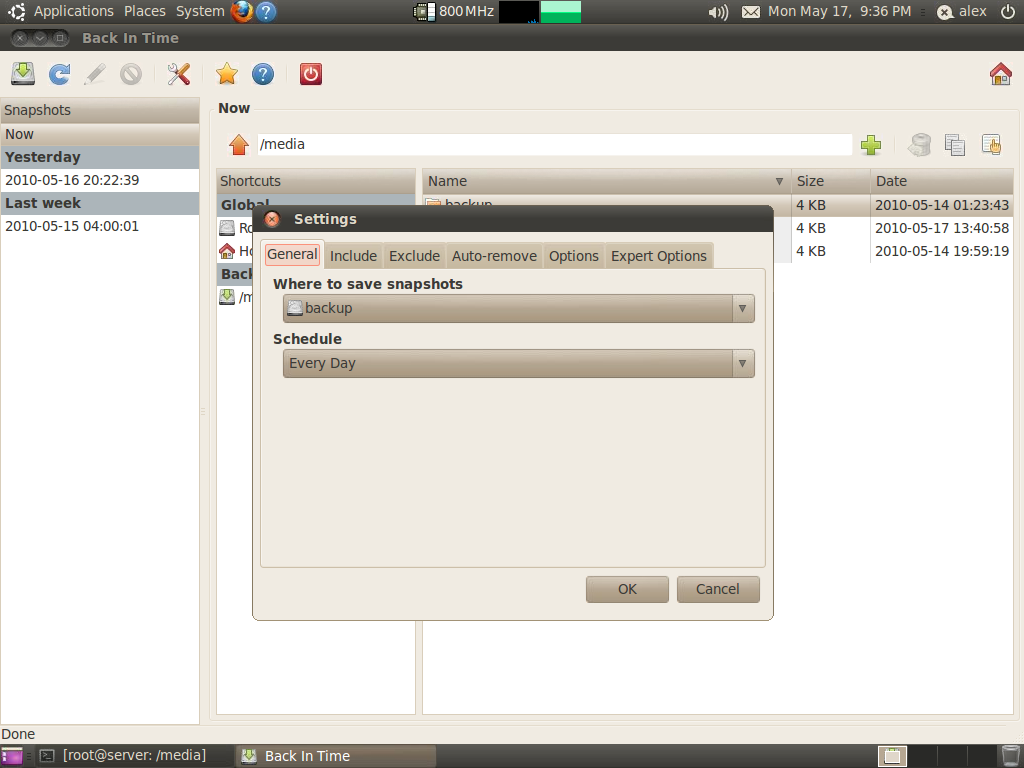
This is all done in the settings menu, which isn’t labelled but represented by the classic screwdriver and spanner icon – intuitive enough.

Under General, make sure you’re saving snapshots to your backup volume. Set the schedule to whatever you like, but I prefer to handle the schedule manually as it doesn’t give enough options. For a desktop machine the “daily” option would make sense, but as this machine will be on 24/7 I want it to run at a set time each day, not whenever it feels like it. So we will setup a cron job manually later.

Under the Include tab add your data folder (/media/data). Under exclude I removed all the preset options as I want everything on the data volume backed up. Everything that is except the lost+found folder, so I would suggest clicking Add folder and adding “/media/data/lost+found”.

The auto-remove options are up to you. I set the free space threshold to 1Gb, checked the smart-remove box, and chose not to remove named snapshots as they all seem fairly logical. The expert options don’t really need tweaking unless you want to do different schedules for different folders.

Click OK to save and you can now take a backup.

Altering the schedule

As I explained above we want to make sure the backup runs at a set time, which the gui for Back In Time doesn’t allow for, so fire up a terminal and enter the command: ‘sudo crontab -e’

The crontab is like task scheduler on Windows, but arguably a lot more powerful and flexible. The ‘-e’ option just tells crontab to edit the existing crontab instead of overwriting.

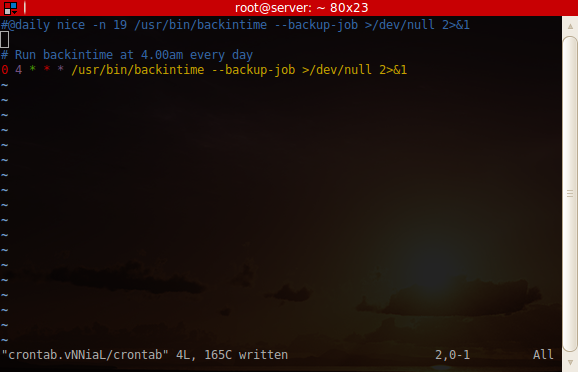
The screenshot below shows my crontab.

The @daily line is the line that the Back In Time gui added. I’m not so concerned about ‘niceness’ at 4am (nice values on Linux serve the same purpose as task priority on Windows), so I left that out. The final line is:
0 4 * * * /usr/bin/backintime --backup-job >/dev/null 2>&1

For an explanation of the crontab, see this crontab quick reference. Basically all you need to know though, is that the first number is the minute and the second is the hour. So if for example you would rather it ran at 1.30am instead of 4am, change the first number to 30 and the second to 1 so it reads:
30 1 * * * /usr/bin/backintime --backup-job >/dev/null 2>&1

Later on we will modify this to also email the result.

Important Caveat

I just discovered that the Back In Time gui blitzes any lines in the the crontab that contain the string “backintime” whenever you click OK from the preferences window. This is a rather annoying problem, as I can easily see this happening.

I recommend making sure the gui schedule is set to every day rather than disabled, which means that if someone does fiddle at least the backup will still happen once a day. The solution to this is to call a wrapper script which does not contain “backintime” in its name… I’ll update this once I’ve written and tested it.

Next part – Monitoring and email configuration

Simple File Backup to Email Script

Here’s a file backup script I installed for a client. The original outline came from a post on the ubuntu forums (I forget where exactly), but it’s simple enough. It creates an archive in /tmp, zips it up, emails it then deletes the archive. If your target is a linux computer then it makes more sense to gzip it by adding a “z” to the tar options (i.e. tar -czf) and removing the zip line.

#!/bin/bash
#
# Simple file backup script, creates archive in /tmp and emails it.
#
# Software required:
#  zip
#  tar
#  mutt

# Variables
[email protected]
SOURCE="/home/user1 /home/user2"
SERVERNAME=server.example.com
MAIL=`which mutt`
ZIP=`which zip`
DATE=`date +%Y_%m_%d`
FILE=myfiles-$DATE.tar
DESTINATION=/tmp/$FILE
ZIPFILE=$DESTINATION.zip

# Actions
tar -cf $DESTINATION $SOURCE 2> /dev/null
$ZIP $ZIPFILE $DESTINATION
$MAIL -a $ZIPFILE -s "Backup for $DATE" -s "$SERVERNAME backup $DATE" $MAILADDR < /dev/null
rm $ZIPFILE $DESTINATION

For mutt to work you need an MTA (mail transport agent) such as postfix. If it’s not installed and you don’t need it for anything else, configure it as a satellite system (the Ubuntu/Debian packages prompt you on install and satellite system is an option). This prevents spammers from using it as a relay, and ensures the mail goes to your real mail server.