Tag Archives: ubuntu

OS and package installation

This article is part of a series about setting up a home server. See this article for further details.

I did a simple install of Ubuntu using the alternate media written to a USB stick. You could use the ordinary desktop CD, or Ubuntu server (but you will need to install a lot more packages on the server version). I did not configure the raid arrays on install. The reason for this is that I didn’t have all the disks ready, but I didn’t want to install OS data on them anyway.

Installing packages

For media playback, the medibuntu repository is essential. See the Medibuntu site for more info, but the commands I used (lifted straight off the Medibuntu site) are:
sudo wget --output-document=/etc/apt/sources.list.d/medibuntu.list http://www.medibuntu.org/sources.list.d/$(lsb_release -cs).list && sudo apt-get --quiet update && sudo apt-get --yes --quiet --allow-unauthenticated install medibuntu-keyring && sudo apt-get --quiet update

sudo apt-get --yes install app-install-data-medibuntu apport-hooks-medibuntu

Next I installed some additional software:

aptitude install openssh-server backintime-gnome gstreamer0.10-plugins-ugly gstreamer0.10-plugins-bad gstreamer0.10-ffmpeg ntp samba winbind libpam-smbpass apache2.2-bin lib-apache2-mod-dnssd mdadm

Some of these warrant explanation:

  • The gstreamer plugins packages are codecs, which may or may not be legal in your country depending on its stance on patents (like anyone really pays an attention to that). However you need to ensure you have codecs available for any media you wish to play back.
  • ntp is for time synchronisation, which isn’t strictly necessary in a home environment but I like to have an accurate source of time on any network.
  • samba, winbind, libpam-smbpass, apache2.2-bin, lib-apache2-mod-dnssd are all related to file sharing. Winbind allows the system to lookup other hosts with Netbios, which Windows uses on small networks without a local DNS server (like most homes). I don’t feel it is necessary to provide a DNS server in a home with non-technical users, and to me it is for a network appliance such as an ADSL router to handle anyway.
  • apache2.2-bin and lib-apache2-mod-dnssd are required for the “personal file sharing” control panel in Gnome to work. The developer has stated that the Apache won’t be required in the future (see this bug report for details. You may not need this functionality for your home server, but I thought it was nice to have in case it’s needed.
  • mdadm is for raid
  • gdisk is for partitioning GPT partition tables. If you prefer to stick with MBR partition tables you don’t need this

Installing NeatX

NeatX is a free implementation of NoMachine’s nx server, originally written by Google for an internal project. It seems to be the easiest and quickest way to get going with Windows RDP equivalent functionality, in fact it’s just a few lines:
add-apt-repository ppa:freenx-team/ppa
aptitude update
aptitude install neatx-server

Next simply download the client from nomachine.com and away you go. There are a few rough edges and I have encountered errors on reconnect, but it’s good enough for me. It is much more efficient than VNC, and the speed increase is more than enough for me to put up with the bugs.

Internal Errors on reconnect

If you encounter internal errors when connecting, delete all directories from /var/lib/neatx/sessions. For some reason it isn’t always cleaning up properly, even if you logoff.

Next part – Configuring the raid array

An Ubuntu 10.04 Home Server

I’ve recently been setting up a home server for my parents using lucid. While it’s not quite a point and click setup process, the process is a lot more streamlined than it used to be.

They have an individual computer each running Windows 7 and, one laptop between them running XP. Mum is also a photographer and generates a large amount of data. Dad also generates a fair bit of data, less than Mum although he does do the occasional home video.

Backups are an ad-hoc affair. Mum has three hard disks in her computer which she manually copies files between and tries to ensure she has two copies of everything. Dad has a portable external drive which he backs up to infrequently. Between them, neither is confident that they’d get all their data back in the event of a disaster.

Dad also liked how my HTPC (running XBMC) worked, and decided one of those would be nice too. So I decided to setup a home server for them and solve all their computer problems. Well, almost.

I started writing this as a single article, but it got a bit long so I’ve decided to break it up into a series. This first post is an overview, the links to the other posts are at the bottom of this article.

I’m assuming a fairly good degree of technical knowledge here, but if there are any gaps you feel I should add please feel free to leave a comment. I am aiming this at a reader who is familiar with Linux and Ubuntu, has installed software with apt-get or Synaptic, is comfortable with using the command line, and understands the implications of using raid5.

Overview

This home server will perform the following tasks:

  • Play music and video via the TV
  • Present a file share to the network, with individual folders for Mum and Dad
  • Backup the contents of their folders nightly to an external hard drive
  • Provide a GUI-based remote administration interface
  • Monitor backups and the raid array, sending emails to both Mum and Dad if something is amiss

Software that needs to be configured to perform these tasks:

  • MDADM for RAID
  • Xbox Media Center (XBMC) for media playback
  • Samba for file sharing
  • Back in Time for backup
  • NeatX for remote administration

The main boot device in this case will be an IDE compact flash card. I did this partly because it makes recovery easier (just write an image to a flash card rather than a whole hard drive), but mainly because it frees up a SATA port!

The hardware components for this particular HTPC are:

  • Gigabyte M85M-US2H motherboard
  • AMD Athlon II 250
  • 2gb DDR2 ram
  • 4x640gb Western Digital 6400AAKS hard drives
  • 1x1TB Western Digital Green
  • 1x2TB Western Digital Green (in external esata case)
  • 4 Raidon/Stardom hotswap drive bays
  • IDE Compact Flash adaptor and 8gb 133x CF card

A note on raid

The 4x640gb drives are configured in a raid 5 array. Personally, this is about as large an array as I would trust Raid5 to, the future is redundancy at the file system layer, as ZFS and Btrfs are capable of. ZFS can’t be used in the Linux kernel and Btrfs isn’t even close to production-ready yet, so for now I believe Raid is still the most sensible option. But if you’re reading this in 2012, you should probably be using Btrfs instead.

Storage

The 1TB hdd is just a single disk for media to be played back on the TV. Anything here is considered replaceable (think of it like the internal HDD in a MySky or TiVO box), so it won’t be backed up at all.

The 2TB hdd is the backup drive. Each night the entire raid array is backed up to it with Back in Time, configured to take snapshots. Since it uses rsync, the backups are incremental and shouldn’t take more than a few minutes to run, depending on how much was changed during the day. Obviously as the array nears capacity fewer snapshots will be able to be kept, and once it does the idea is to replace the 2TB backup hdd with a new one, keep the old one as an archive, delete any data from the raid array that is no longer current, and start again with a fresh clean backup disk. Hopefully by then it will be a 3 or 4TB disk and they can keep more snapshots!

The file system on the backup HDD will be NTFS. This is because it supports hard links and is readable by the Windows machines, which is important for my parents when they go to retrieve files from the archive.

Final notes before we get to the nitty gritty

I had a bit of trouble getting the drive bays lined up with the ports that the OS reported they were attached to. This is important because if mdadm tells Dad that the sata disk on port x has failed, I need him to be able to know that it’s the disk in bay x. Unfortunately on the motherboard I used, Ubuntu assigns them like so:

0 – 1
1 – 3
2 – 2
3 – 4

(motherboard port – ubuntu port)

So while your motherboard may be better designed than mine, don’t assume they are in the same order. The links to the follow-up articles are below:

Changing compiz animations for specific windows in Linux

I use the terminal program Guake on my Ubuntu 9.10 laptop, which is really handy for quick access to a terminal window (I changed the shortcut key from F12 to Alt+~ though, which makes more sense to me as it’s more like Quake :-)).

With Desktop Effects enabled though, the default animation doesn’t quite look right. So to change it I needed to figure how to change the animation for a specific window. Fortunately the process is reasonably simple.

First you need desktop effects enabled, and the CompizConfig Settings Manager (CCSM) installed:
sudo aptitude install compizconfig-settings-manager

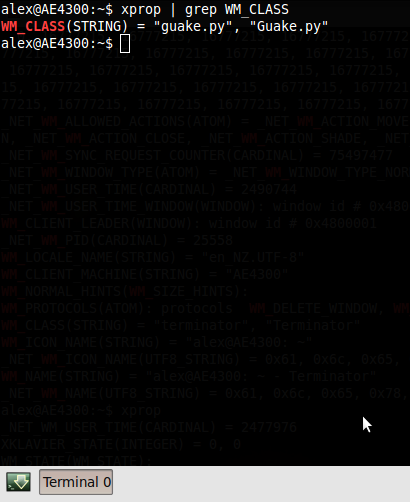
Next, you need to know the “class” of the window you want to change (which to confuse matters is interpreted as the “name” in compizconfig). To get the class/name, enter the following command in a terminal:
xprop | grep WM_CLASS

The cursor should change to a cross, at which point you need to click on the window. You should get something like this:
Getting the window class with xprop

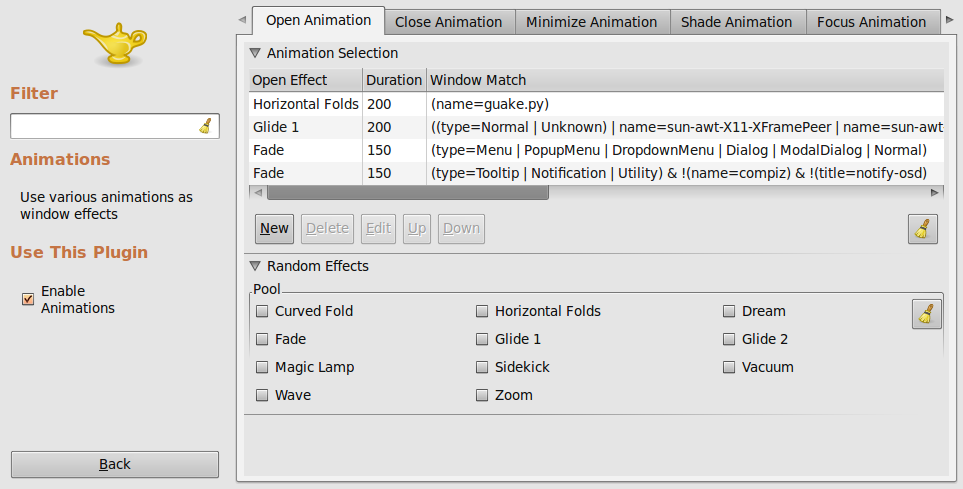
Next, open CCSM by going to System > Preferences > CompizConfig Settings Manager. Click on Animations.

To add a rule for the window you want to customise, click New, choose the effect and duration (200 is a good number). Under “Window Match”, enter the following:
(name=[WM_CLASS])
Where “[WM_CLASS]” is the first field from the xprop output gathered earlier (“guake.py” in my case). CCSM seems to only match the first value for WM_CLASS, as “Guake.py” didn’t work. Refer to the screenshot below for an example.

Screenshot-CompizConfig Settings Manager

Finally, you need to make sure that this rule is at the top so that it matches before any other rules. Simply highlight your new rule and click the up button a few times.

Ubuntu 9.10 boot stats

Bear in mind this is alpha 6. I timed from the end of the bios loading (about 8 seconds, so it’s 46 seconds from power on to idle desktop):

0s – OS starts to boot
24s – at logon screen
38s – desktop loaded, hdd idle

This is not a fresh install as I’ve been using it for a few days, however I did stop postfix and samba from loading at boot (these aren’t installed by default anyway). I’ve also added KVM.

This is pretty impressive performance, but not enough to make sleep or hibernate redundant, and it doesn’t really blow Windows 7 out of the water either.

Specs:

  • Dell E4300
  • Core 2 Duo 2.26ghz
  • Seagate 7200.4 500gb laptop hard drive

Bring on the SSDs – at $900 the Intel 160gb X25-M G2 is still way too expensive and would have to drop by about 60% before I’d even consider one.

HDD failure warning in Ubuntu Karmic (9.10)

I started to write a blog post about my backup solution, but didn’t actually finish it before this happened. I only got it running on Wednesday this week, when today my laptop (running Ubuntu 9.04) refused to boot! I was getting a lot of I/O and “DRDY ERR” error messages. The boot process mounted the drive read only, dropped me to a shell and told me to run fsck manually (not terribly helpful for inexperienced users I might add).

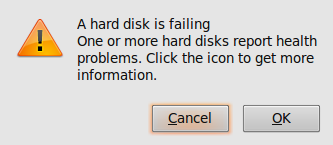
Anyway, instead of doing that I elected to reboot from a flash drive with 9.10 alpha6 on it, and examine the disk from a properly working system. After booting Karmic, I was greeted with the following message:

Screenshot-gdu-notification-daemon

How thoughtful!

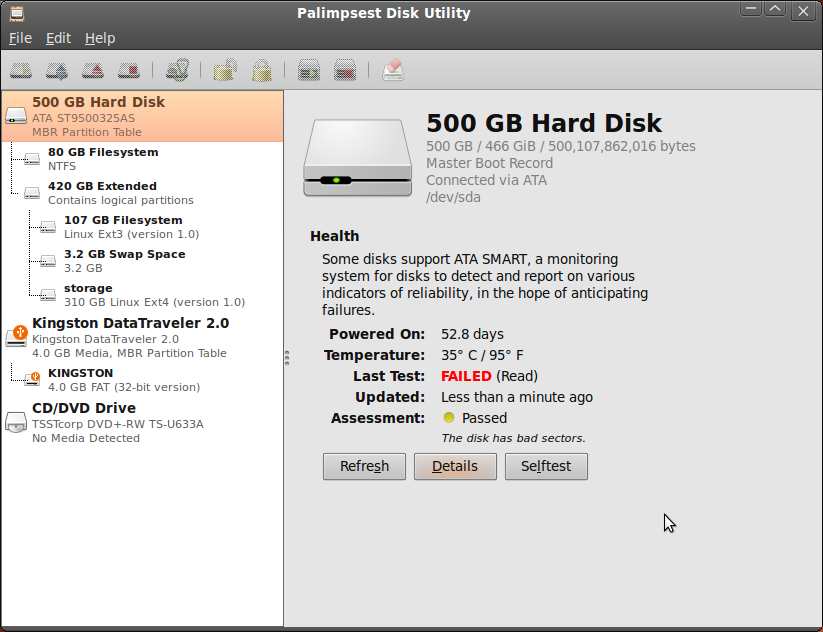
The “icon” it’s referring to is a little disk icon in the top right of the screen with an exclamation mark on it. Clicking on it brings up the new Palimpsest Disk Utility – a nice step forward from 9.04, which only included gparted. There’s not really anything wrong with gparted, but its main focus is on partitioning and it doesn’t have other disk management features such as SMART monitoring. And Palimpsest does present a nice interface:

Palimpsest Disk Utility

Bad sectors are not a good sign, so it would seem that this not-very-old 500gb hard drive is on the way out.

To “repair” the bad sectors (i.e. make sure the filesystem doesn’t use them), I ran “fsck -c /dev/sda5” (sda5 is my root partition, the one that was giving me trouble). This runs the filesystem check in conjunction with the badblocks tools. For now it’s up and running again, but I’ll be replacing the drive and restoring my data before sending it off for RMA!

It looks like I won’t need to go back to a backup, but this certainly shows the value of regular backups and when my laptop failed to boot I was extremely glad I had them!

Ubuntu 9.10 beta is only a week away, and so far “Karmic Koala” is shaping up to be a solid release.

Ubuntu 9.10 Alpha 6 Impressions

So it’s Saturday night and… I’m blogging about Karmic Koala. My social life has really taken off recently.

But on a more serious note I took alpha 6 for a spin on my E4300, and so far I’m impressed. I haven’t actually installed it to the hard drive yet, just booted from a USB key. But everything’s working well so far, and kernel mode setting is just the bees knees. It’s amazing how much of a difference it makes when switching terminals – it’s instantaneous. You will definitely want to be running an Intel or ATI card for this version.

I’ll be upgrading permanently once the beta comes out, so I’ll go into more detail then. I’ll also be refreshing my Mythbuntu media PC (Athlon II 250, Geforce 8200 motherboard), older laptop (HP nx6120), and maybe my old desktop (Intel P35 + ATI 4850), which gives a pretty broad coverage in terms of hardware testing. I’m looking forward to seeing if battery life has improved, as when Vista gets 5 hours and Ubuntu just over 3, you know something’s wrong.

It will also be nice to have an up to date browser again – Firefox 3.5 under Jaunty is not well integrated. Can’t comment on the boot speed as my flash drive is rather slow (and the live distro is not really indicative anyway). I tried to have a go with the new gnome-shell too, but unfortunately couldn’t get it to load. All I did was aptitude install gnome-shell from the live usb distro, so hopefully I’ll be able to get it working after installing the beta.

Decided it’s time to finally wipe Windows too, I never boot to it so it’s just a waste of 80gb. Believe it or not, this will actually be the first time I’ve not had Windows installed on my main computer, so quite a milestone really. It’s been over 3 years since I switched to using Ubuntu as my main OS, and looking back at Ubuntu 3 years ago it has come a long way. Edgy Eft (6.10) was usuable but rough (wireless networking was huge pain), and 7.04 was a big improvement. 7.10 was one of those high points, and was when I first started seriously recommending Ubuntu to others as a replacement for Windows. Then 8.04 with pulseaudio was a bit of a mixed bag but otherwise pretty solid, and 8.10 was a rather unexciting steady improvement. 9.04 was a big step forward with much faster boot times but big problems with the Intel graphics driver. 9.10 looks to resolve most of the Intel graphics regressions but I think we’ll find there will be room for 10.04 to improve again.

That’s one of the things I like about following Ubuntu – we get new toys to play with twice a year.

Bluetooth problems on Ubuntu 9.04

I was having trouble getting my USB Bluetooth dongle working on Ubuntu 9.04. The device itself was really cheap ($10 NZD), but from reading the bugs this isn’t the only device having issues. Below is the lsusb line of my device:

Bus 007 Device 002: ID 0a12:0001 Cambridge Silicon Radio, Ltd Bluetooth Dongle (HCI mode)

The problem was that it was extremely flaky, sometimes it would show up and allow me to scan for devices but usually it wouldn’t. Sometimes “/etc/init.d/bluetooth restart” would bring it to life, but usually not. Another symptom was “Inquiry failed: Connection timed out” when doing a scan (sudo hcitool scan).

In the end the solution was upgrading to the latest version of blueman. There are packages available for Ubuntu 9.04 in the blueman ppa on launchpad: https://edge.launchpad.net/~blueman/+archive/ppa

Add the ppa to your software sources list (instructions on the page), and then do:

sudo aptitude update
sudo aptitude safe-upgrade

After a reboot I was good to go, pairing and file transfers worked perfectly!

Update

This worked on my laptop but not my media PC, despite them both running 9.04 (media PC is mythbuntu however). I also tried updating to the bluez packages from Karmic which didn’t improve the situation. For all the time I’m spedning on this, I think it’s going to be more sensible to buy another bluetooth adaptor.

Setting up a local apt-cache on Ubuntu

Anyone with more than one Ubuntu machine on their network should do this, basically it sets up an apt proxy server so that once a package has been downloaded once by a computer on your network, the rest can get it locally.

To install it:

sudo apt-get install apt-cacher-ng

Browse to http://localhost:3142 and you should see an error page of sorts telling you to edit apt.conf. Ubuntu however splits the apt.conf file into a directory, so instead we create a new file in that directory:

sudo nano /etc/apt/apt.conf.d/02cache

Paste the following line into the file (highlight to copy, middle click to paste):

Acquire::http { Proxy “http://192.168.1.2:3142”; };

And then press Ctrl+O to save followed by Ctrl+X to exit. Replace 192.168.1.2 with your apt cache’s IP address, or hostname if you have DNS. Using DNS is preferable if it is available, but most home networks won’t have a DNS server.

You then need to add the apt.conf.d file to each machine on your network in order for them to download their packages through your proxy.

See http://localhost:3142/acng-report.html for information and maintenance tasks.

Edubuntu for Vanuatu

Over the past few days I’ve been setting up a few old computers to send to a school in Vanuatu. They’re fairly modest machines but still perfectly usable (albeit not with Vista); P4 1.6ghz, 256mb ram, 40gb hdd. They even have nvidia vanta graphics cards (which sadly can’t do OpenGL – it would have been nice to load Stellarium on the machines). They also have brand new 17 inch LCD monitors, as the bulky CRT monitors that they had originally can’t be taken over as luggage on the plane.

The computers are going accross with students as part of a cultural exchange trip, which allows the students to experience life in Vanuatu. The school they are visiting has virtually no IT expertise – when our english teacher sets them up he will be the closest thing they have to a systems administrator!

This makes is more important for things to just work, but there are also other challenges. We could just roll back the machines to the Microsoft operating system they are licensed for (Windows 2000), install a few Open Source applications such as Open Office & Firefox, and send them on their way. However a computer setup in this way doesn’t even begin to realise the potential of computers as tools for teaching and learning.

In the end it was a pretty easy decision to install Edubuntu on them. Edubuntu comes with all the usual productivity tools (the base Ubuntu system), plus a whole lot of “edutainment” packages (games), and also some specific tools to aid the teaching of specific subjects. You don’t get an equivalent setup on Windows 2000 without a lot more effort or a lot of money. Windows 2000 is now 8 years old, and well past its use-by date anyway.

The timing actually turns out to be quite bad however, as Edubuntu 7.10 is now 6 months old, and the LTS version 8.04 is about to be released. But I would rather send over a fully patched Gutsy system than a beta Hardy system, so that is what they’re getting.

The school also asked if we had an old library cataloguing system that they could use, as their one has “crashed”. Unfortunately I only heard about this yesterday, otherwise I could have set up koha on another machine. Koha is an open source intergrated library system that was originally developed by a New Zealand company. There may yet be time to do this, but I have never even looked at it before so it would be a bit of a rush job.