Some of the links in this article are Amazon affiliate links, which pay me a commission if you make a purchase.
I could have brought a plain old Ryzen, a Core i7 or even another Core i5. But with Intel sitting on its hands the past 5 years in the face of no competition, I decided it was time to splash out and reward AMD for not only investing in CPUs again, but making an interesting high-end desktop product while not nickel & diming its customers over PCI-E lanes.
And so, I brought a 1920X.
I don’t really need 12 cores. Other than general browsing, my PC is used for work, (coding) plus a bit of gaming, and a gaming CPU this is not. Running multiple VMs and M.2 devices without slowing down will be nice, but this build is mostly overkill for my needs. And that’s really the point!
Water Cooling
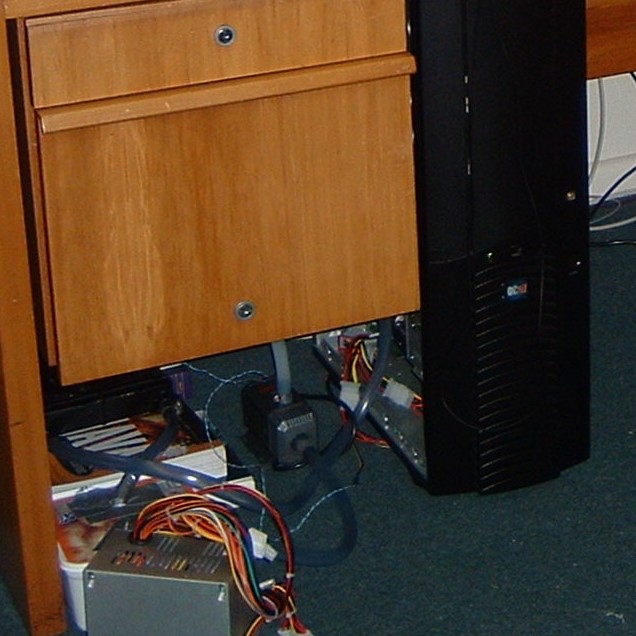
This 180W beast requires a fairly exotic cooling solution, so I decided it was time to do a proper water cooling loop. This is not the first time I’ve done water cooling however. That honour goes to this beauty:
I apologise for the poor photo but it’s the only one I have (it was never pretty). What you’re looking at is an Eheim water pump (sitting to the side of the case, naturally), attached to a heater core from a Honda Civic, with a Java text-book propping it up to give some space for air flow, feeding into a plastic ice-cream container (note the duct tape… that was probably the only thing stopping it from sucking air). There was a 170mm Nidec fan running at a low-speed pushing air through (or quite possibly around) the radiator if I recall correctly. Wired, of course, with some old twisted-pair copper wire.
At least I clamped the hoses.
The only part of the cooling loop that was actually inside the case was a copper liquidcc gen1 waterblock (similar to this, but an earlier, less-refined model), bolted to the AMD Palomino Athlon XP 2100+ on a Gigabyte 7DXR+ motherboard. At the time I thought it was a hot little chip, but the TDP of that CPU is only 65W. You could have practically cooled this thing passively with modern tower coolers.
The plan was to integrate all this (minus the ice-cream container reservoir) into the gigantic full tower case, but it never materialised. How I was going to do it without some serious metal working equipment was never thought through.
I did later improve the loop with an internal reservoir, which subsequently leaked after I used some reinforced tubing which put too much torque on it and allowed some fluid to leak on to the floor of the case (fortunately well away from any electronics).
But it’s fair to say my earlier forays in to water cooling have not been particularly neat or successful.
Fortunately, I can afford to do it properly now; earlier attempts were in my student days and on a very tight budget.
The Full Parts List
The Amazon prices are probably not the same as the table above, as I purchased the bits from three sources: Overclockers UK (water cooling), eBuyer (CPU, motherboard, ram), and CCLonline (Case, PSU). The SSD did come from Amazon, as they were the cheapest, as did the kill coil, but only because Overclockers didn’t have any stock! I overpaid by about £4.
The first thing you might notice is the absence of a graphics card. There are a couple of reasons for this; the main one being that Ethereum/Bitcoin miners are creating a lot of demand, so it’s hard to get one at a reasonable price. Also, gaming is really secondary for me, and for now I’m happy with my existing R9 380X. I also considered putting less memory in it because ram prices are mental, but swallowed it in the end. No point having 12 cores with little or slow memory!
All up, this is by far the most money I’ve ever spent on a single computer, and I’m unlikely to spend this amount again.
At I write this, 3 of 4 boxes have arrived, I’m just waiting for the last parcel from DPD – despite paying for Saturday delivery, I still haven’t received it. Yesterday (Saturday), the courier had a flat tyre, and today he couldn’t find my address, despite me entering it in to the DPD site and explicitly choosing the correct one from the list they provided.
Expect a follow-up post with build pictures and learnings from the experience.

