Tag Archives: linux

Au Revoir Ubuntu, Bonjour Fedora

If you check the about page and previous posts you’ll note that I’ve been travelling the past few months. In fact I’ve just settled in London and started looking for a job.

There are several shortcomings on my CV that have made it difficult to get past the recruitment agents for a lot of the roles I am interested in. Firstly there’s the lack of big corporate experience – I worked as a technical consultant on a major corporate contract for close to 6 months but the majority of my experience (including almost all of my “BAU” experience) has come from the education sector. Secondly, there’s lack of experience on 100+ Linux server sites (unfortunately no schools are that big in New Zealand, and we don’t have the federated district IT model that many state schools operate in the US). Finally and perhaps most critically is the lack of production experience with Red Hat Linux.

My own personal Linux dabbling experience has come from Ubuntu and Debian Linux. At work it’s been Debian and SUSE. However the number of roles that mention these distributions in the UK is insignificant compared to the number that mention RedHat and CentOS (CentOS is a clone of Red Hat Enterprise Linux, basically Red Hat with all the branding stripped and separately maintained repositories). In New Zealand Red Hat is hardly an endangered species, but roles that mention it are similar in number to those that mention Debian, SUSE and even Ubuntu, so lack of experience with it is not really an issue.

In the UK however, it most certainly is an issue for recruiters searching for “Red Hat” in CV databases. So it is for this reason that I must farewell Ubuntu and switch to the red team – which if I am to take this seriously means adopting Fedora (presently Fedora 13) for my day to day computing.

I made the switch yesterday, and so far no problems. There is less hand-holding for sure, but I like how it doesn’t try to hide what’s happening under the hood. The flexible installer was also nice, if not as attractive as Ubuntu’s. I also like how Fedora ships software as the upstream maintainers intended – this strikes me as a more sustainable long term solution than having to backport distribution-specific patches every release, but at the same time it doesn’t have the “coherent vision” of Ubuntu, and there are some niceties in Lucid that I really appreciated such as the messaging notification area.

As a professional tool for software developers and Linux IT professionals, Fedora is a fine choice. For end-users and Linux enthusiasts who don’t have to use a specific distribution in their work, Ubuntu is generally an easier distribution to get in to. In fact I wouldn’t recommend Fedora for anyone other than Linux geeks because only the two most recent versions are supported. This means a forced upgrade every 12 months minimum. Ubuntu LTS releases on the other hand are supported for 3 years on the desktop and 5 on the server. The previous 8.04 LTS release will still be supported on the desktop until April 2011. Install Lucid today and you will get security updates for it until April 2013.

Why not CentOS 5.5? Too old. Having been accustomed to the current versions of software shipped with Ubuntu it’s a bit hard to go back to Gnome 2.16! (Gnome 2.16 was released in September 2006 and was the version shipped with Ubuntu 6.10, Fedora 13 ships with the current stable 2.30 release).
As desktop distributions, CentOS and RHEL are simply too far behind to be competitive, except in large environments with legacy apps which require absolute stability of APIs. However modern applications are often browser based, so for any environment considering a desktop deployment of Linux that doesn’t depend on legacy desktop software, I’d be suggesting a very hard look at Ubuntu LTS.

Despite the title I won’t be abandoning Ubuntu entirely, in fact I play to keep tabs on each release (maybe even dual boot to test each one) but professional needs have dictated that I upskill in “the Red Hat way”. Let’s hope this has a happy ending!

Configuring the backup system

This article is part of a series about setting up a home server. See this article for further details.

Surprisingly, this is one of the easiest bits. If you don’t mind sticking with the options presented by the GUI, Back In Time makes backups so simple it’s almost criminal not to use it. The use of the GUI itself is fairly straightforward so I’m not going to go step by step and instead go for the important bits.

Just make sure you use the root shortcut (Back In Time – root) to prevent any permissions problems.

I’ve used NTFS for the backup volume because it supports hard links and is readable by Windows machines if something goes wrong. A native Linux file system would be preferable for many, but whatever you do don’t use FAT32 (FAT32 doesn’t support hard links, so every snapshot would consume 100% of its size whether the file was changed since the last backup or not).

Creating the Job

This is all done in the settings menu, which isn’t labelled but represented by the classic screwdriver and spanner icon – intuitive enough.

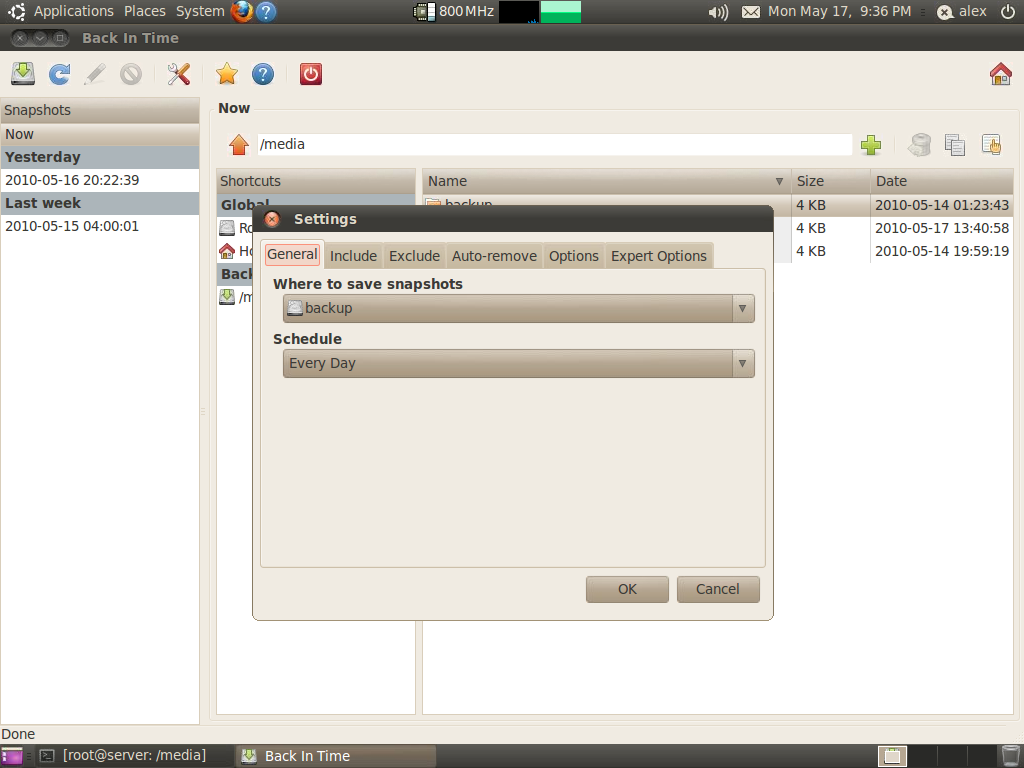
Under General, make sure you’re saving snapshots to your backup volume. Set the schedule to whatever you like, but I prefer to handle the schedule manually as it doesn’t give enough options. For a desktop machine the “daily” option would make sense, but as this machine will be on 24/7 I want it to run at a set time each day, not whenever it feels like it. So we will setup a cron job manually later.

Under the Include tab add your data folder (/media/data). Under exclude I removed all the preset options as I want everything on the data volume backed up. Everything that is except the lost+found folder, so I would suggest clicking Add folder and adding “/media/data/lost+found”.

The auto-remove options are up to you. I set the free space threshold to 1Gb, checked the smart-remove box, and chose not to remove named snapshots as they all seem fairly logical. The expert options don’t really need tweaking unless you want to do different schedules for different folders.

Click OK to save and you can now take a backup.

Altering the schedule

As I explained above we want to make sure the backup runs at a set time, which the gui for Back In Time doesn’t allow for, so fire up a terminal and enter the command: ‘sudo crontab -e’

The crontab is like task scheduler on Windows, but arguably a lot more powerful and flexible. The ‘-e’ option just tells crontab to edit the existing crontab instead of overwriting.

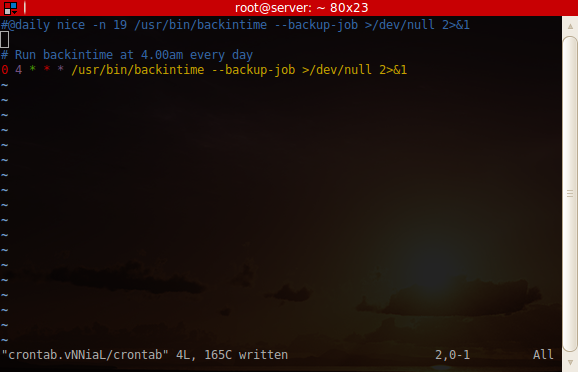
The screenshot below shows my crontab.

The @daily line is the line that the Back In Time gui added. I’m not so concerned about ‘niceness’ at 4am (nice values on Linux serve the same purpose as task priority on Windows), so I left that out. The final line is:
0 4 * * * /usr/bin/backintime --backup-job >/dev/null 2>&1

For an explanation of the crontab, see this crontab quick reference. Basically all you need to know though, is that the first number is the minute and the second is the hour. So if for example you would rather it ran at 1.30am instead of 4am, change the first number to 30 and the second to 1 so it reads:
30 1 * * * /usr/bin/backintime --backup-job >/dev/null 2>&1

Later on we will modify this to also email the result.

Important Caveat

I just discovered that the Back In Time gui blitzes any lines in the the crontab that contain the string “backintime” whenever you click OK from the preferences window. This is a rather annoying problem, as I can easily see this happening.

I recommend making sure the gui schedule is set to every day rather than disabled, which means that if someone does fiddle at least the backup will still happen once a day. The solution to this is to call a wrapper script which does not contain “backintime” in its name… I’ll update this once I’ve written and tested it.

Next part – Monitoring and email configuration

Creating user accounts and setting up the file shares

This article is part of a series about setting up a home server. See this article for further details.

In this section we will create accounts for each user that will access the server, create a folder for each user, make sure the permissions are sane, and configure the samba shares.

For home environments a single user account that everyone uses can be good enough. However I like to have some semblance of security to raise barriers for viruses (who knows what’s going to be connecting to the network), so I setup guest to be read-only and assign write permissions only to authenticated users.

But before we proceed…

One Caveat when doing remote administration in a NeatX session

For some reason NeatX breaks policykit, which means any buttons in control panel applets that require root privileges will simply fail to work.

The way around this is to run the applets with gksu. The most convenient way to do this in my opinion is to create a desktop shortcut.

Go to System > Administration, right click on the users and groups icon in the menu, and “Add this launcher to desktop”. Next, right click on the resulting desktop icon, click properties and in the “Command” field, prepend gksu so that it reads “gksu users-admin”.

Double-clicking on the icon should then prompt you for your password, and all the buttons will work. Hopefully in the future this won’t be necessary!

I also created desktop shortcuts for Disk Utility and Back In Time (root).

Adding the users

Creating users is simple enough, but afterwards we need to add the users to two groups – “sambashare” and “users” (you should be able to figure this out). After doing this, go to Advanced Settings > select the Advanced tab and change the main group to users.

The reason for changing the primary group is so that any files the user creates are also accessible to others in the users group – which will include anyone that we want to be able to access files on the server. If you want to keep files private it is best to leave the primary group as the user name. Old school Unix people tend to know this, but for Windows refugees the lower level Linux concepts such as user groups and file system permissions can seem a bit strange, as they work quite differently.

Folders and Permissions

The raid array in my home server is mounted at /media/data. I like mount points to be owned by root to avoid accidental tampering:
chown root.root /media/data
chmod 755 /media/data

The octal permissions are 755, which means read/write/execute for the owner, read/execute for the group and all other users. For newbies I must confess that the rwx permissions notation is easier to understand, but unfortunately I learned octal permissions and it’s become a habit!

Under the data folder I have a folder for each user. The owner of the folder is the user, and the group is users, as I want Mum and Dad to be able to see each others files:
mkdir /media/data/mum
chown -R mum.users /media/data/mum
chmod -R 775 /media/data/mum

Repeat this for each user (substitute the user for “mum” in the example above). Note the use of the -R switch which applies the command to all sub-folders and files.

If Mum wanted keep her files private, both the owner and group would be the user name, e.g.:
chown -R mum.mum /media/data/mum
And the permissions would be:
chmod -R 700 /media/data/mum
Remember to make sure the primary group is the user name as well.

Setting up sharing (Samba)

I’m not 100% sure I’ve done this the officially sanctioned way, especially since it involves the decidedly old-school method of editing smb.conf. However for anyone comfortable with the terminal I think it works perfectly well.

First open /etc/samba/smb.conf in your favourite text editor (my preference is vim). There’s no need to modify any of the configuration, so scroll down to the bottom where the shares are located. I always comment out the printer shares (print$ and printers), as sharing printers via samba is a fool’s errand in my opinion, just get a blimmin’ network printer.

My shares are setup as follows:
[Data]
comment = Raid5 array, backed up daily
path = /media/data
browseable = yes
read only = no
guest ok = yes

[Backup]
comment = Backup drive, read only, no guest
path = /media/backup
browseable = yes
read only = yes
guest ok = no

[Media]
comment = Media files for XBMC
path = /media/media
browseable = yes
read only = no
guest ok = yes

Some explanation is definitely needed. Firstly while [Data] allows guests and the share is not read-only, guests will not be able to write because of the file system permissions which only allow the owner and group to modify files. You may want to create a public folder with permissions 777, which would allow guests to copy files on to the server. Or you may want to set up a another share and change guest ok to “no” for the data share.

The backup drive is read-only because I don’t want anyone to modify files on the backup drive, and file system permissions are no protection due to it being NTFS (Linux doesn’t and really shouldn’t support NTFS permissions). It would be too easy to go back to a previous version of a file and accidentally save it, and I’m not sure how Back In Time would handle a backed up file being newer than the source. Altering a file in the backup would also change every linked copy, so basically writing to files on the backup volume is bad mmkay? It is shared only to make restoring previous versions convenient.

NFS?

I haven’t covered setting up NFS here, as Mum and Dad both run Windows machines. If you do decide to setup NFS it’s fairly straightforward, but to save yourself some pain make sure the user ID’s match on all machines – NFS matches uid and not the actual user name. Off the top of my head the packages to install are nfs-common and portmap, and the config file to modify is /etc/exports.

A final note on samba passwords

I have found that a login to the local machine is required in order for the samba password to be synchronised with the unix password. If after logging in you still can’t access samba shares with that account, use the command smbpasswd to set the password, e.g.:
sudo smbpasswd mum

If you need to restart samba you can do so with the command ‘service smbd restart’.

Next section – Configuring the backup system

Running EpNamer on Ubuntu

EpNamer is a useful tool for renaming TV episodes. It’s not open source, but it is written in .NET and the developer has released a version that works with mono.

To run it on Ubuntu, you need to download the Mac OSX version from epnamer.com, mount the image, copy the application to your home folder and install some mono dependencies.

This would be quite complicated via gui so I figure 6 lines at the command line is going to be easier for most:

wget http://www.epnamer.com/?dl=EpNamer1.4.4.dmg
mount -o loop -t hfsplus ./EpNamer1.4.4.dmg /mnt
mkdir ~/epnamer
cp -R /mnt/EpNamer.app/Contents/Resources/* ~/epnamer
sudo apt-get install mono-winforms*
mono ~/epnamer/EpNamer.exe

If anyone’s found a better tool for renaming media files on Linux I’d be keen to hear about it! Unfortunately I couldn’t get the current Windows release of EpNamer (1.4.5) working.

Configuring the raid array

This article is part of a series about setting up a home server. See this article for further details.

Most of this can actually be achieved with the GUI these days, RedHat’s disk utility has improved a lot since the version that was included with karmic. To load it go to Settings > Administration > Disk Utility.

Make sure all the disks to be used have no partitions on them, then go to Create > Raid array.
512KiB was the default stripe size and is what I used initially, but I later switched to a 128KiB stripe. The example below uses a 512KiB stripe.

Also, it is a good idea to reduce the size to 128mb or so below the max capacity. Drives of the same advertised capacity can vary slightly in actual size, and if you replace a disk you don’t want the rebuild to fail because the drive is a few megabytes too small.

After selecting the disk members and pressing create the array will be in a “degraded” state until all the disks are synchronised. The amount of time it takes depends on the size of the array, but I’d suggest letting it finish before proceeding, I received errors in disk utility if I tried to create a partition too soon.

Also note that I’ve used the GPT partitioning scheme. GPT is designed to replace the old MBR scheme which has some limitations and can be restrictive these days, so I elected to use GPT. MBR is a safer option if your array is less than 2TB. If you use new hard drives with 4096-byte sectors such as Western Digital “advanced format” drives, you should use GPT. The use of GPT means that fdisk cannot be used, because it doesn’t support it. In its place we use parted and gdisk (“aptitude install gdisk” if you don’t yet have it).

Creating a partition on the array

The only slightly tricky part is creating a partition that is aligned with the raid stripe. You can’t create a partition starting at sector 0 because that’s where the partition table lives, so disk utilities will always offset the start of the first partition. However in order to get the best performance you need to align the partitions with the stripe size.

After creating a partition with disk utility I was greeted with the following:

It appears that disk utility isn’t quite intelligent enough to create properly aligned partitions on its own just yet.

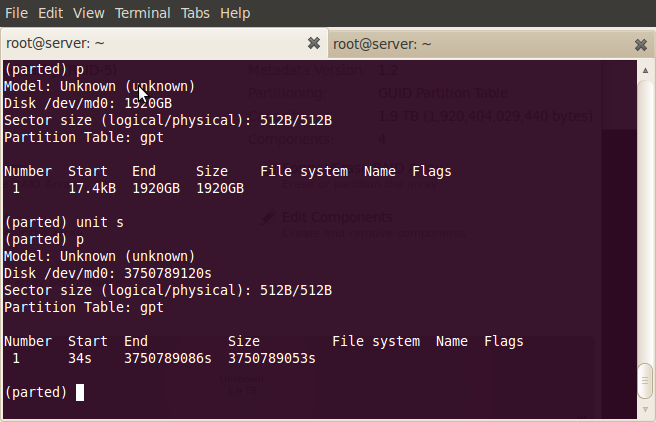
In my case the partition was offset by 17.4KiB, which doesn’t align with the stripe size of 512KiB:

I found the easiest way to get a properly aligned partition was to create a partition in disk utility with no file system, and note the offset given to you by the warning message that appears after the partition has been created. Then, simply delete the partition and use gdisk to create the partition with the original offset plus the figure given to you in the warning.

To get the existing offset, run “parted /dev/md0”, type “unit b” to switch the working units to bytes and type p to print a list of partitions on the volume.

In my example the original offset was 17408 bytes (34 sectors * 512 bytes/sector), and the partition was out of alignment by 506880 bytes. This means it should actually be at byte 524288, which also happens to match the stripe size of 512KiB.

gdisk works in sectors however, so we need to divide the result by 512, giving sector 1024 (524288/512=1024). So in this example you would run gdisk, type n to create a new partition, enter 1024 for the first sector, and accept the default for the last. For the current type I used code 0700, which is “Linux/Windows data”.

The second time around I used a stripe size of 128KiB (it seemed more “normal”), and with this stripe you would offset the start of the partition by 256 sectors (131072 bytes). I don’t believe the stripe size matters much – larger stripe sizes probably perform marginally better with larger files but I wanted something more general purpose as there will be a lot of small documents as well as large photos.

An example of creating a partition in gdisk follows. Note that I’m using /dev/null in this example to avoid destroying my laptop, you would probably want to use the actual blank raid array, which is likely to be /dev/md0. You can delete partitions with gdisk (with d), but for the newbies it’s probably easier to delete any previous attempts in the gui disk utility first.
sudo gdisk /dev/null
GPT fdisk (gdisk) version 0.5.1

Command (? for help): n
Partition number (1-128, default 1): 1
First sector (34-18446744073709551582, default = 34) or {+-}size{KMGT}: 256
Last sector (256-18446744073709551582, default = 18446744073709551582) or {+-}size{KMGT}:
Current type is 'Unused entry'
Hex code (L to show codes, 0 to enter raw code): 0700
Changed system type of partition to 'Linux/Windows data'

Command (? for help): w

Final checks completed. About to write GPT data. THIS WILL OVERWRITE EXISTING
MBR PARTITION!! THIS PROGRAM IS BETA QUALITY AT BEST. IF YOU LOSE ALL YOUR
DATA, YOU HAVE ONLY YOURSELF TO BLAME IF YOU ANSWER ‘Y’ BELOW!

Do you want to proceed, possibly destroying your data? (Y/N) Y
OK; writing new GPT table.
The operation has completed successfully

Creating the file system

Next create the file system on the partition:
mkfs.ext4 /dev/md0p1

I haven’t yet investigated tuning an ext4 partition for raid 5 arrays. There are probably some tweaks to be made here, please comment if you have a suggestion.

Autostarting and mounting the array

At this point you should have a working raid array, shown as running in disk utility and an ext4 partition on the disk. If you reboot you will notice that the array doesn’t start automatically, you have to go into the disk utility and start it manually each time.

Getting it to start by itself also requires falling back to the command line. Make the array is running before proceeding.

First we need to get the config line:
mdadm --detail --scan
You should get a line like the following:
ARRAY /dev/md0 level=raid5 num-devices=4 metadata=01.02 name=:Raid5 UUID=7198dc4b:0b61431d:99f71126:c2d41815
Paste this line into /etc/mdadm/mdadm.conf, below the line that says “definitions of existing MD arrays”. Reboot, load disk utility and you should see that your array has been started automatically.

Automounting the file system on the array simply involves putting a line in /etc/fstab, which unfortunately every technical Linux user still needs to know about (it seems to be the most prominent legacy hangover, but it’s still a pretty good system when you know how it works). My line is as follows:
UUID=47b4d934-c0c3-46c6-b9f7-09c1c7a94774 /media/data ext4 rw,nosuid,nodev 0 1
Note that the UUID here is the UUID of the partition and not the raid array. To get the UUID of your partition, use the command “sudo blkid” and note the UUID of the partition on your raid array, which should be /dev/md0.

Another useful command is “cat /proc/mdstat” which gives some info about active arrays.

You shouldn’t need to create the mount point in /media, in my experience this happens automatically.

Next part – Creating user accounts and setting up the file shares

OS and package installation

This article is part of a series about setting up a home server. See this article for further details.

I did a simple install of Ubuntu using the alternate media written to a USB stick. You could use the ordinary desktop CD, or Ubuntu server (but you will need to install a lot more packages on the server version). I did not configure the raid arrays on install. The reason for this is that I didn’t have all the disks ready, but I didn’t want to install OS data on them anyway.

Installing packages

For media playback, the medibuntu repository is essential. See the Medibuntu site for more info, but the commands I used (lifted straight off the Medibuntu site) are:
sudo wget --output-document=/etc/apt/sources.list.d/medibuntu.list http://www.medibuntu.org/sources.list.d/$(lsb_release -cs).list && sudo apt-get --quiet update && sudo apt-get --yes --quiet --allow-unauthenticated install medibuntu-keyring && sudo apt-get --quiet update

sudo apt-get --yes install app-install-data-medibuntu apport-hooks-medibuntu

Next I installed some additional software:

aptitude install openssh-server backintime-gnome gstreamer0.10-plugins-ugly gstreamer0.10-plugins-bad gstreamer0.10-ffmpeg ntp samba winbind libpam-smbpass apache2.2-bin lib-apache2-mod-dnssd mdadm

Some of these warrant explanation:

  • The gstreamer plugins packages are codecs, which may or may not be legal in your country depending on its stance on patents (like anyone really pays an attention to that). However you need to ensure you have codecs available for any media you wish to play back.
  • ntp is for time synchronisation, which isn’t strictly necessary in a home environment but I like to have an accurate source of time on any network.
  • samba, winbind, libpam-smbpass, apache2.2-bin, lib-apache2-mod-dnssd are all related to file sharing. Winbind allows the system to lookup other hosts with Netbios, which Windows uses on small networks without a local DNS server (like most homes). I don’t feel it is necessary to provide a DNS server in a home with non-technical users, and to me it is for a network appliance such as an ADSL router to handle anyway.
  • apache2.2-bin and lib-apache2-mod-dnssd are required for the “personal file sharing” control panel in Gnome to work. The developer has stated that the Apache won’t be required in the future (see this bug report for details. You may not need this functionality for your home server, but I thought it was nice to have in case it’s needed.
  • mdadm is for raid
  • gdisk is for partitioning GPT partition tables. If you prefer to stick with MBR partition tables you don’t need this

Installing NeatX

NeatX is a free implementation of NoMachine’s nx server, originally written by Google for an internal project. It seems to be the easiest and quickest way to get going with Windows RDP equivalent functionality, in fact it’s just a few lines:
add-apt-repository ppa:freenx-team/ppa
aptitude update
aptitude install neatx-server

Next simply download the client from nomachine.com and away you go. There are a few rough edges and I have encountered errors on reconnect, but it’s good enough for me. It is much more efficient than VNC, and the speed increase is more than enough for me to put up with the bugs.

Internal Errors on reconnect

If you encounter internal errors when connecting, delete all directories from /var/lib/neatx/sessions. For some reason it isn’t always cleaning up properly, even if you logoff.

Next part – Configuring the raid array

An Ubuntu 10.04 Home Server

I’ve recently been setting up a home server for my parents using lucid. While it’s not quite a point and click setup process, the process is a lot more streamlined than it used to be.

They have an individual computer each running Windows 7 and, one laptop between them running XP. Mum is also a photographer and generates a large amount of data. Dad also generates a fair bit of data, less than Mum although he does do the occasional home video.

Backups are an ad-hoc affair. Mum has three hard disks in her computer which she manually copies files between and tries to ensure she has two copies of everything. Dad has a portable external drive which he backs up to infrequently. Between them, neither is confident that they’d get all their data back in the event of a disaster.

Dad also liked how my HTPC (running XBMC) worked, and decided one of those would be nice too. So I decided to setup a home server for them and solve all their computer problems. Well, almost.

I started writing this as a single article, but it got a bit long so I’ve decided to break it up into a series. This first post is an overview, the links to the other posts are at the bottom of this article.

I’m assuming a fairly good degree of technical knowledge here, but if there are any gaps you feel I should add please feel free to leave a comment. I am aiming this at a reader who is familiar with Linux and Ubuntu, has installed software with apt-get or Synaptic, is comfortable with using the command line, and understands the implications of using raid5.

Overview

This home server will perform the following tasks:

  • Play music and video via the TV
  • Present a file share to the network, with individual folders for Mum and Dad
  • Backup the contents of their folders nightly to an external hard drive
  • Provide a GUI-based remote administration interface
  • Monitor backups and the raid array, sending emails to both Mum and Dad if something is amiss

Software that needs to be configured to perform these tasks:

  • MDADM for RAID
  • Xbox Media Center (XBMC) for media playback
  • Samba for file sharing
  • Back in Time for backup
  • NeatX for remote administration

The main boot device in this case will be an IDE compact flash card. I did this partly because it makes recovery easier (just write an image to a flash card rather than a whole hard drive), but mainly because it frees up a SATA port!

The hardware components for this particular HTPC are:

  • Gigabyte M85M-US2H motherboard
  • AMD Athlon II 250
  • 2gb DDR2 ram
  • 4x640gb Western Digital 6400AAKS hard drives
  • 1x1TB Western Digital Green
  • 1x2TB Western Digital Green (in external esata case)
  • 4 Raidon/Stardom hotswap drive bays
  • IDE Compact Flash adaptor and 8gb 133x CF card

A note on raid

The 4x640gb drives are configured in a raid 5 array. Personally, this is about as large an array as I would trust Raid5 to, the future is redundancy at the file system layer, as ZFS and Btrfs are capable of. ZFS can’t be used in the Linux kernel and Btrfs isn’t even close to production-ready yet, so for now I believe Raid is still the most sensible option. But if you’re reading this in 2012, you should probably be using Btrfs instead.

Storage

The 1TB hdd is just a single disk for media to be played back on the TV. Anything here is considered replaceable (think of it like the internal HDD in a MySky or TiVO box), so it won’t be backed up at all.

The 2TB hdd is the backup drive. Each night the entire raid array is backed up to it with Back in Time, configured to take snapshots. Since it uses rsync, the backups are incremental and shouldn’t take more than a few minutes to run, depending on how much was changed during the day. Obviously as the array nears capacity fewer snapshots will be able to be kept, and once it does the idea is to replace the 2TB backup hdd with a new one, keep the old one as an archive, delete any data from the raid array that is no longer current, and start again with a fresh clean backup disk. Hopefully by then it will be a 3 or 4TB disk and they can keep more snapshots!

The file system on the backup HDD will be NTFS. This is because it supports hard links and is readable by the Windows machines, which is important for my parents when they go to retrieve files from the archive.

Final notes before we get to the nitty gritty

I had a bit of trouble getting the drive bays lined up with the ports that the OS reported they were attached to. This is important because if mdadm tells Dad that the sata disk on port x has failed, I need him to be able to know that it’s the disk in bay x. Unfortunately on the motherboard I used, Ubuntu assigns them like so:

0 – 1
1 – 3
2 – 2
3 – 4

(motherboard port – ubuntu port)

So while your motherboard may be better designed than mine, don’t assume they are in the same order. The links to the follow-up articles are below:

Changing compiz animations for specific windows in Linux

I use the terminal program Guake on my Ubuntu 9.10 laptop, which is really handy for quick access to a terminal window (I changed the shortcut key from F12 to Alt+~ though, which makes more sense to me as it’s more like Quake :-)).

With Desktop Effects enabled though, the default animation doesn’t quite look right. So to change it I needed to figure how to change the animation for a specific window. Fortunately the process is reasonably simple.

First you need desktop effects enabled, and the CompizConfig Settings Manager (CCSM) installed:
sudo aptitude install compizconfig-settings-manager

Next, you need to know the “class” of the window you want to change (which to confuse matters is interpreted as the “name” in compizconfig). To get the class/name, enter the following command in a terminal:
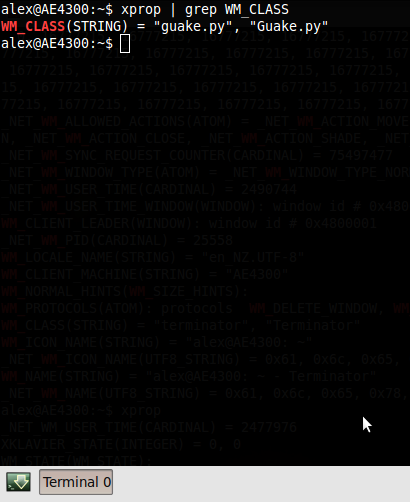
xprop | grep WM_CLASS

The cursor should change to a cross, at which point you need to click on the window. You should get something like this:
Getting the window class with xprop

Next, open CCSM by going to System > Preferences > CompizConfig Settings Manager. Click on Animations.

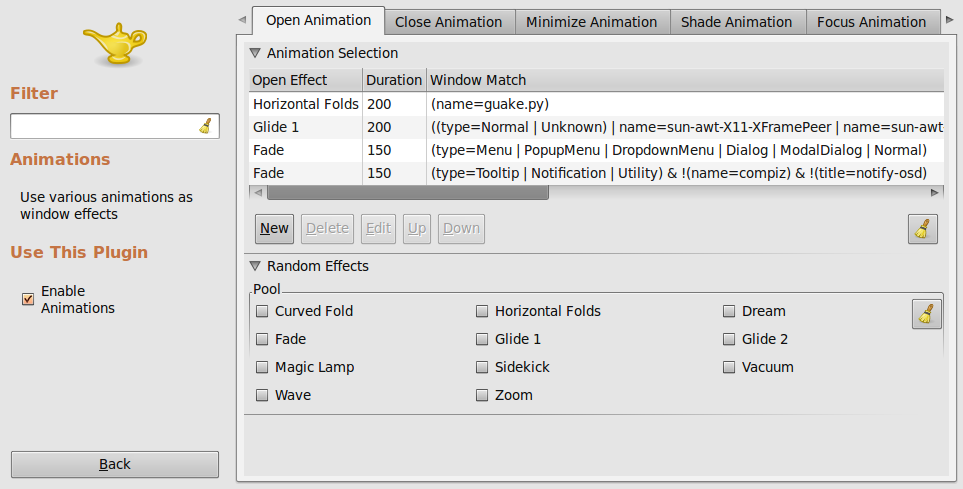
To add a rule for the window you want to customise, click New, choose the effect and duration (200 is a good number). Under “Window Match”, enter the following:
(name=[WM_CLASS])
Where “[WM_CLASS]” is the first field from the xprop output gathered earlier (“guake.py” in my case). CCSM seems to only match the first value for WM_CLASS, as “Guake.py” didn’t work. Refer to the screenshot below for an example.

Screenshot-CompizConfig Settings Manager

Finally, you need to make sure that this rule is at the top so that it matches before any other rules. Simply highlight your new rule and click the up button a few times.

Printing dd stats / status

I keep Googling this, when really I should have committed it to memory by now. It’s extremely useful when cloning hard drives, which takes a long time with modern disks (a 160gb hard drive takes about an hour over eSATA @ ~50MB/s).

Anyway while there are more efficient methods, dd is simple and it works.

So given the following dd command:

dd if=/dev/sda of=/dev/sdb bs=32M

We can find out the pid (process ID) with the following command:

ps ax | grep dd

Which in my case gives:

12147  tty2    R+     6:17 dd if /dev/sda of /dev/sdb bs 32M

i.e. 12147.

To get dd to output the stats, we send it a SIGUSR1 signal:

kill -SIGUSR1 12147

Resulting in:

3205+0 records in
3204+0 records out
107508400128 bytes (108 GB) copied, 2111.05 s, 50.9 MB/s

I should thank the author of the following link, it’s the result I get whenever I google this:

http://prefetch.net/blog/index.php/2006/06/11/printing-dd-status/

Raw photo processing on Linux

Being a Linux user, one of my concerns with shooting raw was what to do with the files once I’d captured them. On Windows I’d probably just use Canon’s software that was supplied with my 40D – Zoombrowser and Digital Photo Professional.

However the default photo mangement application in Ubuntu, F-Spot, pleasantly surprised me in the way it handles raw files. Not only does it understand and preview them, it can manage raw .cr2 files, developed jpegs and camera jpegs as one image, meaning that you can preserve all versions of a picture without cluttering up your library with multiple versions. For me this is almost an essential feature now, as I frequently have three, sometimes four versions of the same image – raw, camera jpeg, developed jpeg, cropped, etc.

So here’s my brief outline of the components I use for managing photos:

  1. F-Spot, installed by default in Ubuntu and also many other distros such as OpenSUSE
  2. UFRaw standalone
  3. F-Spot DevelopInUFRaw plugin
  4. F-Spot RawPlusJpeg plugin
  5. Canon Digital Photo Professional

UFRaw is an excellent raw processing tool, based on dcraw, and supports many other raw formats (not just Canons). Ubuntu provides a standalone version and a GIMP integrated version, but the one we want is just called ufraw. To install it, open a terminal and type:

sudo aptitude install ufraw

You will need to have the universe repository enabled to install this package, to enable it go to software sources and tick the appropriate box.

The F-Spot plugins are simple to install and can be added from within F-Spot itself – just go to Edit > Manage Extensions, enable them if present and install them first if not:

F-Spot Extension Manager

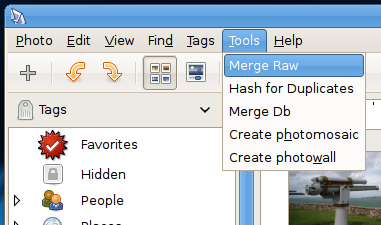
Once you’ve installed everything, the first thing I recommend doing is merging your raw files:

Merging Raw Files

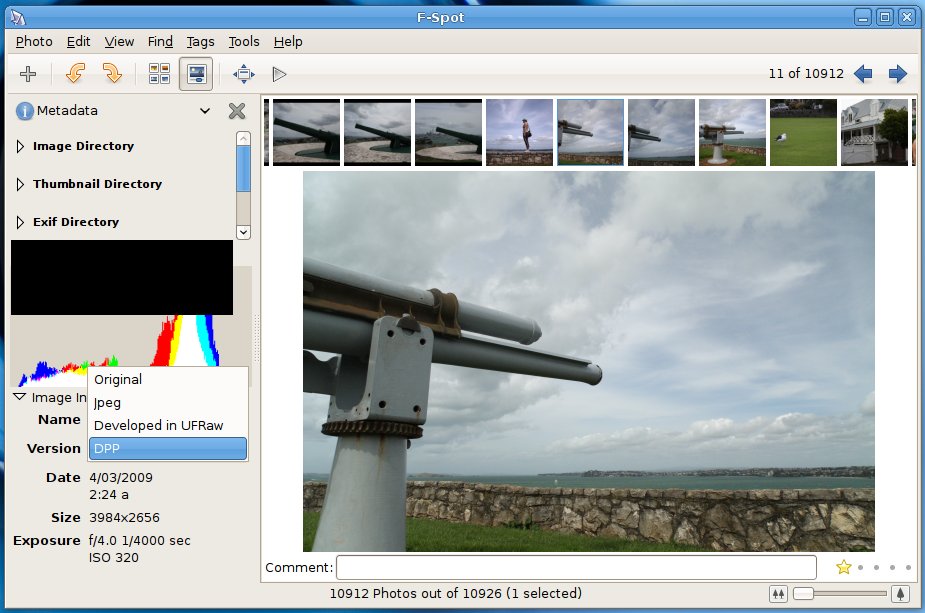
With the UFRaw plugin installed you should also be able to right-click on any image and select “Develop in UFRaw”, but obviously it will only work if the picture you’ve selected actually has a raw file. Any developed files appear as a version rather than a new image like so:

FSpot Versions

The main down side to using UFRaw as opposed to Canon’s Digital Photo Professional, is the lack of lens aberration correction. This may not be a problem for you if you only shoot L glass, but for the rest of us with consumer zooms the lens correction is a nice feature to have. I also find that it’s easier to achieve better results with DPP, it’s not that UFRaw can’t make the adjustments, but DPP does seem to make more intelligent guesses and I find I can achieve a good result faster than with UFRaw.

Fortunately, Digital Photo Professional works fairly well in Wine. To install it on Ubuntu 8.10 simply pop in the CD, and open the setup.exe file with wine (right click, Open with “Wine Windows Program Loader”). I’d suggest deselecting all drivers and anything unnecessary, I installed DPP only).

F-Spot and UFRaw make a pretty powerful photographic toolset, and with DPP running in Wine there’s little need for Windows. If you don’t like F-Spot there’s Google’s Picasa (which is actually a Wine app on Linux…), and DigiKam which is the KDE equivalent.