
Some long time readers of this blog may remember my home server articles, the most recent being “Ubuntu Home Server 14.04 – A DIY NAS“. There haven’t been any more recently because there’s not been much to report. The server described in that article, built in 2014, has been backbone of my home network ever since.
Since then, I have swapped out hard drives a couple of times (it now contains 2x16TB Seagate Exos and 4x4TB Seagate IronWolf), doubled the ram to 8GB, and added a NVME riser card (along with a cheap 128GB NVME SSD), so I could have a separate boot drive while using all 6 SATA ports for hard drives.
Along the way it also lost HTPC and media player duties to an Apple TV, so now it’s little more than a file and backup server with Plex Media Server, Syncthing, and Duplicati installed. And the operating system has been upgraded from Ubuntu 14.04 to 16.04, 18.04, 20.04 and now 22.04.
A couple of weeks ago though, it failed. And by failed I mean, all I got was blank screen when powering on. No post, and no signs of life other than spinning fans.
My immediate thought was a loose connector, or possibly memory or motherboard failure, so I disconnected everything, blew the dust out and plugged everything back in. With the hard drives unplugged, everything worked. With 4 hard drives plugged in it still worked. Then it failed again when I connected the last two.
By now I figure I’m looking at a dodgy SATA cable, SATA port, or hard drive, but the core components are obviously fine. So why not give it a minor overhaul at the same time?
Unnecessary integrated SATA ports
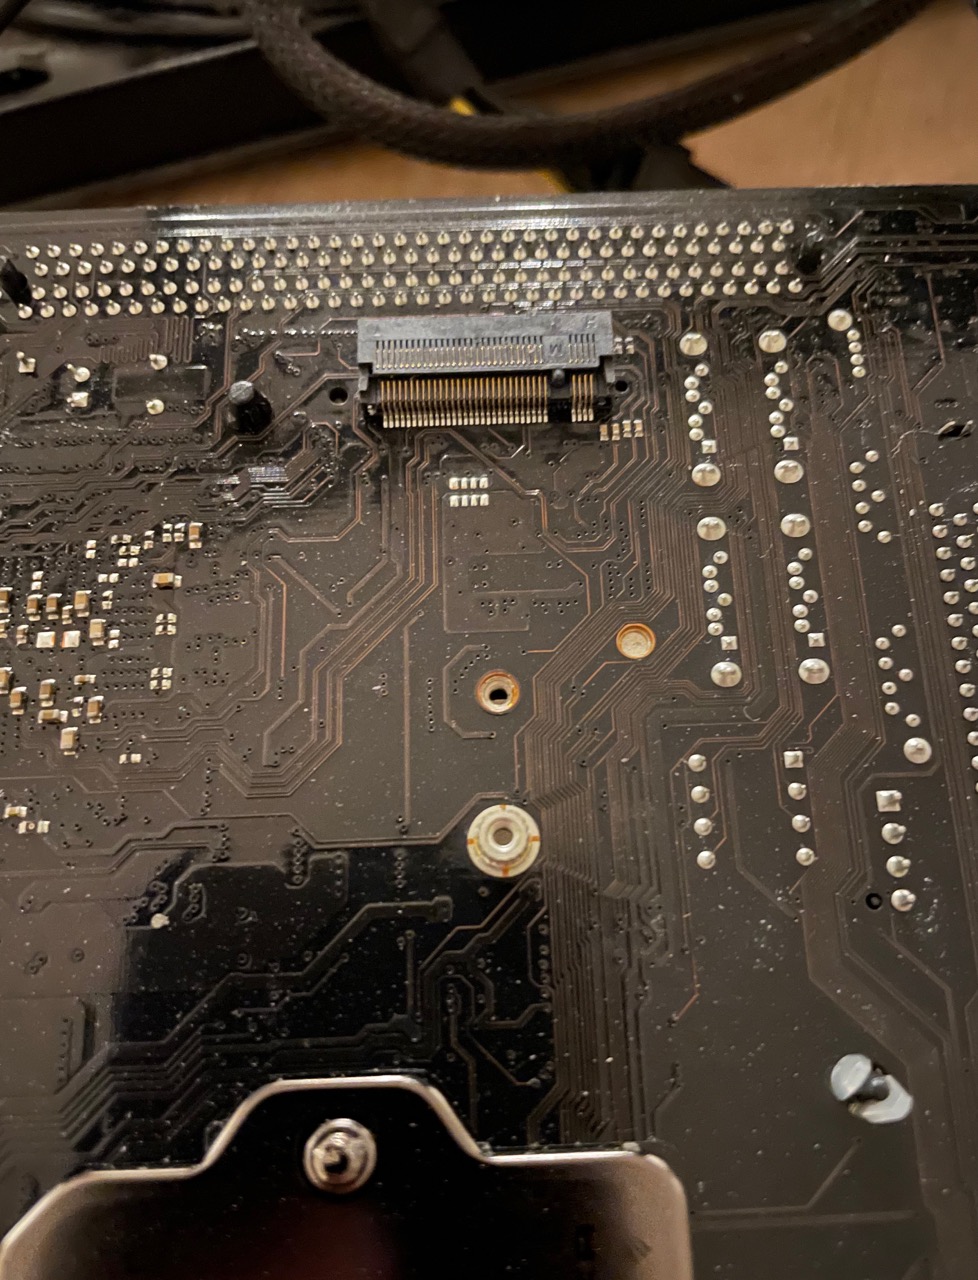
One of the key requirements in the original article was at least 4, preferably 6 SATA ports, to make good use of the 6 drive bays in the Fractal Node 304 case that I chose. In those days it wasn’t too hard to find Intel ITX motherboards with 6 ports, but these days it’s nigh on impossible. There is also a caveat that I wasn’t aware of at the time – two of the ports on the Asrock Z97E-ITX are shared with the M.2 slot on the back. So you either have 4 ports and an M.2 SSD, or 6 ports and no SSD.
Originally I used an old 60GB 2.5″ SATA SSD, which was of course connected to the motherboard via one of the SATA ports. But at one point some years ago I wanted to add a 6th hard drive.
My solution to that was the PCIE M.2 riser card I mentioned at the start. It worked great, but it also consumed the only PCIE slot, which, while not such a big deal for a NAS, still felt a bit wasted on a single SSD.
Since then though, I’ve discovered the world of LSI HBAs, which are commonly used in entry-level servers. Essentially, you can buy a second hand Dell H200 or H310 (other brands have similar cards), which are functionally identical to an LSI 9211-8i. If you write the LSI “Initiator Target” (IT) mode firmware over the original firmware, you get a standard 8-port SAS HBA, which is supported by practically all open source kernels. Throw in a couple of SFF-8087 to 4xSATA breakout cables, and you can connect 8 hard drives to a single HBA. Oh and did I mention that second hand ones go for under £25 on eBay?
Obviously I bought one, along with a set of breakout SATA cables, and a 40mm fan to put on the heatsink, as it’s designed to be used in server chassis with much better airflow than my small box of hard drives!
Benefits of an HBA
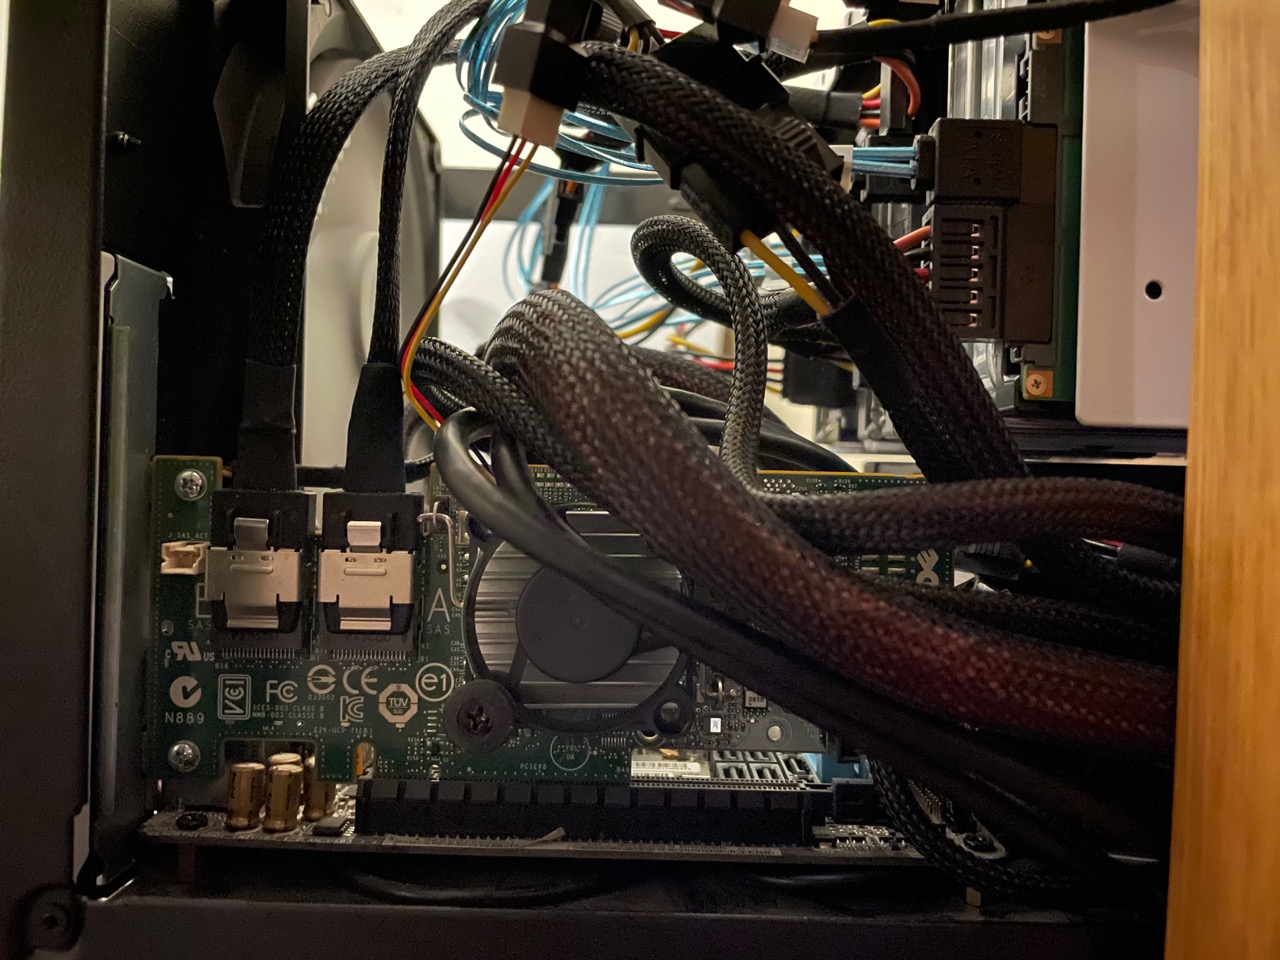
The obvious benefit of the H200 is having 8 SATA ports, which is more than almost any motherboard. Even if you don’t have 8 3.5″ hard drive bays, an extra port can be useful for a 2.5″ boot drive. And with one controller and 4 (let alone 6) ports on the motherboard, you could connect 12 drives, which is starting to get in to r/DataHoarder territory.
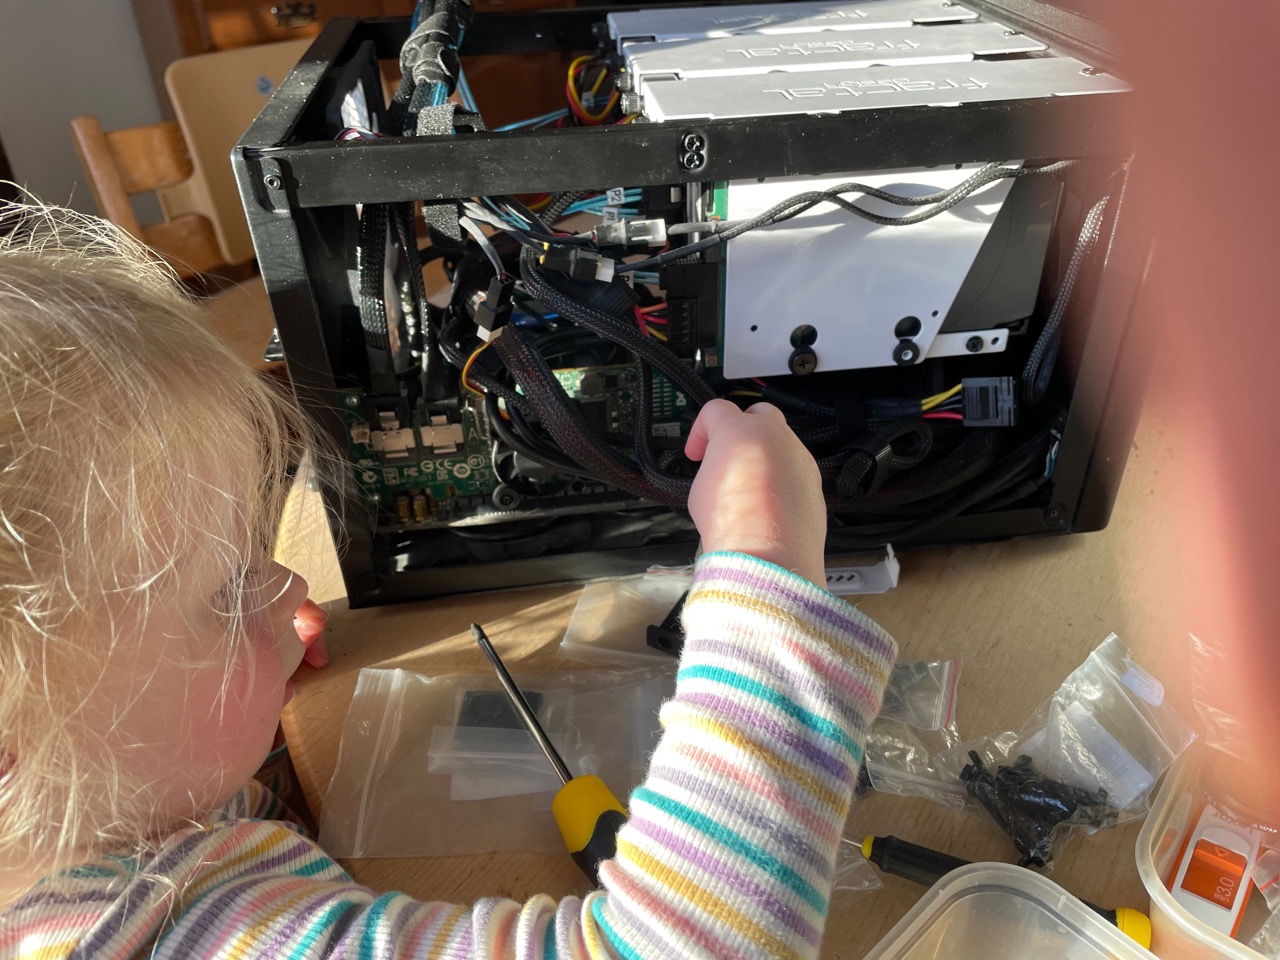
Second is easier wiring. Despite having the same number of hard drives to connect, they all terminate down to just two SFF-8087 ports on the SAS controller. What’s more, the ports are raised off the motherboard which makes them much easier to access in a cramped case such as this:
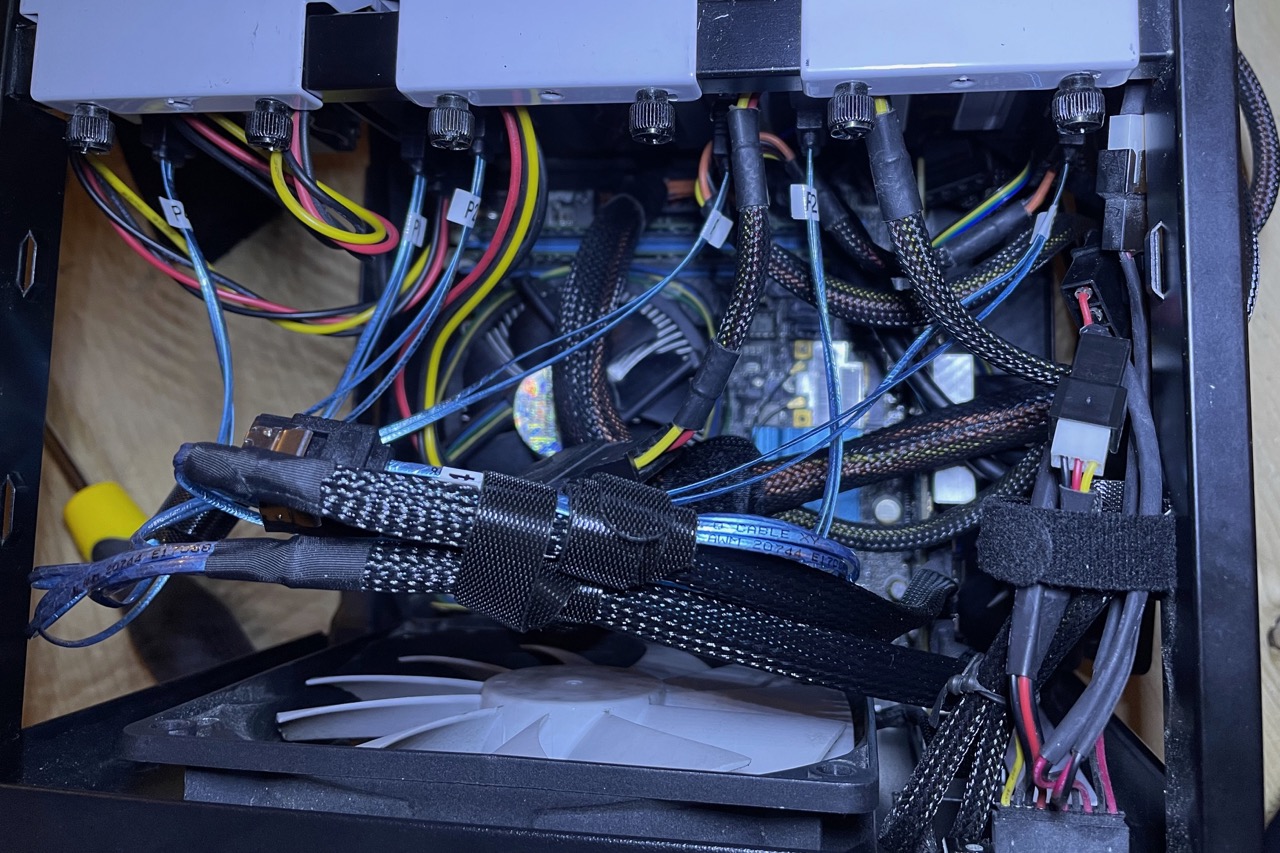
It’s pretty difficult to wire neatly in a Fractal Node 304, but I can assure you that it was a lot messier with 6 SATA cables going into the motherboard.
Flashing the H200
The process for flashing the Dell H200/310 to a plain old HBA is well documented by mattr at techmattr.com, including the pitfalls of doing it on an EFI motherboard. The sketchy part, from my perspective, was trusting a random zip file from a blog, because LSI was acquired by Avago, and then by Broadcom (RIP). Some of the files you need are much harder to find, particularly the old version of sas2flash which allows downgrading and cross-flashing.

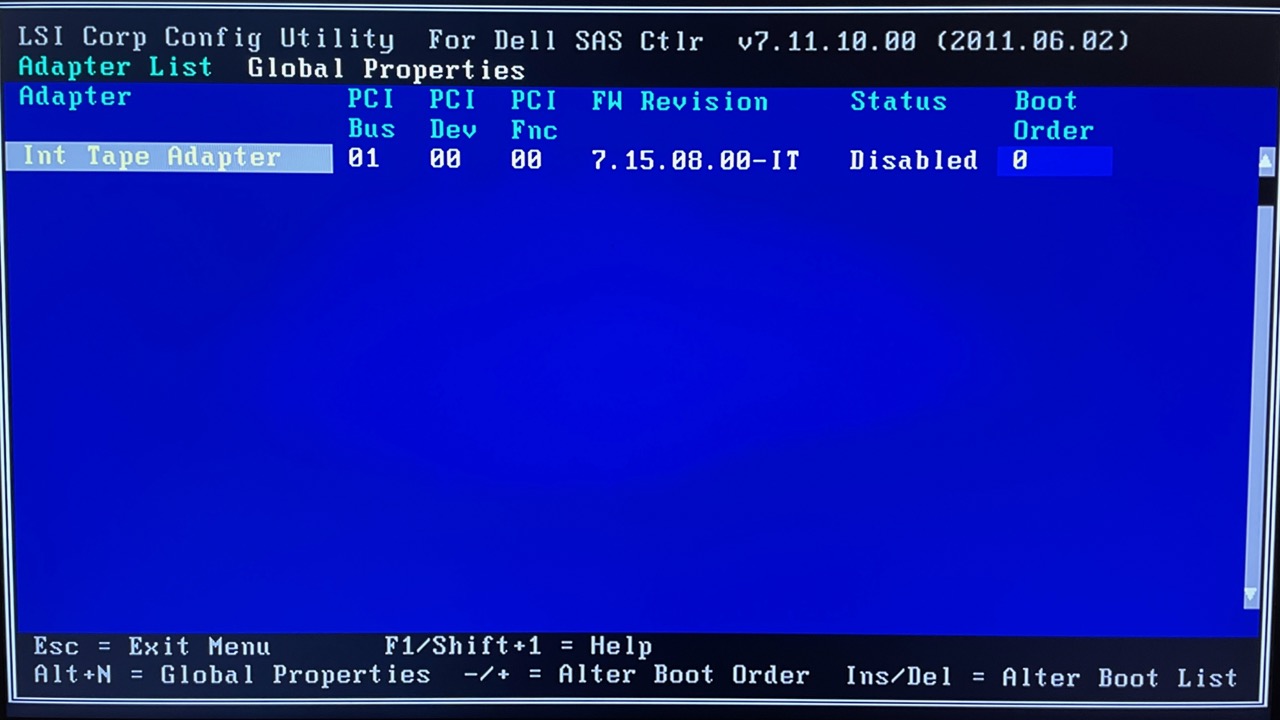
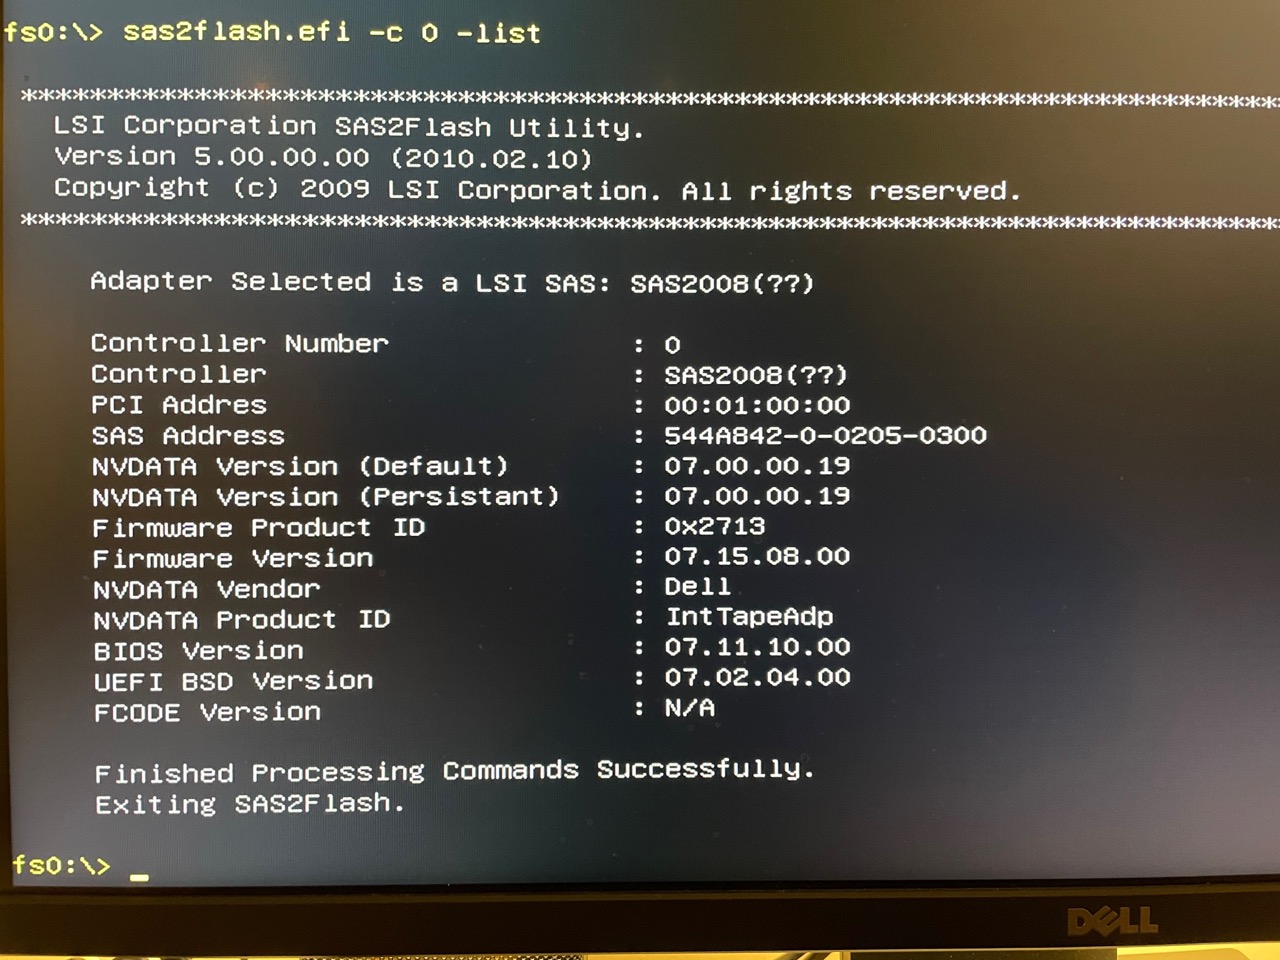
But so long as you’re comfortable flashing firmware on various things, the process is pretty painless.
Oops, I need a new SSD
With the LSI HBA working, the next thing to do was retrieve the NVME SSD from the riser card and install it into the motherboard’s M.2 slot, which is on the back.
Unfortunately, I forgot one important thing – the M.2 slot on the back of the Asus Z97-E is a “2242” type, I.E. 42mm long. Most SSDs, including the one I had installed in the riser card, are 2280, I.E. 80mm long.
Unfortunately 42mm SSDs seem to be quite rare. The best option I could see was a Transcend MTS420S 240GB SATA SSD for £33, but I didn’t want to wait another week without backups, so I opted for a Sabrent Rocket 512GB NVME, which set me back a cool £75. I figure the extra space (and speed) will come in useful at some point. Maybe.
With the new SSD installed and the old one in a USB enclosure, the only thing left to do is to clone the old one to the new, followed by an expansion of the existing partition and filesystem to fill the extra space.
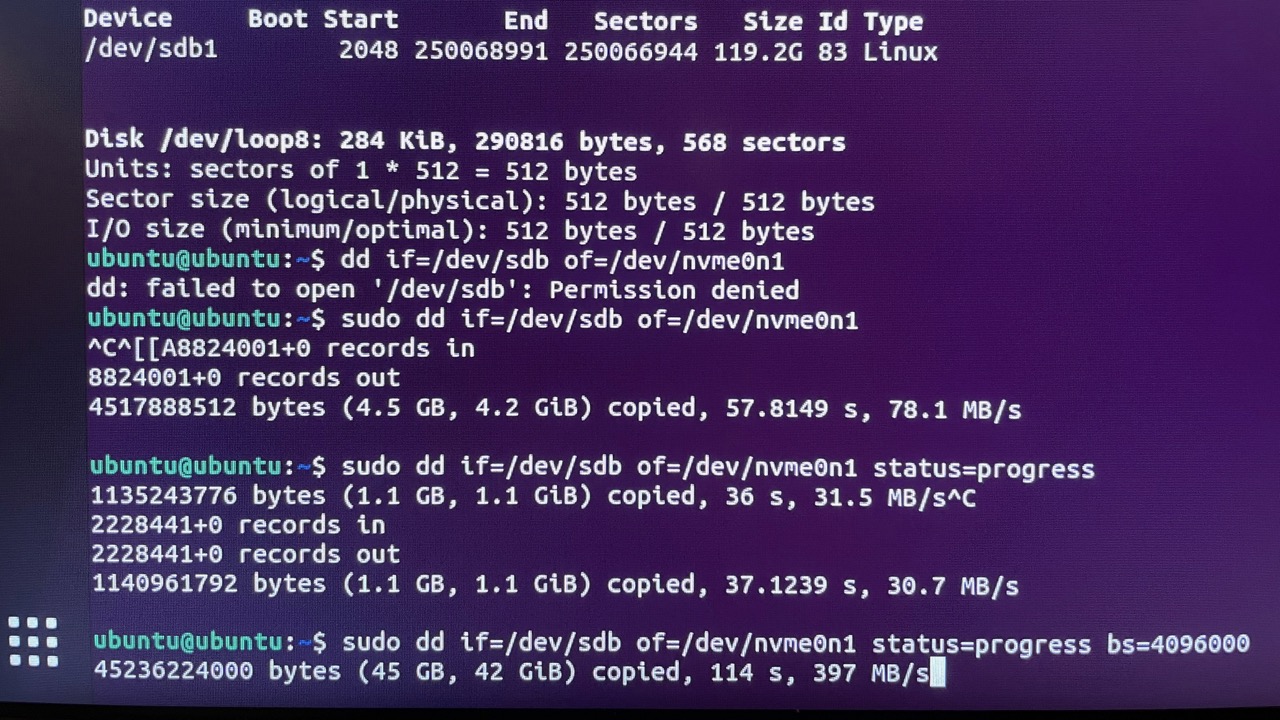
dd is probably the easiest way to do this, when you don’t have to shrink a filesystem, but I just did it this way because it’s the way I know. The new status=progress flag is handy, and as you can see from the screenshot, setting a larger blocksize does wonders for performance!
CPU Upgrade
The £30 Celeron G1820 from 2014 has done a good job, but it was never quick and it’s positively anemic these days. I’m not sure a modern equivalent would be much better – Intel now asks £60 for a similar (core and clock speed wise) Celeron G6900. 8 years of progress in this space gets you a bit more cache, about 25% more instructions per clock… all for nearly 100% inflation in the price. Maybe you get lower power consumption, but the thermal design power (TDP) is the same.
If I were to buy an Intel CPU for a NAS these days I’d opt for an i3 12100F, which at £99 is only 50% more expensive than the Celeron for double the core count, but I think back in 2014 an i3 was about 3-4x more expensive.
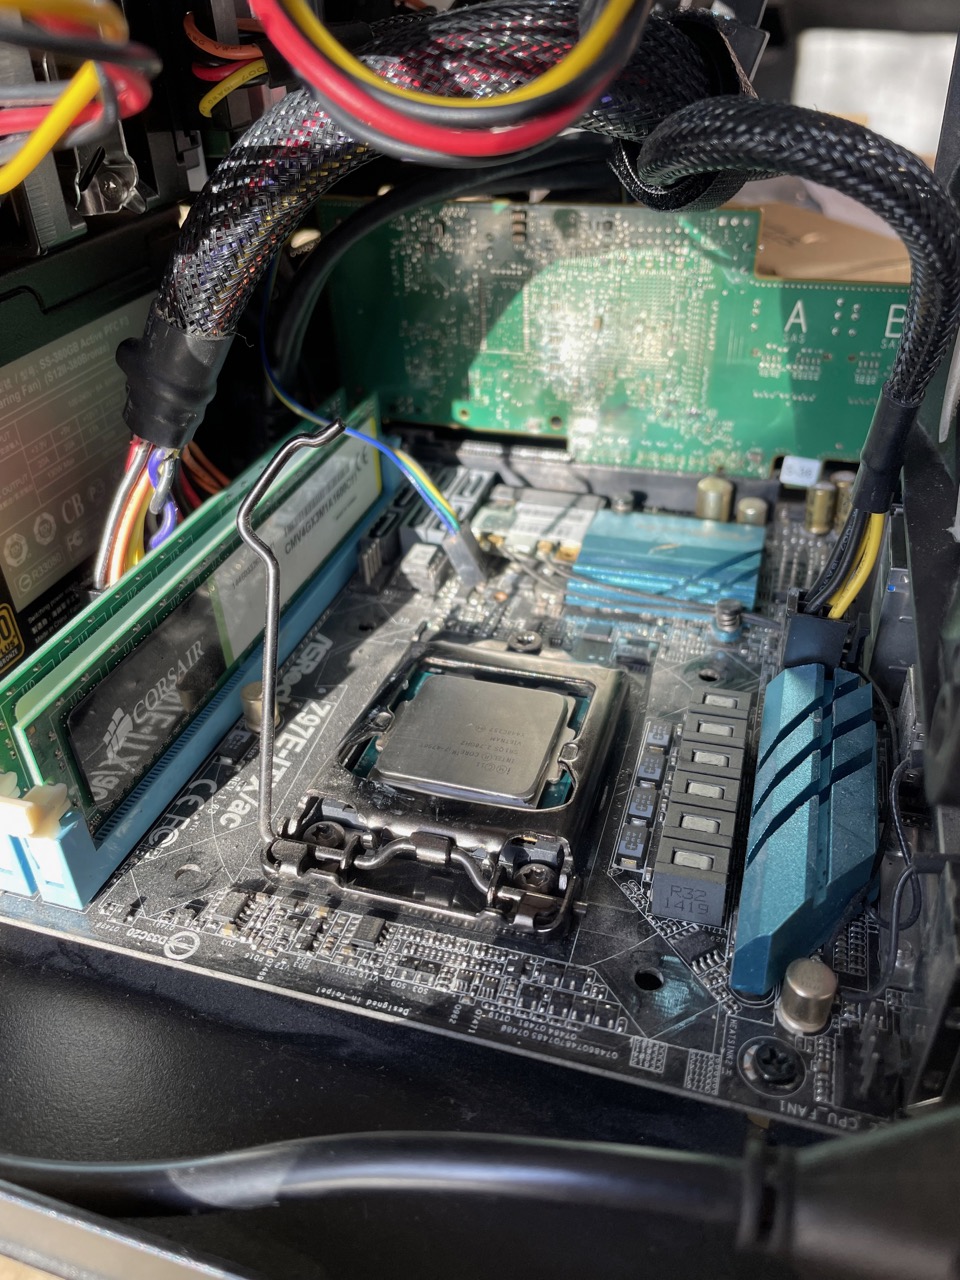
But I didn’t want a new motherboard, so I needed to find a Haswell CPU from 2014. The best option I came across was a Core i7 4790T on eBay for £40 including shipping. This is a 4-core 8-thread model, probably one of the best CPUs you could get in 2014, at least in terms of performance per watt. It’s well behind the curve these days, but I’m not sure Intel has done vastly better under 45 watts. I feel it will hold up pretty well for a few more years, at least until I upgrade to something with ECC memory support.
When it arrived I was not impressed – the packaging was poor, and it had thermal paste on the underside. I can understand some around the heatspreader, but the bottom is inexcusable, and not cleaning before selling it is just sloppy, especially as this person was selling a lot of them. I expected more professionalism.
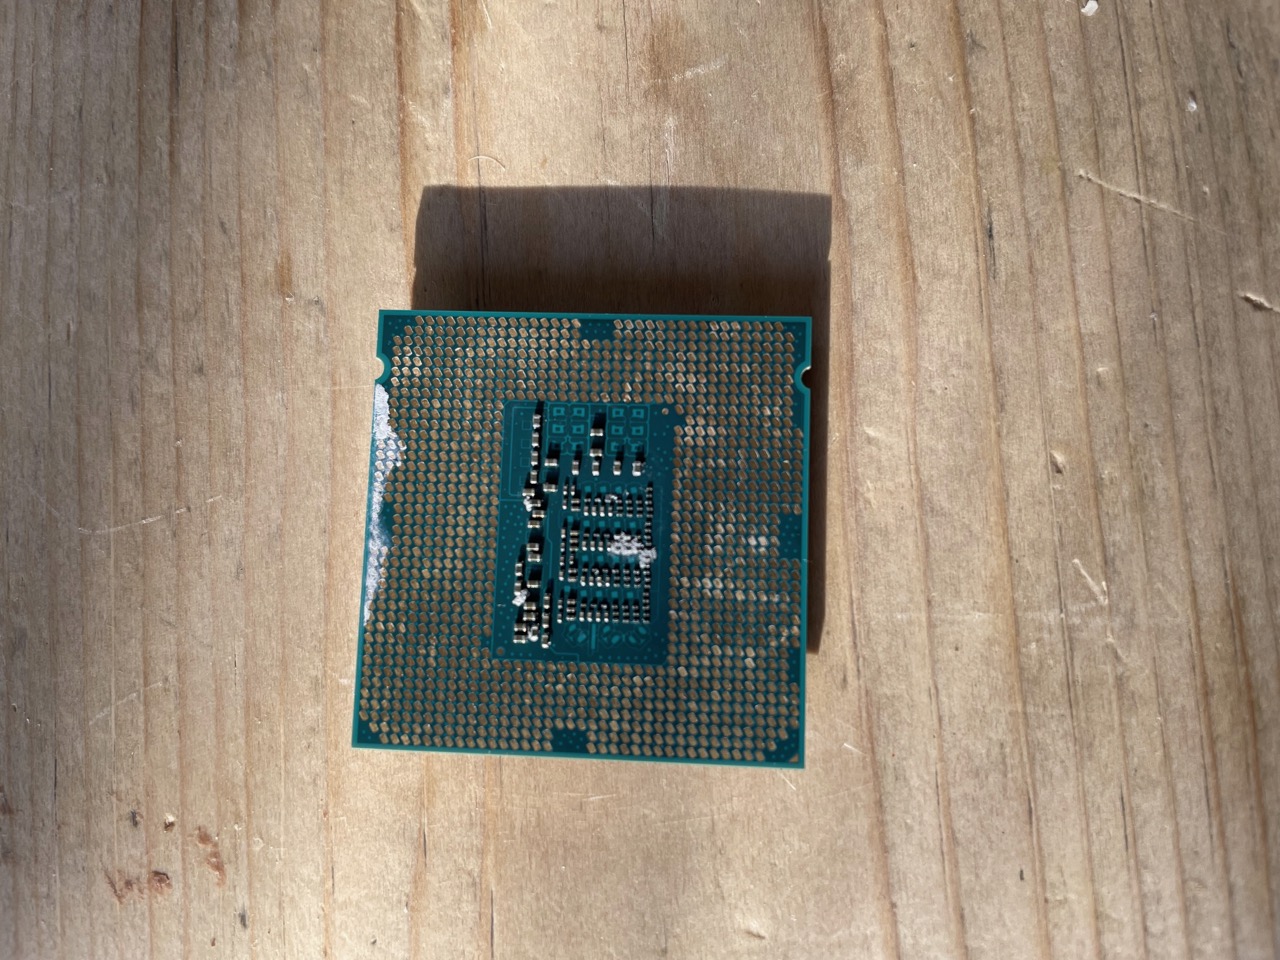
Excess paste is nothing a bit of isopropyl alcohol can’t fix, and it works fine – no issues while stress testing whatsoever. But I probably wouldn’t have bought it had I known the level of care in handling it had been subject to.
Hard drive rails
Some recent hard drives, such as the 18TB Seagate Exos drvies I bought, don’t have the middle set of mounting holes, which the drive cages of the Node 304 need to mount them securely. Originally I made do by mounting them on just one end, but as part of this overhaul I wanted to solve the issue properly.
When I contacted the maker of the case (Fractal Design) for advice, they immediately offered to send out an accessory kit for the Node 804, which has adapter rails for such hard drives, free of charge.
I am grateful to Fractal Design for this. The case is 8 years old, and this level of support so long after purchase is well above and beyond. I’ve always been happy with Fractal Design cases, but to receive this level of support so long after purchase is icing on the cake.
After mounting with the adapter rails, the clearance between the drives is reduced somewhat:
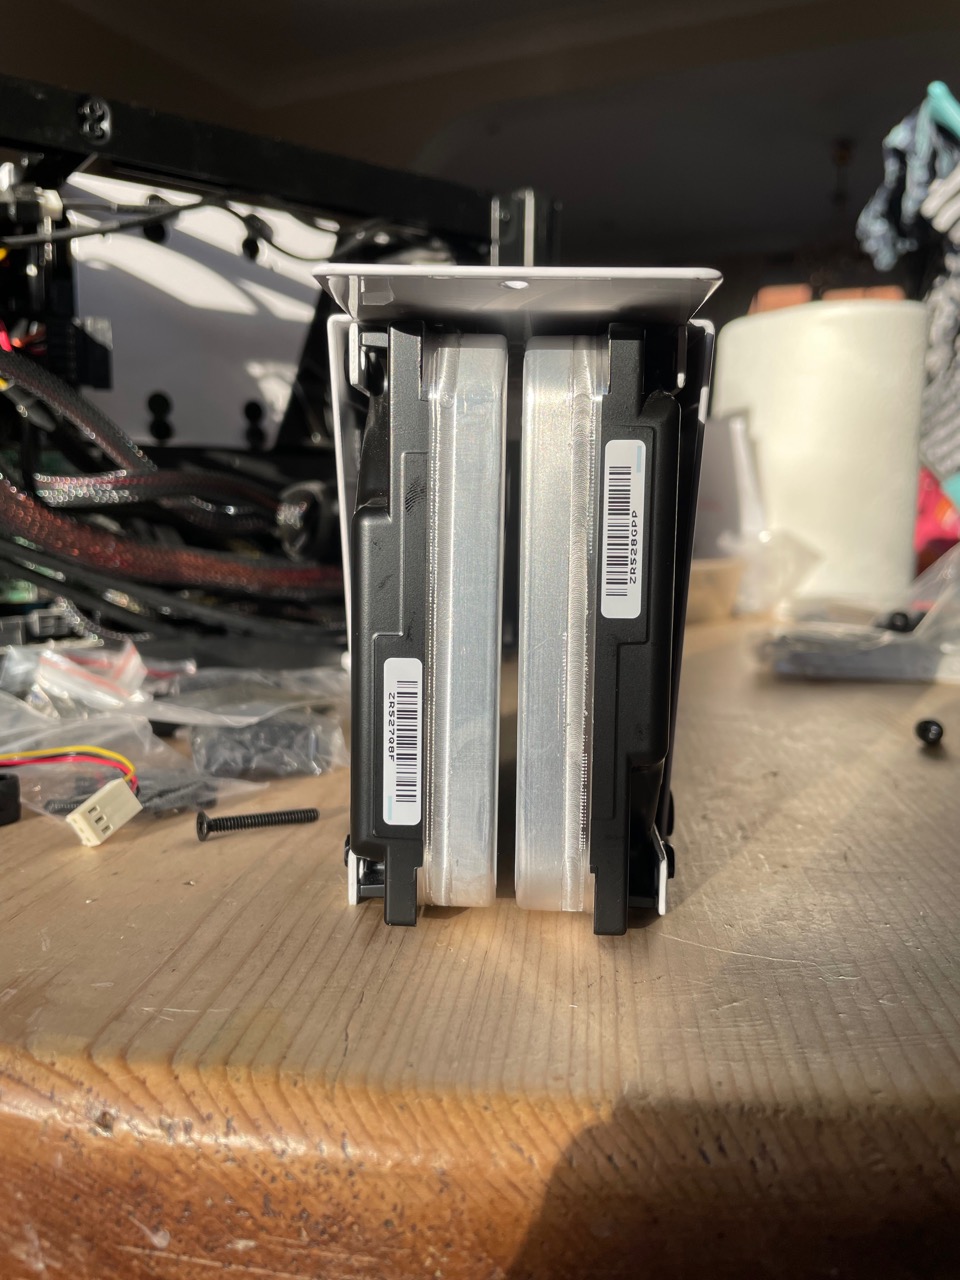
In hindsight I probably should have paired the drives on rails with older ones, but there are fans sitting right in front of them, and fortunately the temperatures aren’t noticeably worse.
Adding it all up
As part of this overhaul I’ve:
- Added an 8-port SAS HBA, flashed it with IT firmware, and added a 40mm fan
- Upgraded the CPU from a dual-core Celeron to a Quad-core i7 of the same generation
- Added rails to the Exos hard drives to mount them securely
- Swapped out the SSD for a smaller model connected directly to the motherboard
The final bill of materials:
| Used Dell Perc H200 | £25 |
| Two SFF-8087 to 4xSATA cables (0.5m) | £14.58 |
| 40mm ball-bearing fan | £3.47 |
| Used Intel Core i7-4790T | £40 |
| Sabrent 512GB 2242 NVME SSD | £75 (ouch) |
| Total | £158.05 |
Nearly half of that was the SSD; with more patience and a cheaper Transcend model it would have been nearer £110.
But I think it’s still fairly modest overall, and it means the 2014 edition of my Home Server lives on. Hopefully for a few more years to come!
Reflection
After running my own NAS for 8 years, would I recommend this path? If you have any linux sysadmin skills, absolutely. Aside from this most recent failure, it’s never skipped a beat, and maintenance has essentially consisted of an OS upgrade every couple of years (although I do tinker much more regularly than that). A home-brew NAS will be cheaper, more powerful, and more flexible than pre-built solutions, but you do have to take responsibility for managing the disk arrays yourself, and that does leave more room for user error.
NAS devices from the likes of Synology have nice user interfaces that make adding and removing drives a breeze, but you’re sacrificing a lot of power and flexibility for that convenience.
For me this is a no-brainer.
Homebrew NAS Resources
- Case guide (Gentoo wiki) – good resource if you’re looking for a case
- Home server (Gentoo wiki) – general information
- Overview of common used LSI SAS controllers on the market (Art of Server – video)
- SAS HBA crossflashing or flashing to IT mode, Dell Perc H200 and H310 (techmattr.com)
Footnote on BTRFS
This quote from the last home server article did not age well:
While the customised software shipped with a NAS does offer some conveniences, it also gets in the way of using newer Linux features such as BTFS RAID 5/6 (which is currently not considered stable but should be within the next 12 months).
I never did use the RAID5/6 functionality as it still isn’t considered stable in 2022. While I am still using a BTRFS-managed array, with the most recent Exos drives I opted to create a new ZFS array rather than expand the existing BTRFS one. In the end I stuck to good old mirroring (RAID1), and will continue to do so with ZFS, as it’s simpler and less error prone.
Eventually I’ll migrate the data from the BTRFS volume to ZFS volumes, and rebuild the 4x4TB array as another zpool. Or possibly as a vdev in the existing pool, but as a newbie to ZFS I’m not sure how comfortable I am with that!
Pingback: ZFS compression and encryption | Al4