Tag Archives: ubuntu

Samba config for Apple Time Machine

I’ve been using samba’s vfs_fruit module to enable backing up my mac laptop to my ubuntu-based NAS. I’ve found the configuration fiddly, and it occasionally breaks with macOS upgrades.

Anyway, I thought I would document my settings in case it helps anyone else out there. The file system backing my Time Machine share is ZFS, and I am using Samba 4.15 and MacOS Sonoma 14.4.1.

Global config

In /etc/samba/smb.conf under the [global] section, I have the following (not complete config, just the relevant settings):

protocol=SMB3
vfs objects = acl_xattr fruit streams_xattr aio_pthread
fruit:aapl = yes
fruit:model = MacSamba
fruit:posix_rename = yes
fruit:metadata = stream
fruit:nfs_aces = no
recycle:keeptree = no
oplocks = yes
locking = yes

Some comments:

  • I believe SMB3 is required – Time Machine struggles with older protocols.
  • The order of vfs objects is important – aio_pthread must go last.
  • Without aio_pthread, my backups fail while scanning. I suspect Time Machine is heavily threaded and does a lot of requests in parallel – apparently too much for a single samba thread.
  • fruit:posix_rename = yes appears to be the default and can probably be omitted
  • fruit:metadata = stream was a copy-paste and not thought through by me – I’m unsure of the implications of this

These work for me as a general set of settings for mac clients – I don’t use Windows or Linux clients often, so I don’t know how well it works for them. It’s possible some of these options are not required, as they’ve accumulated over time.

Share Config

The share itself is configured like so:

[TimeMachine NAS]
path=/pool1/backup/timemachine
comment=Time Machine
valid users = alex
writable = yes
durable handles = yes
kernel oplocks = no
kernel share modes = no
posix locking = no
ea support = yes
browseable = yes
read only = no
inherit acls = yes
fruit:time machine = yes

According to the docs, “fruit:time machine = yes” sets durable handles, kernel oplocks, kernel share modes and posix locking – you can probably omit these.

/pool1/backup/timemachine is a ZFS volume with a quota, which was set with “zfs set quota=3TB pool1/backup“. The available space is reported correctly to the client (Finder), so I’d expect it to work fine for restricting disk usage, and for time machine to manage its snapshots.

See also

Home Server – new HBA edition

Some long time readers of this blog may remember my home server articles, the most recent being “Ubuntu Home Server 14.04 – A DIY NAS“. There haven’t been any more recently because there’s not been much to report. The server described in that article, built in 2014, has been backbone of my home network ever since.

Since then, I have swapped out hard drives a couple of times (it now contains 2x16TB Seagate Exos and 4x4TB Seagate IronWolf), doubled the ram to 8GB, and added a NVME riser card (along with a cheap 128GB NVME SSD), so I could have a separate boot drive while using all 6 SATA ports for hard drives.

Along the way it also lost HTPC and media player duties to an Apple TV, so now it’s little more than a file and backup server with Plex Media Server, Syncthing, and Duplicati installed. And the operating system has been upgraded from Ubuntu 14.04 to 16.04, 18.04, 20.04 and now 22.04.

A couple of weeks ago though, it failed. And by failed I mean, all I got was blank screen when powering on. No post, and no signs of life other than spinning fans.

My immediate thought was a loose connector, or possibly memory or motherboard failure, so I disconnected everything, blew the dust out and plugged everything back in. With the hard drives unplugged, everything worked. With 4 hard drives plugged in it still worked. Then it failed again when I connected the last two.

By now I figure I’m looking at a dodgy SATA cable, SATA port, or hard drive, but the core components are obviously fine. So why not give it a minor overhaul at the same time?

Continue reading

Ubuntu Home Server 14.04

I had grand intentions.

This home server article was to be a detailed masterpiece, a complete documentation of my home server setup.

It hasn’t turned out that way, and many pieces are missing. Turns out, that writing a detailed article on setting up a server is much harder than just doing it! So what you see here is what I finally managed to publish, 5 months after actually building it. I hope you find it useful, and I don’t rule out the possibility that I may update parts of it in future. Continue reading

Ubuntu 14.04 – No USB keyboard after upgrading kernel

After upgrading my Ubuntu 14.04 LTS install from linux kernel 3.13 to 3.16, USB input devices, particularly my keyboard, stopped working.

On rebooting to an older kernel, the keyboard worked again. The reason for this, is that the base kernel package doesn’t include the usbhid module, which is require for USB input devices.

The solution, is to install the linux-image-extra package for your kernel. In my case it was:

[shell]
sudo apt-get install linux-image-extra-3.16.0-28-generic
[/shell]

You can either do this via ssh, or boot to an older working kernel first.

Afterwards, you should be able to do [shell]modprobe usbhid[/shell], or simply reboot, and your usb input devices should function correctly.

Ubuntu Home Server 14.04 – A DIY NAS

It’s been more than 4 years since I wrote about home servers, but my Ubuntu Home Server article was, for a while, the most popular post on this blog. Since moving to the UK though, I’ve taken a more appliance-based approach to my home network. For the last few years I’ve been using a Boxee Box for media playback, and a 4-bay Netgear ReadyNAS duo NV2+ for storage, mainly to keep the bulk of my possessions to a minimum.

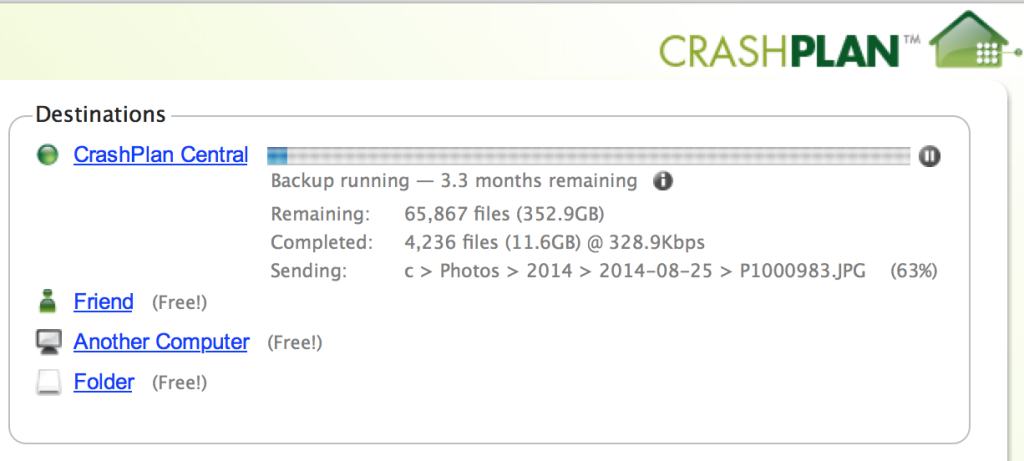
The appliance approach does have advantages. It is power efficient, easy to setup, and very low maintenance. But after getting an internet connection with decent upload speed, I wanted to run CrashPlan on the NAS without having to have another PC running. I managed to get it running by following directions I found here.

There’s just one problem:

3.3 months to upload 350GB is a little too long

3.3 months to upload 350GB is a little too long

Performance is abysmal, and I’ve only selected the most important data – my photos. I’m limited not by my internet connection, but by the NAS’s anaemic CPU and lack of ram (just 256Mb). Furthermore, it’s always had very slow read and write speeds – generally around 2Mb/sec, and loading a large directory via its Samba shares can take a while.

So I started to look for a replacement. My requirements:

  • Minimum 2GB ram
  • Strong CPU, preferably x86
  • 4+ drive bays
  • Linux based OS
  • Root access to said OS

The best pre-built option I could find which meets those requirements is the Thecus N5550, but at £383 it is a long way from cheap. And it barely meets the specs; an Atom CPU is strong for a NAS but not by modern x86 standards.

While the customised software shipped with a NAS does offer some conveniences, it also gets in the way of using newer Linux features such as BTFS RAID 5/6 (which is currently not considered stable but should be within the next 12 months). You’re also reliant on the vendor for distribution upgrades, and the priority is going to be shiny features which consumers will appreciate, not keeping the foundation OS up to date. The ReadyNAS NV2+ is currently running Debian Squeeze, and will be until the day support ends.

At this point I realised that a pre-made NAS with the level of power and flexibility I wanted doesn’t exist at a realistic price point. And with the end of Boxee support its days as a useful device are numbered, so a HTPC could be on the cards as well. It’s time to build my own server again.

Continue reading

Which laptop to buy, 2014 edition

In what could only fall firmly into the first-world problems category, I’m currently suffering a dilemma as to what laptop I should buy. My requirements are common – a good balance of power, performance and portability. I’ve decided the specification I should go for is:

  • Intel Core i5 (4th generation, Haswell)
  • 8Gb ram
  • 256Gb SSD
  • 13″ display, resolution at least 1920×1080

I think these specs make for the best price / performance balance on most of the laptops I’ve priced up.

Continue reading

Pausing Spotify and playing a random video in Python – A party trick for Halloween

For a Halloween party last weekend I wrote a python script to pause Spotify, play a random video and start music playback again. The videos were basic ogg files I cobbled together which showed a scary image and evil laughs or screaming with OpenShot. I can’t really share them, as I don’t have rights to the media, but it’s pretty simple to recreate them yourself.

The code for this script is on Github, and I’ve reproduced the latest snapshot below. Feel free to fork and improve if you want to scare your guests, or add support for other OS’s. Presently it only supports Linux because I used dbus to perform the play/pause actions.

[python]
#!/usr/bin/python

”’
This is a Halloween party script which pauses Spotify and plays a video
at random intervals.
”’

import random
import subprocess
from subprocess import call
from time import sleep
import os
import datetime

start_time = datetime.time(21, 0, 0)
stop_time = datetime.time(23, 0, 0)

video_dir = ‘/home/alex/Videos/scream/’
videos = { ‘scream1_nofade.ogg’: 30,
‘happy.ogg’: 1,
‘evil_laugh.ogg’: 5,
}

def time_in_range(start, end, x):
“””Return true if x is in the range [start, end]”””
if start <= end:
print(“start<end”)
return start <= x <= end
else:
print(“end<start”)
return start <= x or x <= end

def weighted_choice(weights):
total = sum(weights for video in weights)
r = random.uniform(0, total)
upto = 0
print(“total: %s\nrandom: %s” % (total, r))

for video in weights:
w = weights
if upto + w > r:
return video
upto += w
assert False, “shouldn’t get here”

def spotifyPause():
command = “dbus-send –print-reply –dest=org.mpris.MediaPlayer2.spotify /org/mpris/MediaPlayer2 org.mpris.MediaPlayer2.Player.Pause”
print(“pausing spotify”)
os.system(command)

def spotifyPlay():
print(“playing spotify”)
command = “dbus-send –print-reply –dest=org.mpris.MediaPlayer2.spotify /org/mpris/MediaPlayer2 org.mpris.MediaPlayer2.Player.PlayPause”
os.system(command)

def play_video(video_file):
print(“Playing %s” % video_file)
#call([‘/usr/bin/mplayer’, ‘-fs’, video_file], stdout=None, stderr=None)
#result = subprocess.Popen([‘/usr/bin/mplayer’, ‘-really-quiet’, ‘-fs’, video_file])
result = subprocess.check_call([‘/usr/bin/mplayer’, ‘-really-quiet’, ‘-fs’, video_file], stdout=None, stderr=None)
return result

def playBuzz(buzzfile):
print(“Buzz…”)
result = subprocess.check_call([‘/usr/bin/mplayer’, ‘-really-quiet’, ‘-ss’, ’18’, buzzfile], stdout=None, stderr=None)
return result

def infiniteLoop():
while 1:
current_time = datetime.datetime.now().time()
#if current_time > stop_time or current_time < midday:

choice = weighted_choice(videos)

random_time = random.randrange(1200,2400)
random_time = 3

video_file = video_dir + choice
print(“Chose video %s after %s seconds” % (video_file, random_time))
sleep(random_time)

# Whether to play buzz
buzz = False
if random.randrange(0,100) > 90:
buzz = True

# Continue if outside time range
if not time_in_range(start_time, stop_time, current_time):
print(“Not playing video, outside time range”)
continue

# Do it
spotifyPause()
if buzz:
playBuzz(‘/home/alex/Videos/scream/audio/buzz.mp3’)
play_video(video_file)
spotifyPlay()

if __name__ == “__main__”:
infiniteLoop()
[/python]

Changing boot order in Ubuntu 13.04 (or Debian) – the easy way

I wanted nice, concise instructions on changing the boot order in Ubuntu 13.04, which uses Grub 2. Being a newbie focused OS however, Googling “ubuntu boot order” results in SEO blogs with lots of fluff, and then the actual instructions start out with “install package from ppa”…

What the hell, I just want to change the boot order!

Continue reading

Intel wifi led blinking AGAIN on Ubuntu 12.04

I previously posted about this on previous versions of Ubuntu, but despite updating the instructions for 11.10 the instructions are once again obsolete. It seems Intel changes the name of its wifi kernel module every release…

On my Dell E4300 with “Intel Corporation WiFi Link 5100” (as reported by lspci), the module name is now “iwlwifi”. This means the kernel options you add to /etc/modprobe.d should be against this module rather than iwlcore (11.04) or iwlagn (11.10).

So the instructions once again:

$ sudo -i
# echo 'options iwlwifi led_mode=1' >> /etc/modprobe.d/wlan.conf
# modprobe -r iwlwifi && modprobe iwlwifi

Bear in mind that the second line removes the wifi kernel module temporarily which will disconnect your wifi. It should automatically reconnect, if not reboot.

Slow desktop performance on Ubuntu 11.10 with nvidia graphics cards

11.10 has been a bit of a mixed bag. On the plus side it has Gnome 3, giving me a practical (and in my opinion superior) alternative to Unity. On the minus side I had upgrade glitches on both my work and personal machines, and they were unrelated issues! Might be wise to wipe and reinstall for this one (you did separate your home partition when you installed didn’t you :)).

Anyway after getting it working on my work PC (which has an 8400GS), the desktop was quite laggy in both Unity and Gnome3. It was still usable but I didn’t realise how bad it was until I went home and noticed how much smoother my laptop was, with its lowly 2009-era Intel integrated graphics…

The solution was to install the latest 285.05 Nvidia driver, but trust me when I tell you that you do not want the hassle of using the Nvidia installer from the Nvidia website.

It is much simpler to use the X Updates ppa.

So assuming you already have the default binary Nvidia driver installed and activated (nvidia-current), the quick command line solution to your performance woes should hopefully be:

sudo -i
add-apt-repository ppa:ubuntu-x-swat/x-updates
apt-get update && apt-get upgrade
reboot

You should notice an update for the nvidia-current package being installed.

That wasn’t too bad was it? :)